Green Goddess Grilled Cheese

Green Goddess Green Cheese

Hi Savvys!

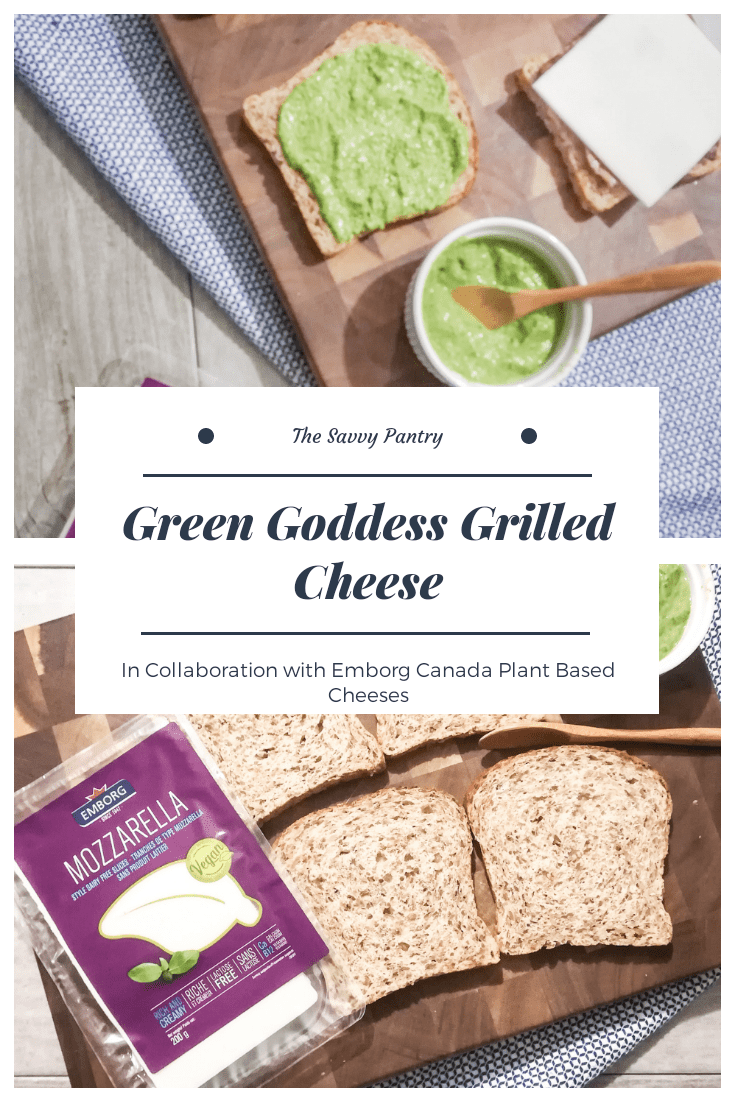
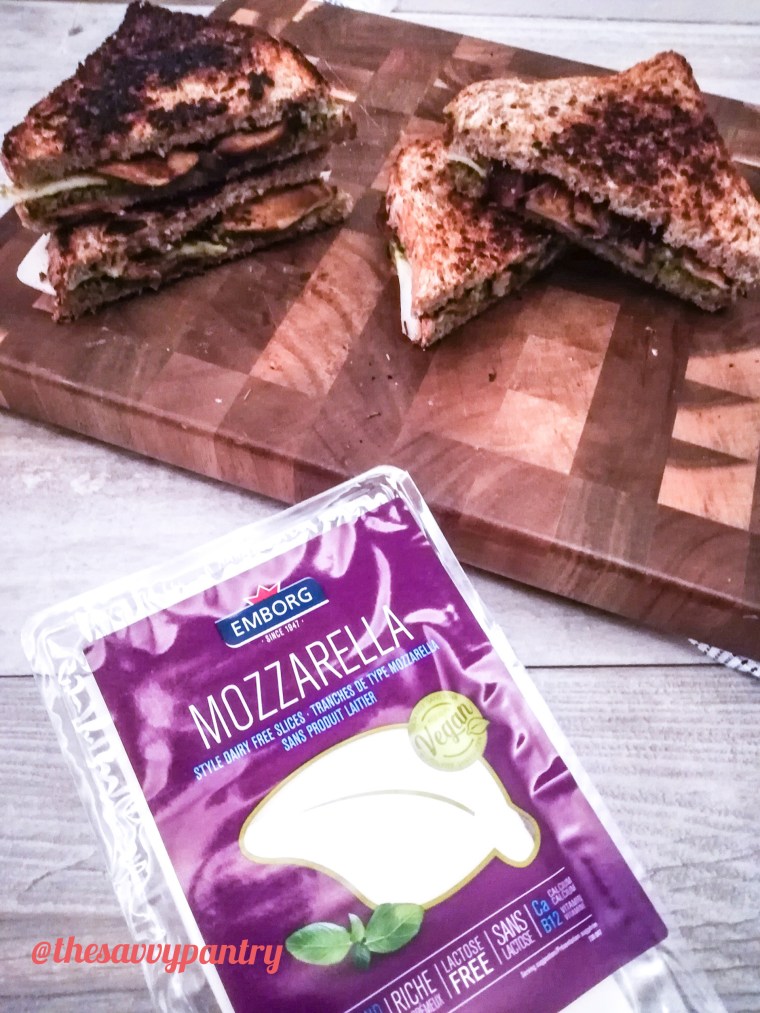
I am so excited to be posting my first ever sponsored post!  This Green Goddess Grilled Cheese recipe is sponsored by Emborg Canada (@emborgcanada) and features their new line of vegan cheeses.  I received 2 styles of sliced cheese: cheddar and mozzarella.  As soon as I first opened my package and saw the mozzarella slices, there were so many ideas for recipes running through my head that I knew I had to make a post about it.

The Savvy Pantry Green Goddess Grilled Cheese

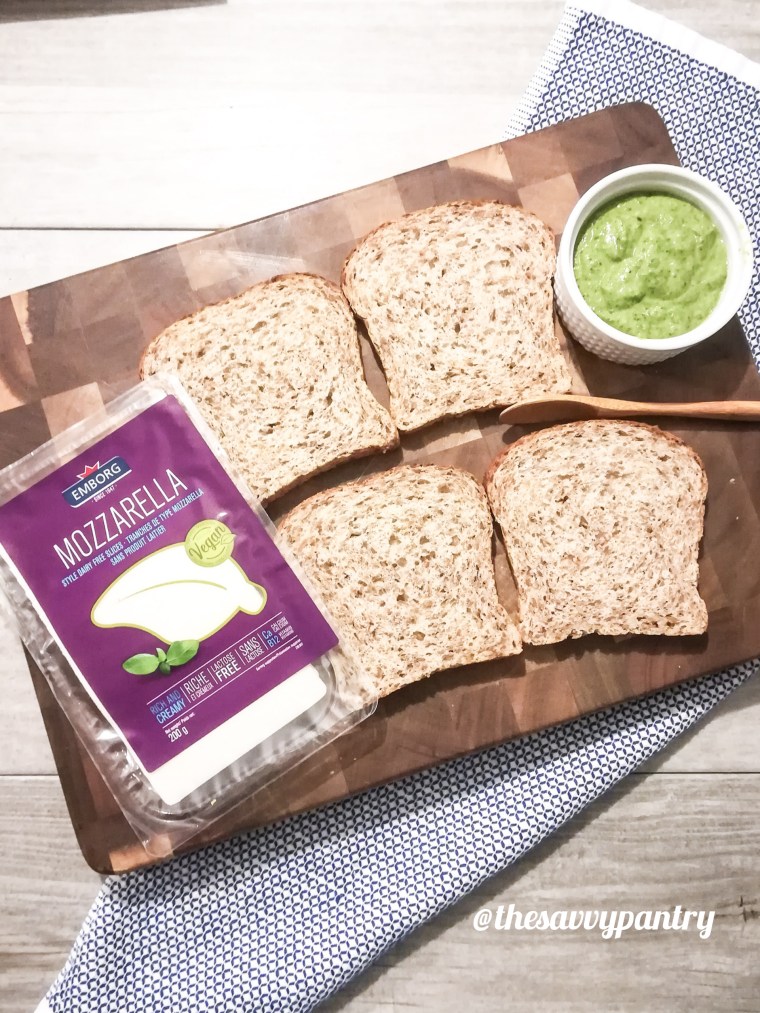
The cheese: the slices are sturdy, holds up well when grilled in a sandwich and is gooey when you bite into it.  The main ingredient is coconut oil but it does not taste like coconut at all.  It has the familiar saltiness from dairy mozzarella and is just as versatile.  I used 4 slices for this recipe and was pleasantly surprised that you could also re-seal it, meaning I could use the remaining slices for another day.


Since we are getting ready to leave on vacation for our holiday break, this recipe was inspired by the ingredients that I had to use up before we left.  Full of fresh herbs on top of sourdough bread (from my freezer) and sautéed king oyster mushrooms, this grilled cheese is hearty and so satisfying.  Feel free to change up the bread, the type of mushroom and the ratio of herbs.  It will taste just as good!

The Savvy Pantry Green Goddess Grilled Cheese

Enjoy, set forth, and be savvy!

Recipe makes 6-8 sandwiches

Prep Time: 20 minutes

Cook Time: 10 Minutes

Ingredients

Green Goddess Sauce

  • 1 handful each parsley, cilantro and basil
  • 1 bunch of green onion, roughly sliced
  • 2 garlic cloves
  • Juice from 1 lime
  • ¼ cup avocado oil
  • ¼ tsp salt
  • ¼ tsp black pepper

Sauteed King Oyster Mushroom

  • 2 tsp oil
  • 1 package king oyster mushroom, sliced thinly (170 grams)
  • 1 tsp balsamic vinegar
  • 1/2 tsp dried oregano
  • ½ tsp granulated garlic
  • Salt and pepper to taste

Sandwich

  • 1 package Emborg Mozzarella style cheese
  • 8 slices of your favourite bread
  • ¼ cup vegan butter (I used vegan Becel)

Directions:

For the Sauce:

Throw all of the sauce ingredients into a blender (or food processor) and blend until smooth.  Scrape down and process again to make sure all of the ingredients are well blended.

For the mushrooms:

Add oil on medium high to a grill/frying pan.  Once the oil is hot enough (test by adding 1 slice of mushroom and if it sizzles, it’s ready), add all of the sliced mushrooms.  Try to place them in a thin layer and try not to overlap (it’s ok if you do!).  Let it cook for 2 minutes.  Using a wooden spoon, sautee the mushrooms so they lie on their other side, and add the rest of the ingredients.  Cook for another minute (make sure all of the balsamic vinegar has cooked off).  Turn off heat and set aside for sandwich assembly.

Assembly:

Lay out all of the bread on a cutting board (you may have to do 4 slices at a time, 2 sandwiches at a time).

Spread about 1 tbsp green goddess sauce onto 4 slices of the bread.  Arrange the mushrooms evenly on the remaining 4 slices of bread.  Add a slice of Emborg Mozzarella style cheese onto each of the mushroom slices.  Place the green sauce sliced bread on top of the cheese sliced bread, with the sauce on top of the cheese.

Using the same pan you cooked the mushrooms in (mainly because I’m lazy and try not to dirty too many pans), place on top of your stove on medium low.  Butter 1 side of each sandwich with about ½ tbsp. of vegan butter (or as much as you want).  Carefully take a sandwich and place the buttered side onto the hot pan.  Butter the other side of the sandwich with another ½ tbsp. of vegan butter.  After about 2 minutes (be careful not to burn!), flip and cook for another minute or so (until you are satisfied with the brownness).

Set the sandwiches back onto your cutting board and let rest for a minute before slicing into it.  Enjoy!  If you have leftover green goddess sauce, use as dipping sauce or use in another recipe (be Savvy)!

The Savvy Pantry Green Goddess Grilled Cheese


3 Vegan Holiday Mains: Pot Pie, Lentil Loaf with Cranberry Orange Sauce and Pumpkin Barley Risotto


TheSavvyPantry-3VeganHolidayMains-Title

Hi Savvys,

Welcome to the 3rd post in my Vegan Holiday Series!  I will be sharing with you 3 easy mains that you can impress any guest!  All of these recipes take 30 minutes or less to prepare which is always great during this hectic time of year.  I’m excited to share with you my pot pie made easier with store bought pastry, a lentil loaf with homemade cranberry orange sauce and a pumpkin barley risotto that is so creamy that you’re guests won’t even realize it’s made with barley!

Hope you guys enjoy these recipes! Now set forth and be Savvy!

TheSavvyPantry-3VeganHolidayMains-PotPie

Ingredients for the Pot Pie

  • 1 cup of soy curls (you can substitute beans or tofu if you cannot find soy curls)
  • 1 tbsp butter
  • 1 cup of leek, sliced
  • 1 clove of garlic, minced
  • 1 carrot, diced
  • 1 celery stock, diced
  • 1 potato, diced
  • 1/2 tsp sage
  • 1/2 tsp thyme
  • 1/2 tsp salt
  • 1/4 tsp black pepper
  • 1/3 cup flour
  • 1/2 cup soy milk
  • 1 1/2 cup of water
  • 1/2 cup frozen peas
  • 1/2 cup frozen corn
  • 1/4 cup bunch of parsley, chopped (about 2 tbsp fresh parsley chopped)
  • 1 premade crescent roll dough (Pillsbury is vegan, though it does contain palm oil so it’s debatable)

IMG_20191116_203204

Directions for Filling of Pot Pie

  1. Pre-heat oven to 350 degrees
  2. Put the soy curls into a large bowl and cover with water to hydrate – set aside
  3. In a large sauce pan, heat the butter and cook the leeks and garlic over medium heat until fragrant, about 1 minute
  4. Add the diced carrot and celery and cook for another 3 minutes
  5. Add the potatoes and dried spices and cook for 4 minutes (if using fresh parsley, do not stir in yet)
  6. Add a splash of water if the veggies seem dry and are sticking to the bottom of the pan
  7. Add the flour and coat all of the veggies until you don’t see any raw flour left
  8. Add the soy milk and water and mix until well incorporated.  You will notice that a thick sauce is starting to form
  9. Drain the soy curls by squeezing out all of the excess water.  Add the soy curls to the pot along with the frozen peas and corn
  10. Mix until well combined.  Take off the head and add the parsley and mix into the mixture.

Directions for Assembling Pot Pie

  1. Pour the mixture into a 10-inch pie dish
  2. Arrange the premade pastry dough on top of the mixture so it creates a crust
  3. Bake, covering the top with a baking sheet (to not burn the pastry dough) for 40 minutes
  4. Uncover and bake for 10 minutes to brown the top

TheSavvyPantry-3VeganHolidayMains-LentilLoafwithCranberryOrangeSauce

Ingredients for the Lentil Loaf

  • 3 flax eggs (3 tbsp flax seed, 9 tbsp water)
  • 1 tbsp butter
  • 1 onion, diced
  • 3 cloves of garlic, minced
  • 2 carrots, diced
  • 1 package 222g mushrooms, diced
  • 1 tsp salt
  • ½ tsp black pepper
  • ½ tsp sage
  • 1 tbsp dried parsley
  • 1 tsp dried oregano
  • 1 tsp thyme
  • 2 cups packed chopped kale
  • 1 tbsp soy sauce
  • 1 tbsp apple cider vinegar
  • 2 tbsp ketchup
  • 2 cup brown lentils
  • 1 cup quinoa

Ingredients for the Cranberry Orange Sauce

  • 1 bag of cranberries (340 g)
  • 1/2 cup sugar
  • 1/2 cup maple syrup
  • the zest and juice of 1 orange
  • 1/2 cup of water (you want 1 cup of liquid when combined with the orange juice)

IMG_20191116_205621

Directions for the Lentil Loaf

  1. Preheat your oven to 350 degrees
  2. Prepare the ingredients for the flax egg and set aside
  3. Heat the butter on medium heat and cook the garlic and onions until fragrant, about 2 minutes
  4. Add the carrots and cook for another 4 minutes
  5. Add the mushrooms and all of the dry spices and cook for 2 minutes
  6. Add the kale, soy sauce, ACV and ketchup and cook until the kale is wilted, about 1 minute
  7. Take off the heat and add the mixture to the food processor along with the lentils, quinoa and flax eggs
  8. Pulse until well combined, but do not puree completely as you will need to texture in order for it to hold up
  9. Line a loaf pan with parchment paper and add loaf mixture to the pan
  10. Bake for 60 minutes with a cookie sheet covering to prevent burning

Directions for the Cranberry Orange Sauce

  1. Add all ingredients to a pot and simmer with the lid ajar on medium heat for 30 minutes
  2. Blend half the mixture in a food processor, and add to the other half of the sauce to get a chunky consistency
  3. You may also blend the entire mixture in a food processor if you like your cranberry sauce to be well blended

TheSavvyPantry-3VeganHolidayMains-PumpkinBarleyRisotto

Ingredients for Pumpkin Barley Risotto

  • 4 1/2 cups stock or water
  • 1 tbsp vegan butter
  • 2 cloves of garlic, minced
  • 1 onion, chopped
  • 1 cup barley
  • 1 cup pumpkin puree
  • 2 cups packed spinach
  • 1/4 cup nutritional yeast
  • 1/2 cup vegan parm
  • 1 tsp thyme
  • 1 tsp salt
  • 1/2 tsp black pepper
  • 1/4 tsp ground nutmeg

IMG_20191116_205726

Directions for Pumpkin Barley Risotto

  1. Bring the stock/water to a simmer in a small pot, and keep in on low while you prepare the remaining ingredients for the barley risotto
  2. Add the butter to a large dutch oven and cook the garlic until fragrant over medium heat, about 1 minute
  3. Add the onions and cook for 3 minutes
  4. Add the barley and coat in the onion and garlic mixture
  5. Add pumpkin puree and mix well into the barley mixture until well combined
  6. Turn heat down to medium low and add ½ cup of the warm broth/water to the barley mixture and stir. Let sit and stir for 4 minutes until absorbed.  With the barley risotto, you do not need to tend to it the entire time so you can periodically stir as you add in more liquid
  7. Continue adding ½ cup broth at a time to the barley mixture and stirring until all of liquid is absorbed, covering the pot with the lid ajar after each time you add the liquid to allow the barley to soak the broth up
  8. After all of the liquid is added and absorbed, take off the heat and add the spinach and remaining spices and stir to combine.
  9. Optional: Top with more vegan parm

Bertolli Influenster VoxBox Review

Bertolli Influenster VoxBox Review

Hi Savvys!

I was so excited to have received the Bertolli Influenster VoxBox because 1. I love free stuff and 2. I love it even more when it’s food.  I knew exactly what I wanted to do with the sauce as soon as I got it in my hands.

I had made the Avant Garde Vegan meatball recipe and had it all frozen, waiting to be used for a special occasion.  This was that special occasion.

TheSavvyPantry-BertolliInfluensterVoxBox (2)

Like with all premade foods, I always like to add my own flare by adding extra ingredients to it.  For this sauce, I had started with some sautéed cherry tomatoes, king oyster mushroom and of course spinach (for all of the extra leafy green goodness).

The sauce:  I was so amazed by the flavour of this jarred sauce.  I had chosen the Olive Oil and Garlic sauce and wow did it have a lot of flavour.  I am usually skeptical when it comes to pre-made garlic sauces because I usually find the garlic flavour underwhelming.  The garlic here was subtle, but you definitely knew it was there. The olive oil also added lots of depth and umami to the sauce.

The meatballs: It was easier to make than I had expected, though you do need a good couple of hours free before you embark on this task.  It is well worth it though because it can easily serve 8 people so you will have plenty in the freezer for future use.  The meat balls are very meaty in texture, almost like pork meat balls, and the flavour is just like any Italian meat ball you would typically imagine.

Overall I would highly recommend both the sauce and the Avant Garde recipe.  They go perfectly well together and feels like an authentic Italian meal (at least to me anyway).  I’m so happy I have left overs during the week because it is true comfort food without being too heavy!

Comment below on if you tried the Avant Garde recipe as well as the sauce and let me know your thoughts!

Now set forth and be Savvy!

TheSavvyPantry-BertolliInfluensterVoxBox (3)

Ingredients:

This recipe serves about 4 portions

  • 1 tbsp oil
  • 1 pint cherry tomatoes, sliced
  • 1 package king oyster mushrooms, sliced (about 6 large mushrooms)
  • 1 handful of baby spinach
  • 1 jar of Bertolli Olive Oil and Garlic pasta sauce
  • About ¼ of the Avant Garde Vegan Meatball recipes

Directions:

  1. Heat the oil in a pot over medium to high heat.
  2. Add the cherry tomatoes and let them fry for about a minute.
  3. Add the sliced king oyster mushrooms, stir it with the mushrooms so that they touch the pan (instead of just sitting on top of the mushrooms), and let fry for about a minute.
  4. Reduce the heat to medium and add the tomato sauce, spinach and meatballs.
  5. Cover and let simmer for about 8 minutes on medium low.
  6. Serve over your favourite pasta!

*I received the Bertolli VoxBox from Influenster complimentary for review. All thoughts and comments expressed my own.

Garlic Dill Pickles

thesavvypantry-garlicdillpicklestitle

Hi Savvys!

Being savvy often means that I’m so stubborn that I need to make everything as closest to scratch as possible.  This also means that I can be creative and add/remove ingredients to suit my taste buds.  These pickles are my dream come true!  These are sour, bold in garlic flavour and fresh from the dill.  I re-used an old bulk pickle jar to pickle these, but you can choose to use 2 1L mason jars for the recipe below.

You can increase/decrease the ratio of spices below, but keep the sugar, salt, water and vinegar the same!

Now set forth and be savvy!

TheSavvyPantry-garlicdillpickles-02.jpg

Ingredients

  • 2 cups water
  • 2 tbsp salt
  • 1 tbsp sugar
  • 5-8 cloves of garlic
  • 2 tsp peppercorn
  • ¼ cup packed dillweed with stems
  • 2 cups white vinegar
  • 12 pickling cucumbers

Directions

For the jar:

To prepare your jar, I just wash with hot water and soap and leave to completely dry before using it.

TheSavvyPantry-garlicdillpickles-16.jpg

For the brine:

Bring the water, salt, sugar, garlic and peppercorn to a boil and let it simmer for about 5 minutes.

After 5 minutes, turn it off the heat and add the vinegar, mix and set aside.

Slice the cucumbers with a mandolin so it’s to your desired thickness. I like to cut mine so it’s about 3/16  inch thick.  You can cut it into wedges or even leave whole depending on how you like your pickles.

Place the dill weed and the cucumbers into your cleaned jar.  Pour the brine mixture into the jar until all of the cucumbers are submerged.

Now the pickles are ready to sit in the fridge.  Let it marinate for minimum 1 week, but the longer you wait the better they taste.  I’ve kept my pickles for as long as 6 months and they’ve been fine.

TheSavvyPantry-garlicdillpickles-01.png

Baked Vegan Samosas

Baked Vegan Samosas

Hi Savvys!

Every year for New Year’s eve, my family hosts a party with lots of food, games and family.  I’ve gotten into the tradition of helping to make most of the appetizers with my sisters.  Since moving to Toronto, I now like to prep a lot of the appetizers before arriving to Montreal, and freezing them until we’re ready to bake them.

TheSavvyPantry-BakedVeganSamosas-2

These samosas are wrapped in phyllo dough and filled with lots of spices and veggies.  The recipes calls for lots of pantry staples and veggies that you usually already have on hand.  These are my take on samosas, and have become a family favourite.

I hope your family enjoys them as much as my own!

Enjoy, set forth, and be savvy!

Recipe makes 24-30 samosas

Prep Time: 60 minutes

Cook Time: 20 Minutes

Ingredients

Samosas

  • 6 small potatos (or large potatos), cubed (yields about 4 cups of potatoes)
  • 1 tsp grated ginger
  • 1 clove of garlic, minced
  • 1 small onion, diced
  • 1 tbsp oil of your choice (try not to use coconut oil)
  • ½ tsp coriander seed
  • ½ tsp mustard seed
  • ½ tsp cumin seed
  • 1 tsp garam masala
  • 1 tsp curry powder
  • ¼ tsp hot chilli powder
  • ¼ cup water
  • ½ cup frozen green peas
  • ½ cup frozen corn
  • ½ tsp salt
  • Hand full of cilantro, chopped
  • 1 package of phyllo dough

Directions:

Preparing the veggies:

Peel and cut the potatoes into bite sized pieces about ½ inch cubes.  Set aside in a large bowl.

Grate the ginger, mince the garlic and dice the onion and set aside in another bowl.

Preparing the filling:

Heat the oil on medium high in a frying pan (large enough to fit all of the potatoes in).  Fry the coriander, mustard and cumin seeds in the oil until fragrant, about 2 minutes.

Add the bowl of ginger, garlic and onions and fry till fragrant, about 2-5 minutes.

Now add the potatoes and cook for about 4 minutes.

Add the rest of the ingredients except for the frozen green peas, corn, cilantro and phyllo dough.  Cook for another 7 minutes until the potatoes are tender.  You may need to add a bit more water to prevent the filling from sticking to the pan.

Add the frozen green peas, corn and cilantro and stir until heated through.

Set aside to cool and prepare your working area for the phyllo dough.

Assembly:

Preheat oven to 350 degrees.

Unroll and lay out the phyllo sheets onto a baking sheet and place a damp cloth on top to prevent drying.

Prepare another baking sheet lined with parchment paper.

Take a single sheet of phyllo dough, and cut it in half lengthwise so that you have 2 pieces for 2 samosas.

Now take 1 of the halves and place a tbsp of filling in the top left corner, and fold the sheet in half again lengthwise so that you’ve created a little pocket for the filling.  Now fold the filling side down so it creates a triangle – continue to fold the filling into a triangle shape and place on a the baking sheet with the seam side down.

Continue to make the samosas by making 2 with 1 sheet of phyllo dough.

Bake the samosas for 15 minutes, flipping halfway through.

TheSavvyPantry-BakedVeganSamosas-1

Covergirl Exhibitionist Mascara Review

COVERGIRL Exhibitionist Mascara Review

Hi Savvys!

I’m so happy to have received Influenster’s Covergirl Exhibitionist VoxBox.  With Covergirl’s new success of becoming cruelty free, it sends a signal to other beauty companies that as consumers, this is what we want!  We don’t want our products tested on animals while we still want the same quality expected from these large companies.

With the launch of this VoxBox to help socialize Covergirl’s new cruelty free status, the products for review include the Exhibitionist mascara, liquid eyeliner and lipstick.

TheSavvyPantry-Covergirl-Dec2018.jpg

The mascara: there’s been so much hype about this Exhibitionist Mascara that I had developed high hopes for it.  I decided not to curl my lashes before apply it because I wanted to see how it would hold up to my straight and stubby lashes.  I was a bit disappointed because it didn’t make my lashes look any thicker than how they usually look.  I was impressed however that it was able to curl my lashes and make it look slightly different.

The liquid eyeliner: you definitely need to have a steady hand if you are not used to liquid liners.  It had been a few years since the last time I tried liquid liners and I must say I loved it.  It went on smoothly and dried pretty quickly.  I really helped completed my look along with my mascara for an overall finished look.

The lipstick: I LOVE this lipstick!  It glides on smoothly and is such a luscious shade of red.  I will definitely be wearing this shade in the future.

Hope you guys found this review helpful.  As someone who doesn’t wear makeup often, it was very helpful to have received all 3 products to help me complete my look for any  occasion.  I do have to say I will definitely be thinking about applying this more in my daily routine!

TheSavvyPantry-Covergirl-Dec2018-2.jpg

See below link for my video!

Now set forth and be Savvy!