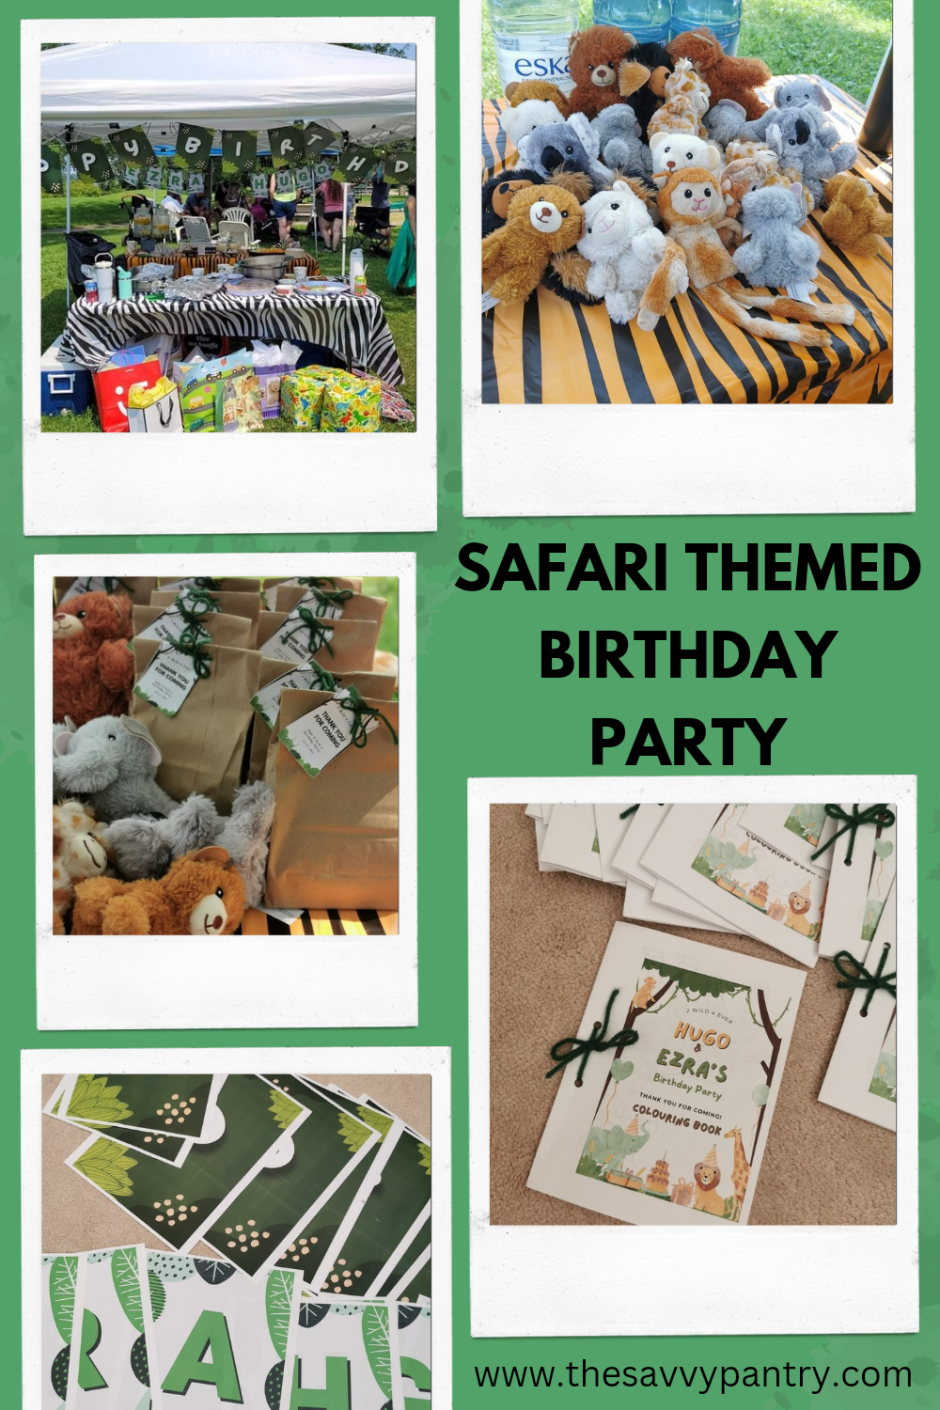
How I Threw a Low-Cost, Low-Waste Safari-Themed Birthday Party for My 2- and 4-Year-Olds
Planning a birthday party can be a big task, especially when you’re juggling the needs and interests of two little ones. I knew a safari-themed birthday party would be perfect for them as they both love animals and are both “wild”! But I was determined to keep it low-cost, low-waste, and full of DIY charm. Here’s how I managed to pull off a birthday celebration in under two weeks!
1. Setting the Scene: DIY Decorations
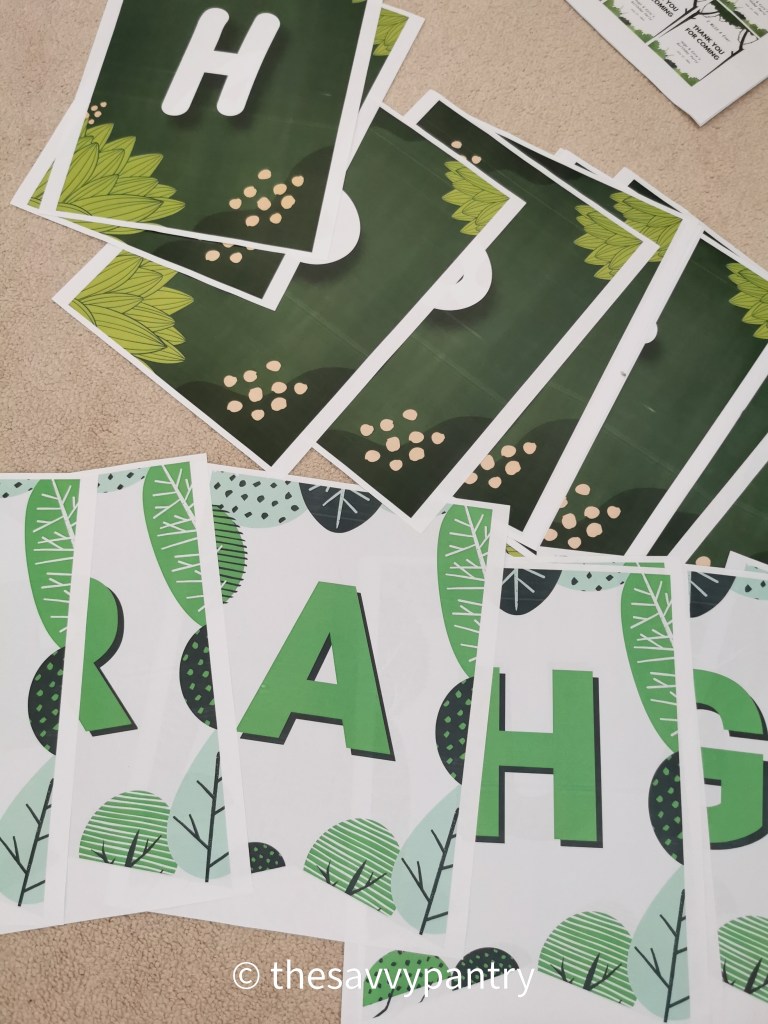
I started with the decorations, aiming for a fun yet simple safari vibe. I made Happy Birthday banners and the boy’s names using Canva to design and then a colored printer to print. The banners featured abstract shapes and colors that fit the safari theme, and I used green yarn and wooden beads to string them together. If I were to do it over, I would have printed 2 letters on 1 page instead of 1 letter per page as the banners ended up being really long! I would have also laminated the paper to ensure they were waterproof.
Instead of buying disposable tablecloths, I sourced some disposable tablecloths through my local free mommy group. I was even able to get napkins! The result was a vibrant, safari-inspired setup without the waste.
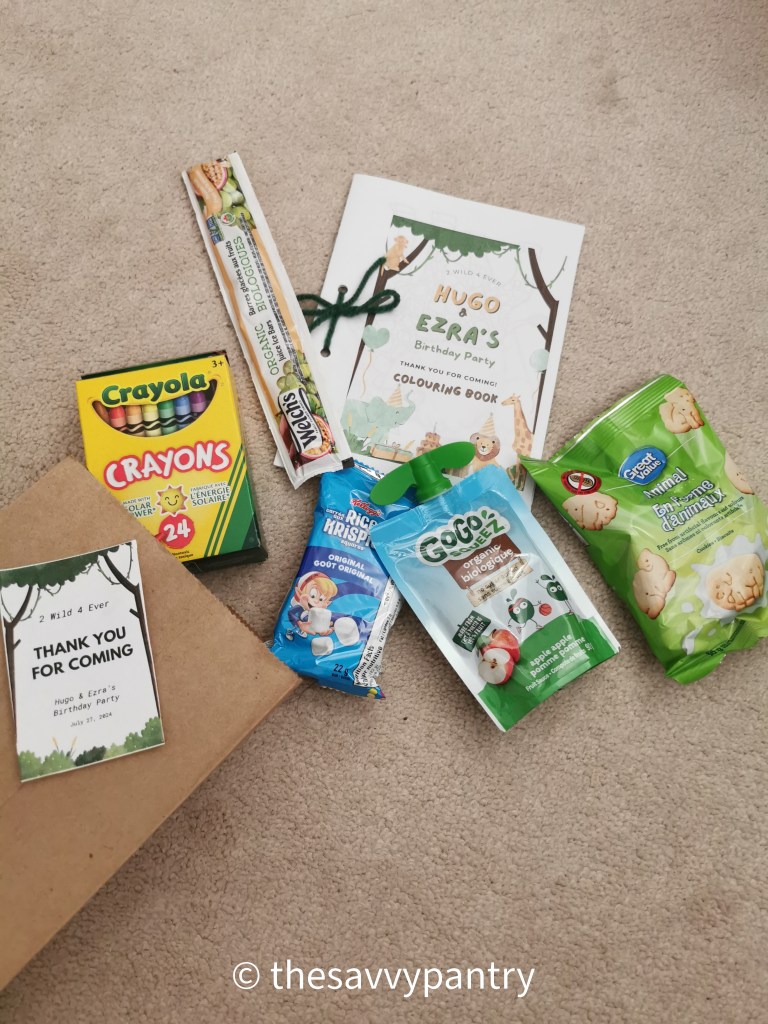
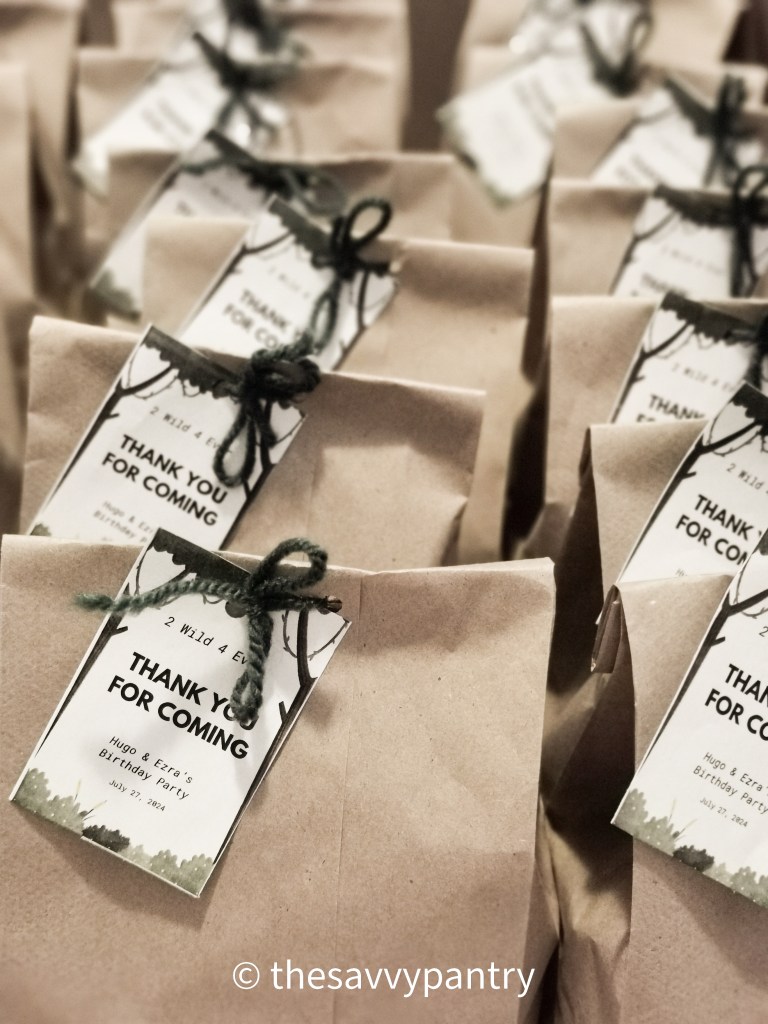
2. Creative and Sustainable Loot Bags
For the loot bags, I wanted something that the kids would love but that wouldn’t end up as landfill. I made the loot bags out of simple lunch paper bags that I already had at home. Inside, I wanted to ensure there were lots of snacks as well as activities that I knew all kids would love. I included some sweet snacks, a DIY colouring book filled with animals along with a box of crayons. For the infants, I swapped out the coloring book for a small book I found at the dollar store. These were not only budget-friendly but also aligned with my low-waste goals. Plus, the kids can use the crayons and books over and over again!
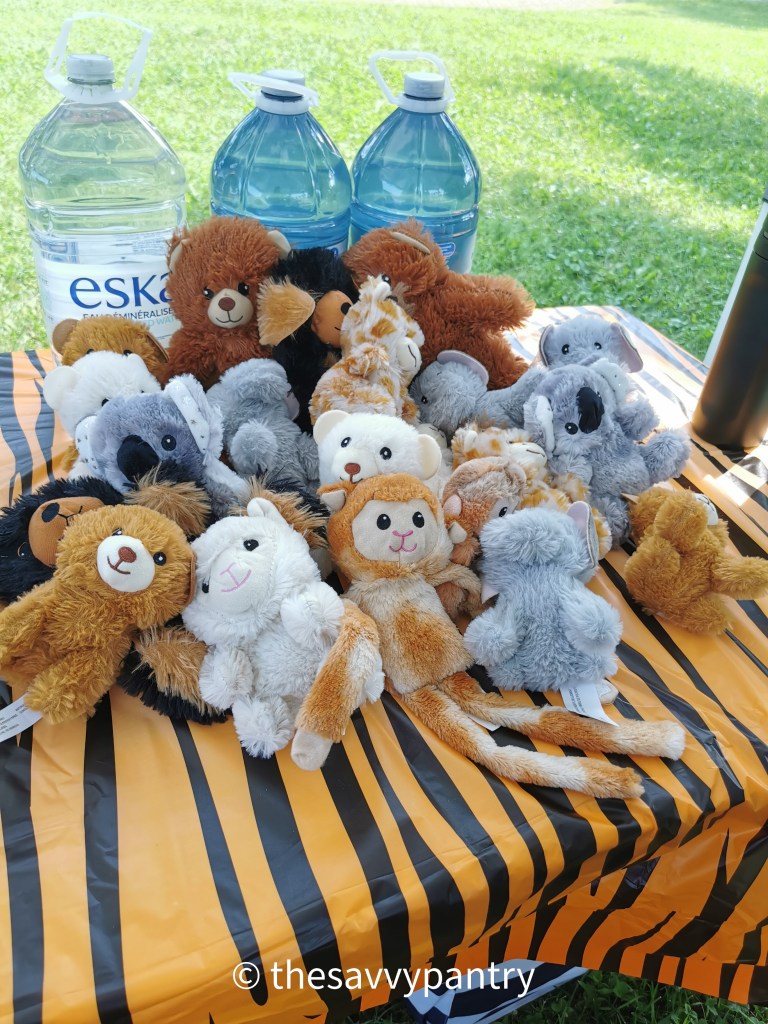
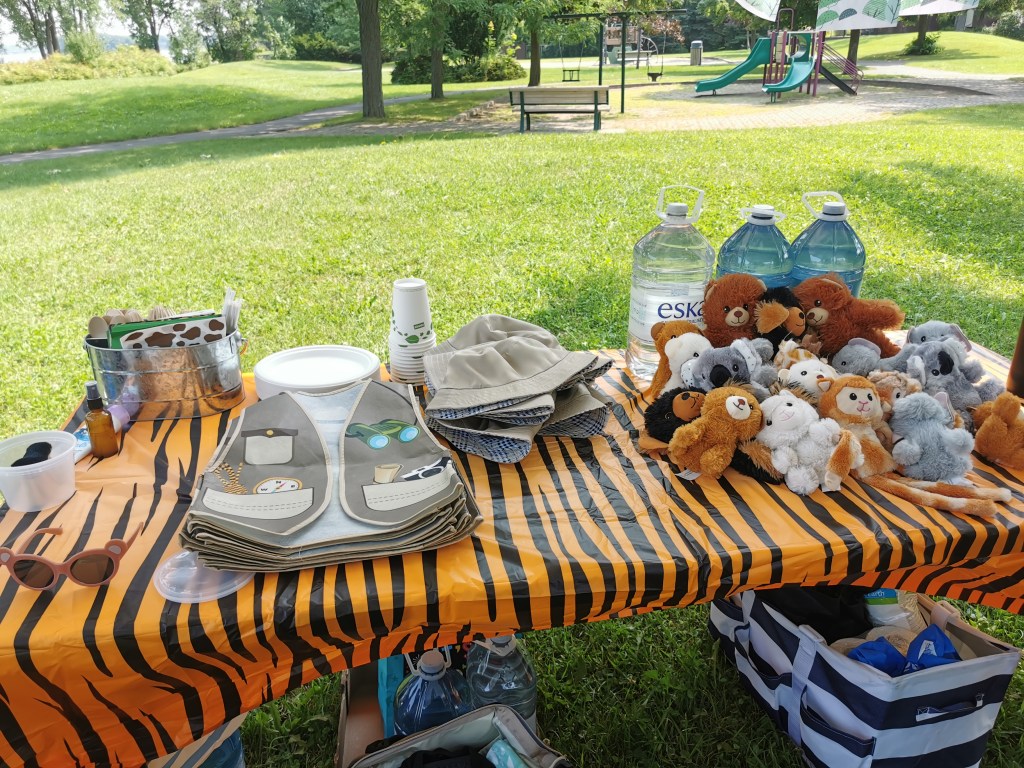
Since this was a safari theme, I wanted to make sure there were safari elements. I got these explorer vests and hats that the kids got to wore. I also purchased a bunch of stuffed animals from the dollar store that the kids also got to take home as a pet – adding to the safari theme!
3. Fun Safari-Themed Activities
What’s a safari without an adventure? Luckily for us, our venue was a public park with lots of space for the kids to run around as well as multiple play areas. It even had a lake where the kids walked around looking at the birds and throwing rocks in the pond. Luckily for us, we didn’t have to rent the park so this ended up being free!
4. Safari Cake and Food
When it came to food, I wanted to make it themed but it was hard to feed a crowd of both adults and kids (about 20 kids and 30 adults) while keeping on-theme.
For the appetizers, I had made pizza rolls, focaccia and served veggies and chips with dip. For the main meal, I got it catered by Wok Café, which was my mom’s contribution, so this did not affect our budget!
I served lots of cakes from Walmart and Costco and for the birthday cakes, I added safari animals that kept it simple for me but also kept to the theme.
Throwing a safari-themed birthday party in under two weeks might sound daunting, but with a bit of creativity and a focus on DIY, it can be both manageable and rewarding. My kids had a blast, the decorations and venue was a hit, and I was able to keep costs down while minimizing waste. If you’re looking to plan a party that’s fun, affordable, and gentle on the planet, I hope these ideas inspire you to get creative and have fun with it!
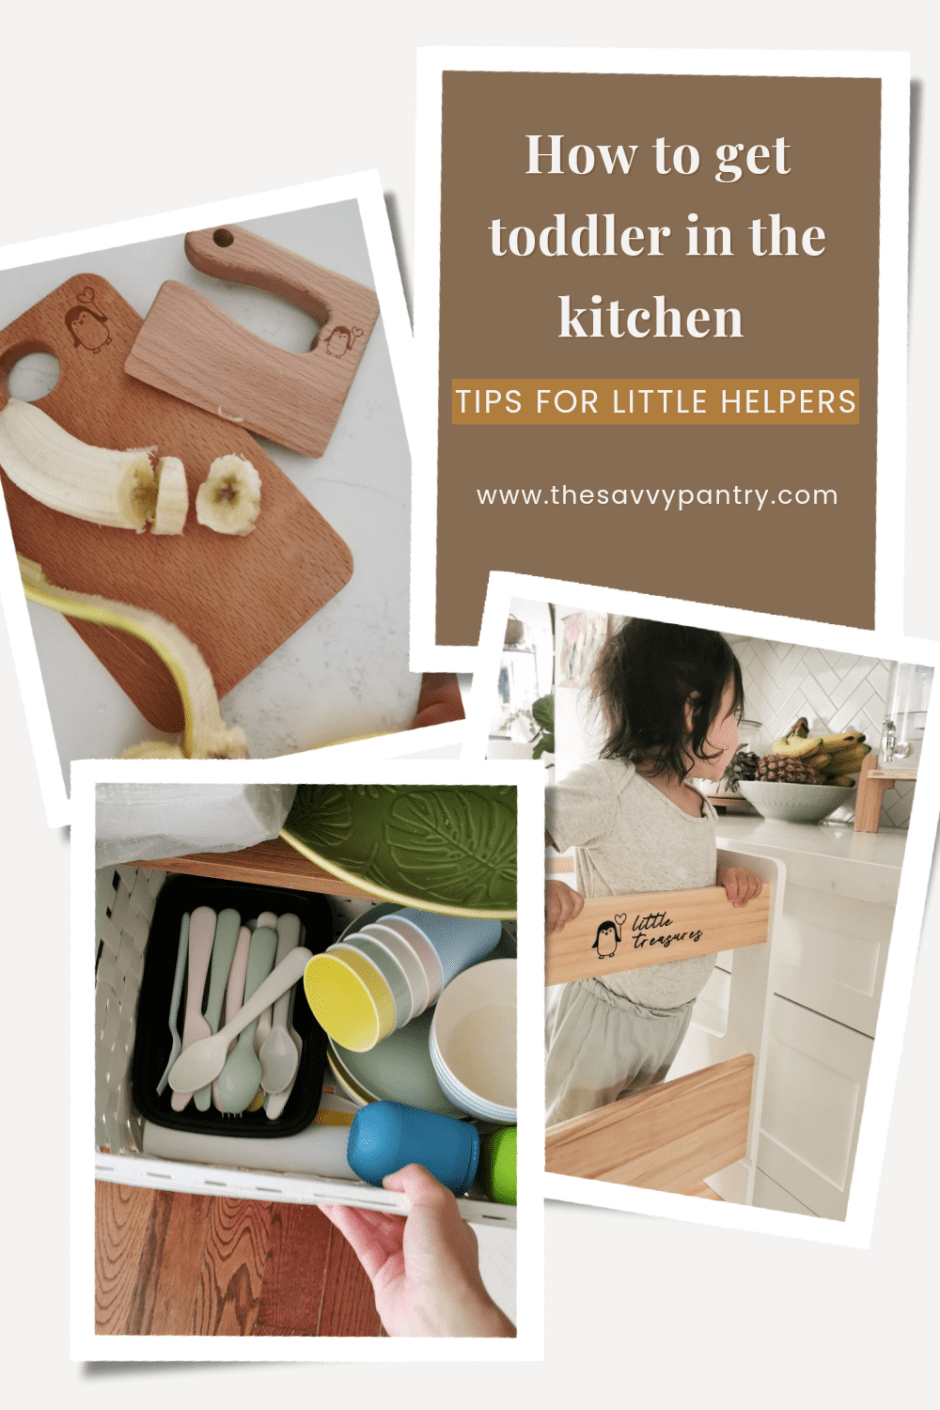
Involving children in the kitchen can be a delightful way to foster independence, responsibility, and a love for cooking. A Montessori-friendly kitchen is designed to be accessible, safe, and engaging for young chefs. As a food, recipe developer and mother of two, it’s important for me to get my kids in the kitchen as much as possible! Here are some tips on how we set up our kitchen and dining room area to encourage our kids to experiment and learn in the kitchen!
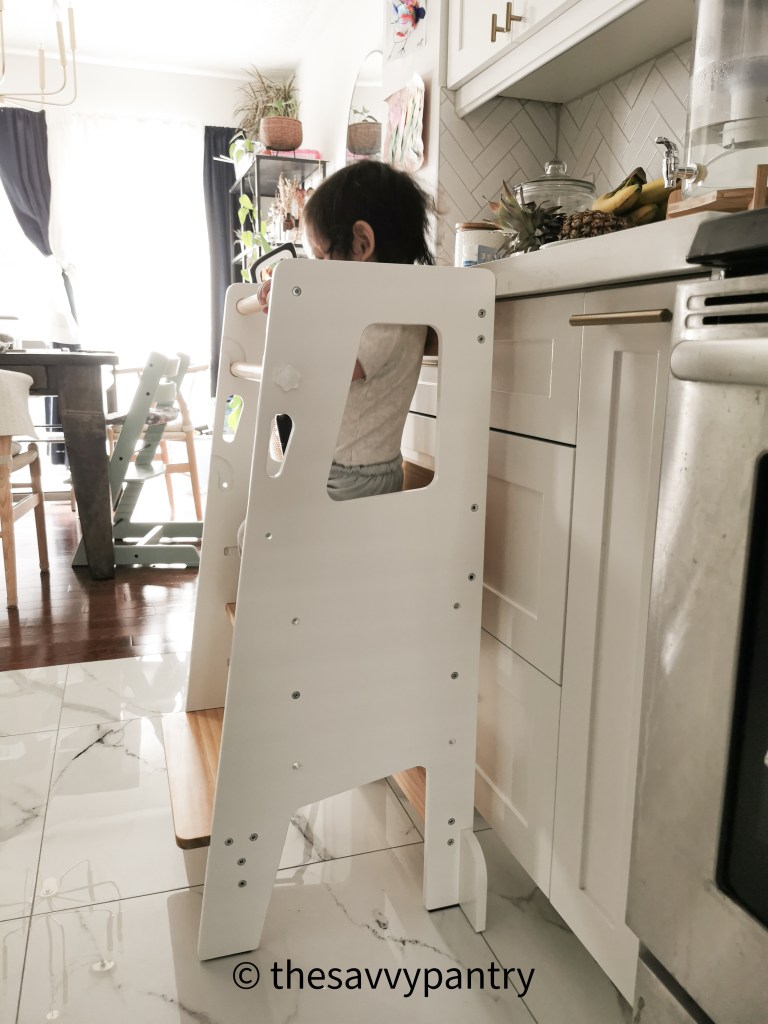
Learning Tower
A learning tower is a fantastic investment for any Montessori kitchen. It provides a safe and sturdy platform for children to stand on, bringing them up to counter height so they can fully participate in kitchen activities. We love this one from Little Treasures – use code THESAVVYPANTRY for 5% off your order!)
Safety: Ensure the tower has safety rails and a stable base. Some models are adjustable, growing with your child.
Location: Place the learning tower in a spot where your child can easily access the counter but is away from potential hazards like the stove.
Involvement: Encourage your child to use the learning tower whenever they want to help with cooking or baking. It’s an excellent way to include them in everyday tasks.
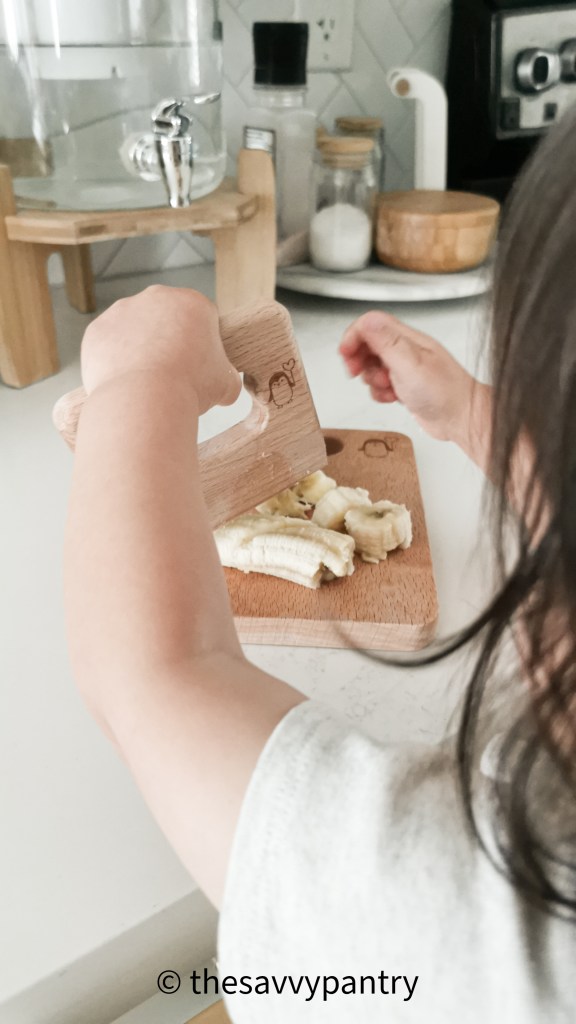
Montessori Cutting Board and Cutter
A child-friendly cutting board and cutter are essential for encouraging kids to participate in food preparation. These should be safe, easy to use, and appropriate for their age and skill level.
Cutting Board: Opt for a smaller board that’s stable and non-slip. A board with a handle can also help with maneuverability. We love this one from Little Treasures – use code THESAVVYPANTRY for 5% off your order!.
Cutter: Start with a crinkle cutter or a child-safe serrated knife. These tools allow children to cut soft fruits and vegetables while minimizing the risk of injury. Our little one loves this one (use code THESAVVYPANTRY for 5% off your order) and it’s easy for them to grab and cut food with.
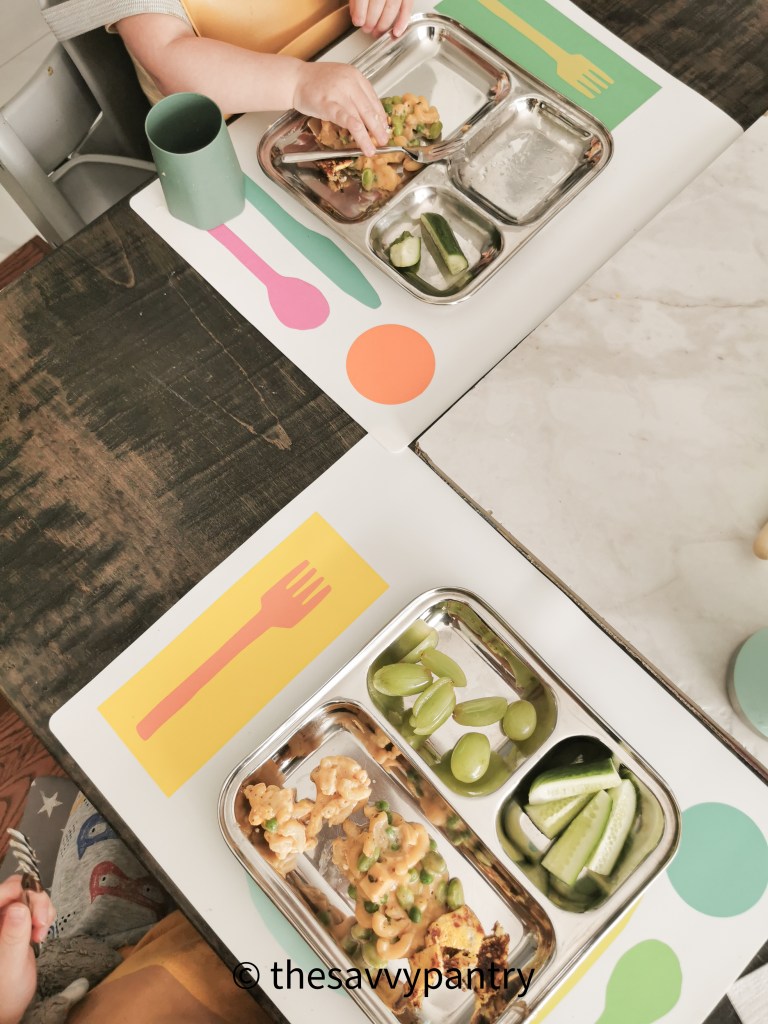
Montessori Placemat
A Montessori placemat is a simple but effective tool for teaching children about table setting and organization. Typically, it includes outlines of where each item should be placed: the plate, utensils, cup, and napkin. Here’s how to incorporate it into your kitchen:
Design: Choose a placemat with clear, durable outlines that can be easily cleaned. I love this on from Lovevery.
Placement: Keep it within reach so children can set the table independently.
Usage: Encourage your kids to use the placemat during every meal, reinforcing the habit of neatness and order.
Montessori Utensils
Providing child-sized utensils helps children develop fine motor skills and confidence in handling kitchen tools. Look for utensils that are sturdy, safe, and appropriately sized for little hands. Creating an area where it is easily accessible for them to set their own place setting is also an important skill and allows them to take pride in contributing to meal time.
Spoons and Forks: Choose smaller, rounded utensils that are easy to grip.
Knives: Start with a butter knife or a special child-safe knife designed to cut food without risking injury.
Tongs and Spatulas: These tools are excellent for improving hand-eye coordination and can be used for a variety of tasks like flipping pancakes or serving salad.
Practical Tips for a Montessori-Friendly Kitchen
Organize Accessibility: Keep frequently used items within easy reach of your child. This includes utensils, ingredients, and cleaning supplies.
Clear Instructions: Provide simple, clear instructions for tasks. Break down steps into manageable chunks to help your child understand the process.
Patience and Encouragement: Allow your child to make mistakes and learn from them. Celebrate their efforts and progress, no matter how small.
Safety First: Always supervise your child in the kitchen, especially when using heat or sharp tools. Teach them about kitchen safety rules early on.
Incorporate Fun: Make kitchen time enjoyable by involving your child in choosing recipes, tasting ingredients, and decorating finished dishes.
Creating a Montessori-friendly kitchen is a wonderful way to encourage your kids to experiment and develop a love for cooking. By providing the right tools and environment, you can foster their independence and confidence, setting the foundation for lifelong culinary skills. Happy cooking!
Comment below on if you would like to share some tips from your kitchen!
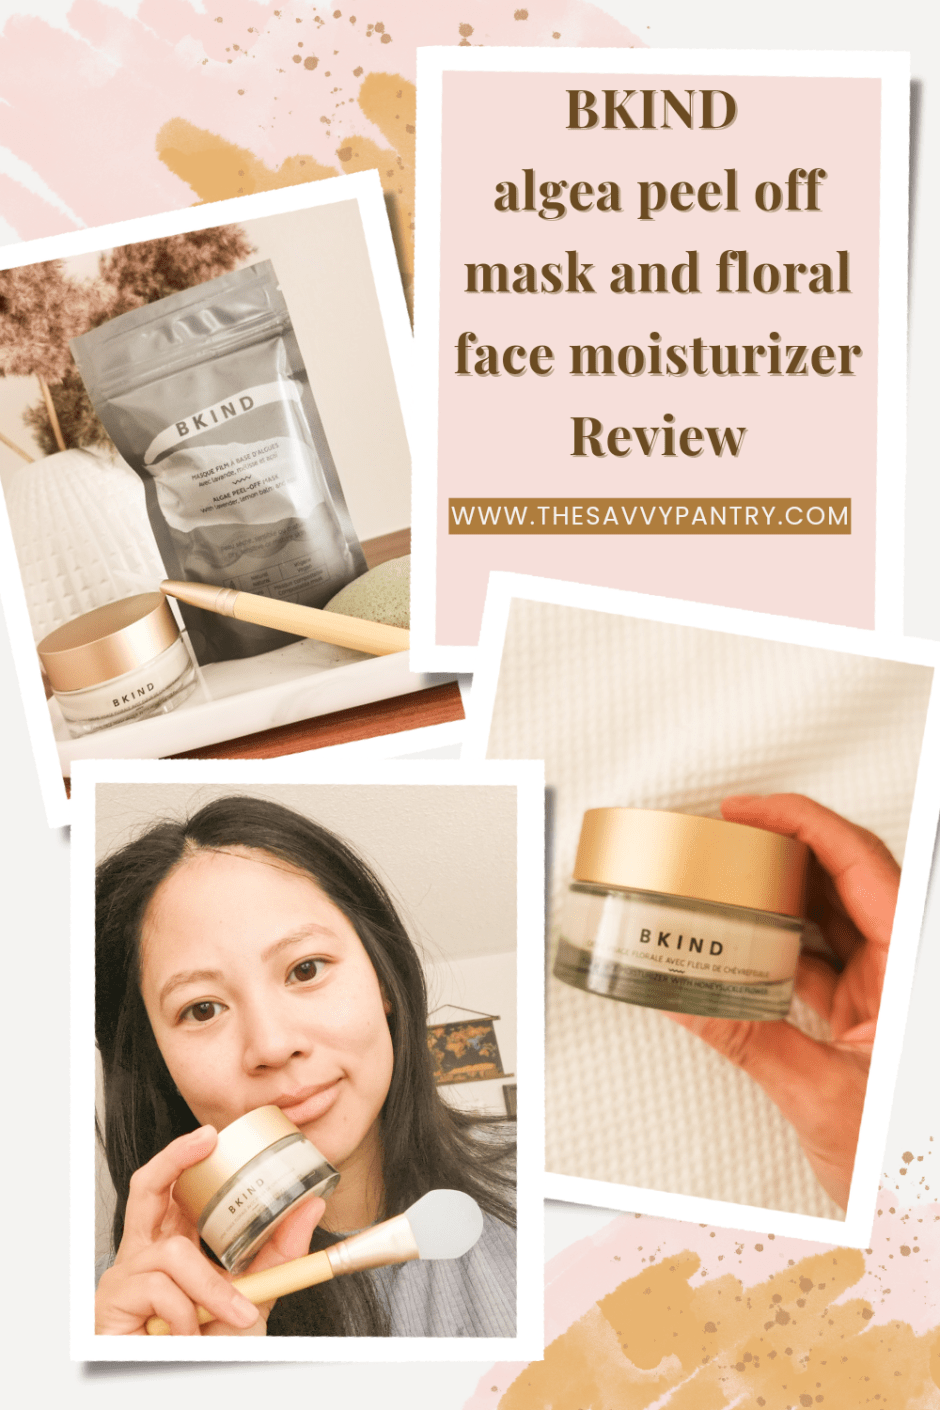
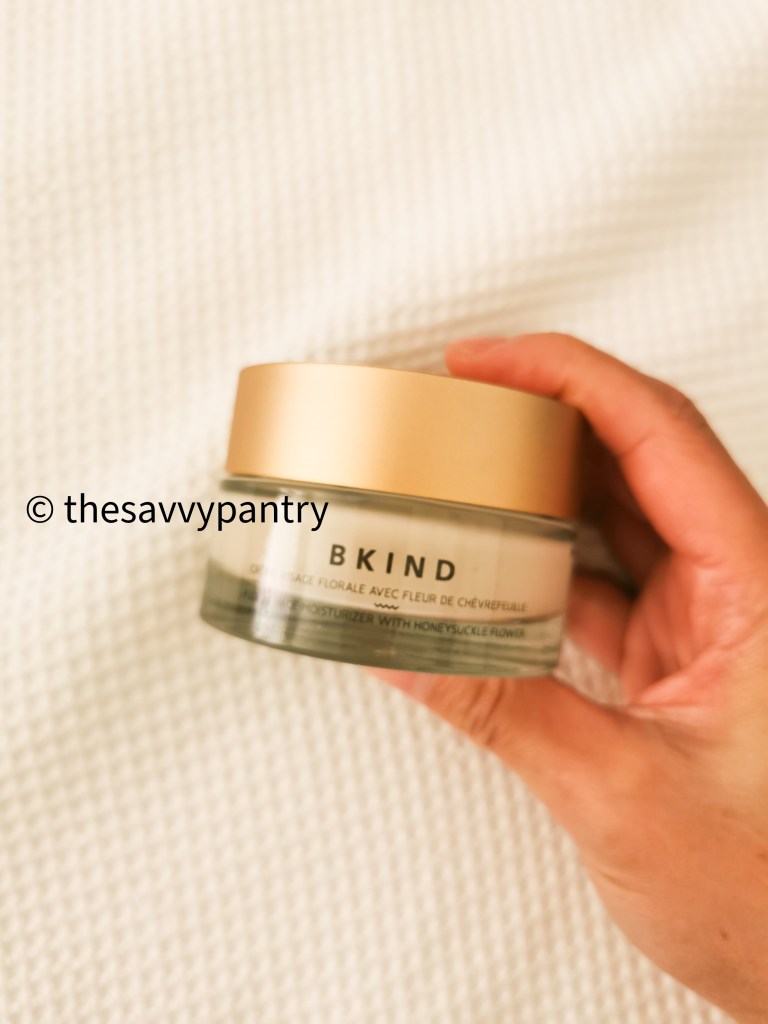
I have been wanting to try out BKind nail polishes for a while now because they are non-toxic and vegan. When I checked out their website, I didn’t realize that they also had a huge line of skin care products! Since I use skin care products more than nail products, I was excited to try some out for myself!
I love that BKind are a Montreal based beauty company that is focused on offering vegan, cruelty-free and all natural.
Here is my review of BKND’s Algae Peel Off Mask and Floral Face Moisturizer.
If you want to get some products for yourself, check out BKind and use code THESAVVYPANTRY for 15% off your order!
Now set forth and be savvy!
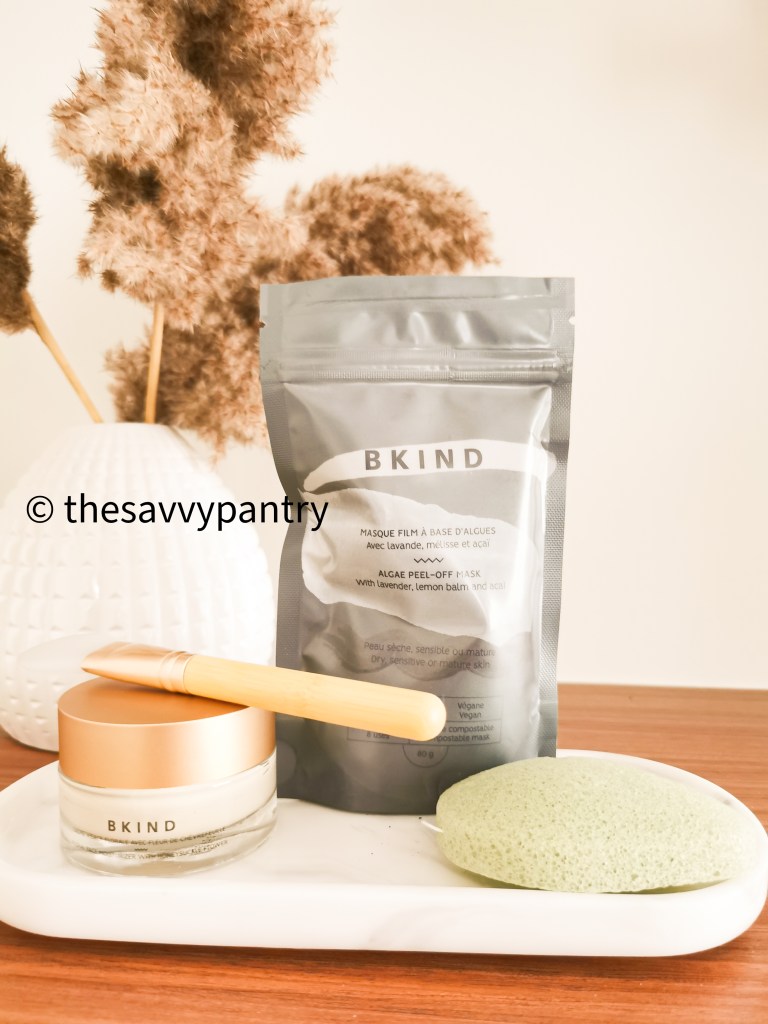
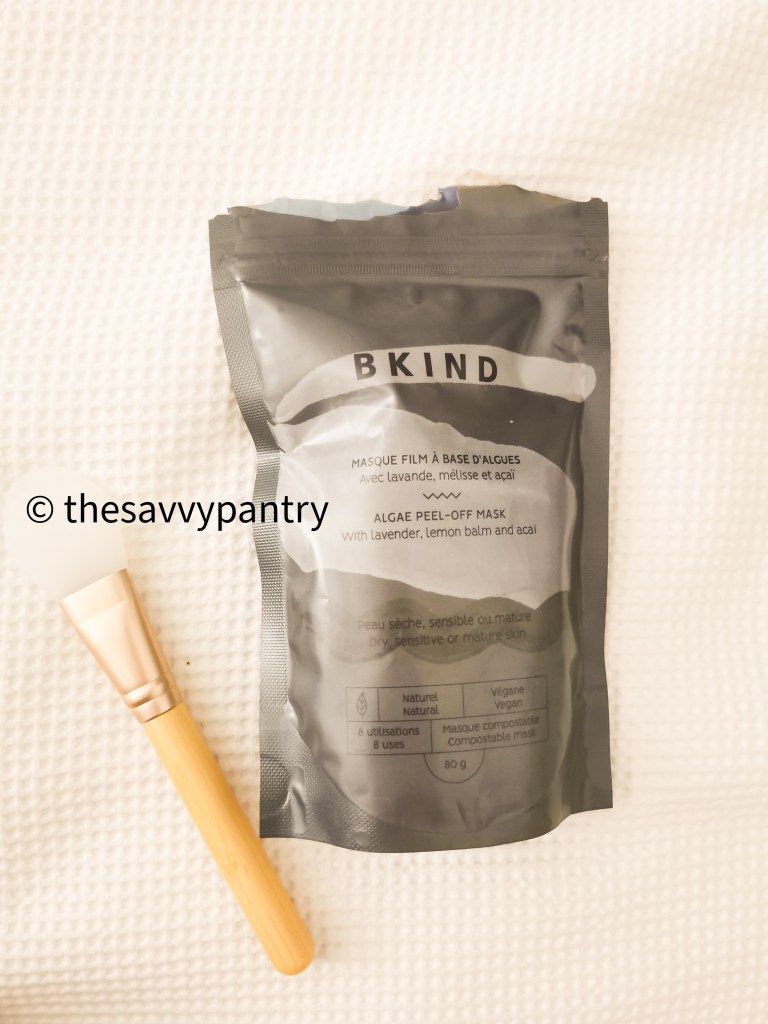
Part of my skin care routine includes a mask that I incorporate every week or so. This peel-off mask does take a little precision when mixing the formula with some water – I ended up using a kitchen scale to ensure I had the right ratios according to the directions. I applied it with a face mask applicator, which I highly recommend since it will be easy to spread an even layer with on your face. Alternatively, you could use a small kitchen spatula. At first, I thought that the mixture was too much, but once you start applying it on your face, you will realize that you need to in fact apply all of it to your face so that when it sets, it is easy to peel off.
It set pretty quickly, and after about 10 minutes, it was time to peel off! I admit, this part was my favourite part of the process. The mask came off almost in one piece and it was easy to wipe off the little pieces that remained.
I love how it made my face feel so soft and refreshed! I will be using this once a month as 1 package only has about 8 uses.
I applied the floral face moisturizer right after taking off the peel-mask. The cream is thick, rich and absorbs really quickly into my skin. I love the subtle smell and it’s perfect to use as a day or night cream. I look forward to applying this cream on every night!
Going to the store to do my weekly grocery shop used to be my alone time where I could spend hours exploring all of the products of various grocery stores on a any given week. I used to not really set myself a budget or a grocery list and would shop till my heart’s content.
Since COVID and having 2 babies, grocery shopping is still my alone time but it looks a little different now adays. I now shop within a schedule and with intention: if I am not utilizing online grocery, then I am limiting myself to 1 store a week, and 2 every other week for a bigger grocery shop. Of course, I now set myself a budget.
Since creating this new routine, I wanted to share my tips on how to beat inflation and stick to a budget when grocery shopping for a family of 4! Check out my video for a grocery haul where I was able to spend under $50 at Real Canadian Superstore and Walmart for the week.
A few things to keep in mind:
In 2022, we spent about $12,000 in total on groceries, which averages to about $1000 a month.
This year, our budget is $600 a month, which I think is still realistic and I will get into why in the next bullet point
Our current budget for restaurants is only about $120 a month; last year we were under budget for this (only spent about $1000 for the year), which is why we overspent in groceries. This year, we plan on utilizing our budget for restaurants more, so we decreased it for groceries.
We consider all consumable goods such as diapers, toilet paper and laundry detergent as part of our grocery bill
We are primarily plant-based at home and our protein sources include tofu, beans and meat-alternatives. I also stock up and freeze when they are on sale so I do not necessarily purchase these on a weekly basis.
I am currently on maternity leave, so my shopping habits are slightly different than when I am working full time
We are a family of 4: 2 adults and 2 under the age of 4. Your budget will look different based on the age of your children and activity level of your family
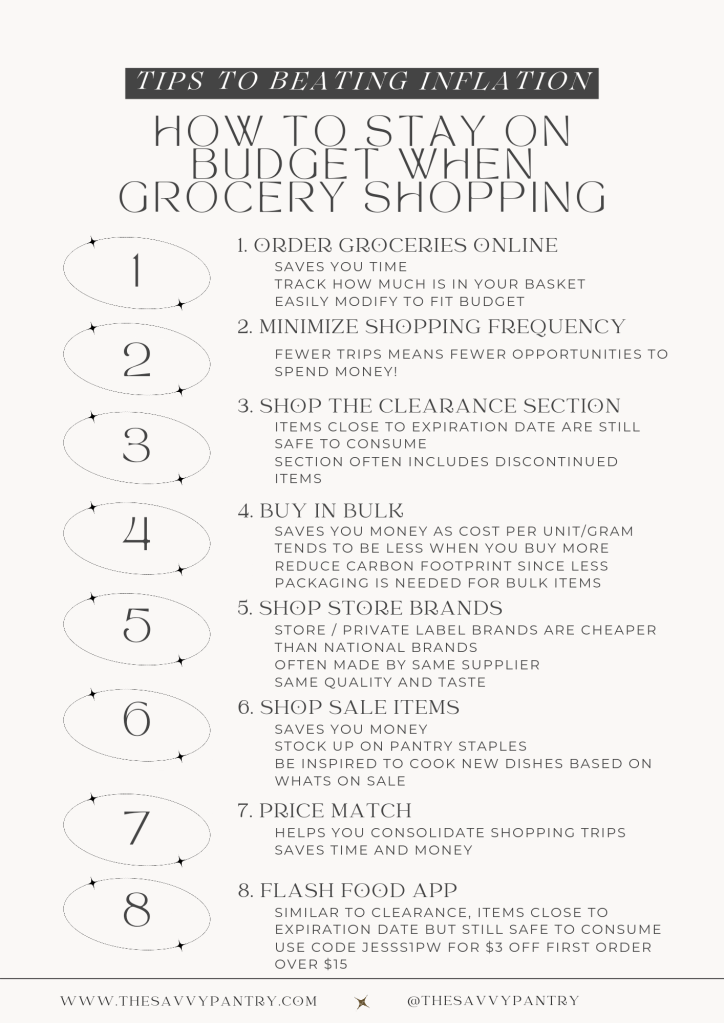
Here are my tips for beating inflation when grocery shopping:
Order Groceries Online – I limit myself to one online grocery order per month and use this as my monthly stock up. I like to utilize online grocery ordering to help keep us in a budget since it’s easier to set a budget and add/delete items according to need and priority. It also saves me so much time since I will slowly add items during the month, and the week of my order, I will check the weekly flyers and adjust my cart accordingly. I budget myself $400 max for my monthly pantry stock up, giving me a remaining $200 for the next 3 weeks on smaller stock up trips. I mainly shop at www.walmart.ca for all of my online grocery needs.
Minimize how often you shop – as mentioned, I limit myself to 1 trip a week and 2 trips in the week where I have to do our monthly stock up. This is an easy way to keep me on budget and more manageable since I know I get to spend roughly $60 that week on that trip. Keep in mind that the fewer trips to the store you make, the fewer opportunity there are to spend money and go over budget!
Don’t be afraid of the clearance section – half of the time, the clearance section has items that are almost about the be expired but still good to consume that week (or frozen for a later use). The other half of the time, the clearance section will contain products that have been discontinued by the store so they need to clear it out to make room for new product, however its best before and expiration dates are still well into the future.
Buy in Bulk – when you buy in bulk, the cost per unit/gram ends up being cheaper than when buying the smaller format. You are also reducing your carbon footprint by purchasing in bulk since there is less package being used per unit/gram of that item. I do recommend only purchasing in bulk on items that you consume regularly or that have a longer shelf life to reduce any potential food waste.
Shop store brands – store brands are usually made from larger national brand just with a different labeling on top. You can save money by shopping store/private label brands without sacrificing on quality or taste! At RCSS and No Frills, I like their naturally imperfect produce since you can get a large amount for a cheap price. Walmart’s Great Value brand has lots of great pantry items and I always buy this brand when doing my pantry stock up on flours, spices and snacks.
Shop what’s on sale. My boys go through berries like little monsters and if I purchased them every week without looking to see what’s on sale, that means I could be buying a pint of blueberries for over $7! Since I limit our berry intake to what’s on sale, I can easily save 50% of normal retail value when shopping only what’s on sale. I also love finding meal inspiration based on what produce is available and on sale that week and this also ensures that my family is getting a variety of nutrition by changing it up every week!
Price Match – most retailers have a list of stores they are willing to price match from and usually have a maximum quantity that you can price match, however I highly recommend utilizing apps like Flipp to search items that you can easily price match. This will save you time by consolidating your shopping trips as well as money by keeping you on track for your budget.
Flash Food App – I love this app because it allows me to research clearance items before hand and stock up where I can! For example, whenever I see that there is medium to firm tofu available on this app, usually it is listed for $1 when regular retail is over $3. I am able to save over 66% by shopping our protein staples and freezing them so that they are always available on hand. This means that on a monthly basis, I may not even need to replenish our plant-based proteins because I already have a well stocked reserve in the freezer. Use code JESSS1PW for $3 off your first order over $15
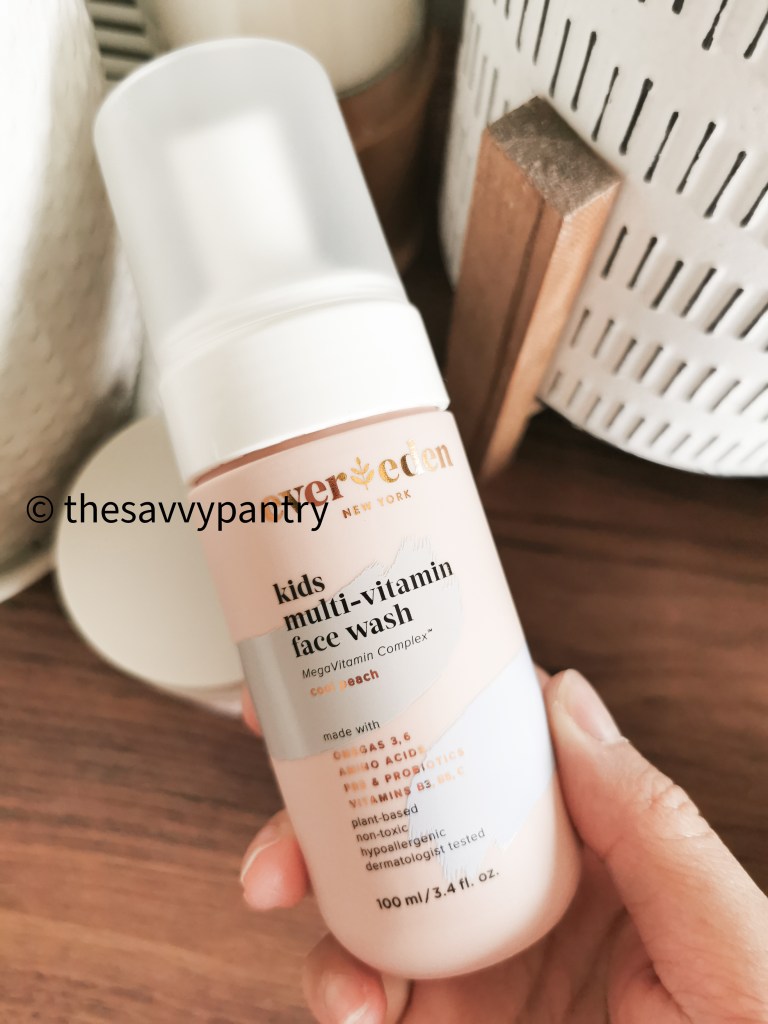
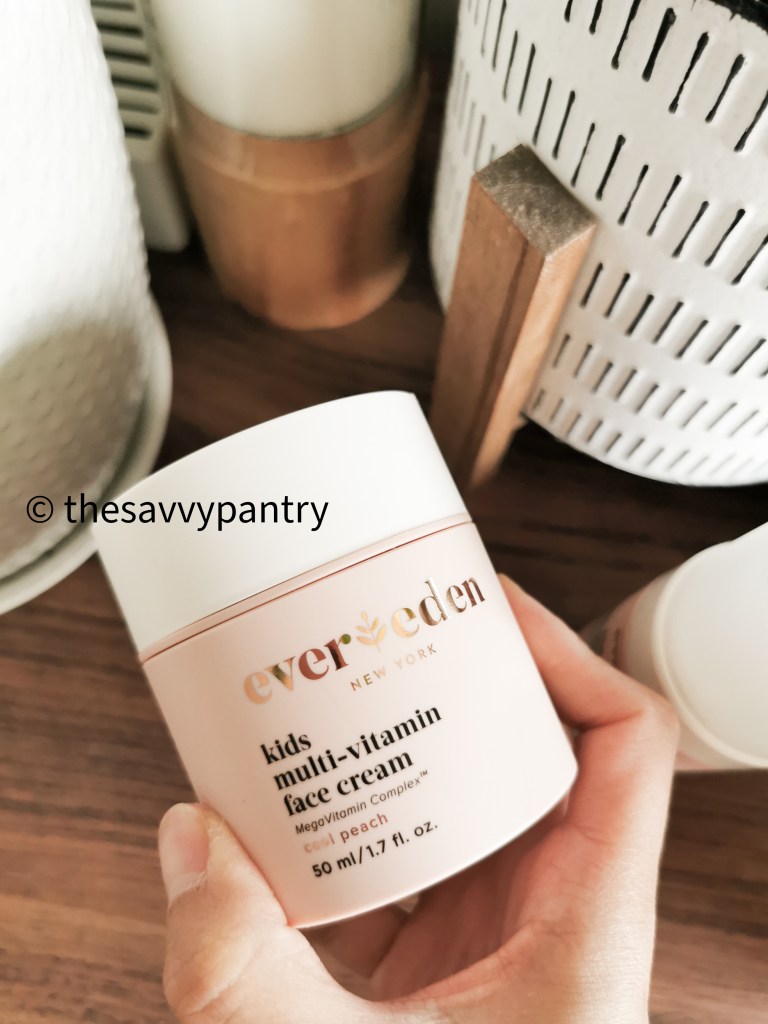
Ever since the summer started, I noticed that my toddler has had a lot of acne, especially on his face. Since we’ve been playing outside a lot this summer, with a combination of sweat, sunscreen and dirt, it’s caused a few blemishes on his face. To alleviate these acne breakouts, I wanted to find a kid friendly face wash and face cream that was effective but also safe to use on him. Since I don’t use much product on him in general, I wanted to keep his skincare routine to a minimal. I am glad to have found Evereden’s Multi-Vitamin Face Was and Multi-Vitamin Face cream!
See below for the full review on both products for my little ones.
Check out ever-eden.com to shop all of the skincare products. Don’t forget to use code JESSICA10812 for 15% off your order!
I love how light this face wash is for my little one. My toddler doesn’t like any thing on his face, especially when it comes to skincare. This foaming cleanser is perfect for him because it allows me to gently wash his face while taking a bath in the tub. I love that the formula includes organic coconut water which delivers a rich, foaming lather that really helps remove the dirt from his face!
Applying the Evereden Multi-Vitamin Face Cream after the face wash is the perfect pairing to ensure my toddler’s face is well hydrated after a full day of playing out in the sun. This cream hydrates, balances and smooths his sensitive skin. I also love the applicator, allowing me to easily dispense with one hand while also controlling the amount being dispensed.
I love that Evereden products are cruelty free and made with plant-derived, clean and non-toxic ingredients.
Don’t forget to check out ever-eden.com to shop all of the skincare products. Don’t forget to use code JESSICA10812 for 15% off your order! Now set forth and be savvy!
It is breastfeeding awareness month and we have just completed year 1 of breastfeeding with my 2nd baby. Even though I exclusively breastfed both babies, I learned so much breastfeeding the 2nd time around. I wanted to share some tips to help alleviate any stress that other moms might face during their breastfeeding journey. I do want to emphasize that this was my experience and I know every mother and baby will have a slightly different experience, but these are some things that I learned breastfeeding my 2nd baby that I wish someone would have told me during my 1st.
Cluster Feeding
Nothing prepares you more for cluster feeding than going through it yourself.
Cluster feeding is a way for your baby to help increase your milk supply and can happen as often as every 45 minutes. With my first, I used to stress so much because I thought it meant that my little one wasn’t getting enough milk
After understanding that it’s just nature’s way of ensuring your milk supply is ramped up, breastfeeding my 2nd became mentally much easier, even though it was still physically very exhausting
Also be prepared that cluster feeding tends to happen more often overnight, so you will experience frequent night wakings!
How often should a baby feed?
You will read all over the internet that a baby should feed every x amount of time and anything more or less than that is not normal and you should supplement with formula. This used to cause me so much stress and mental exhaustion, trying to calculate how much breast milk my little one was getting. In actuality, breast fed babies will eat as often and as long as they need to.
As long as they are gaining weight and producing the appropriate amount of dirty diapers for their age, then they are fed enough.
The rule of thumb is to offer the breast as soon as baby seems fussy as a first response.
Milk Output when Pumping
Lots of advice is given that you should pump especially in the early stages to help increase milk supply.
I did this with my first and would only be able to pump an ounce here and there at a time
What I now understand is that in the first 3 months when your milk supply is still regulating, the best way to increase is to just put your baby to your breast.
I also learned with my 2nd that if I were to pump in the first 3 months, I would actually be putting myself into over supply since I am telling my body that I need to produce more milk than I actually need. I learned this because my milk letdown for my 2nd baby was a lot more than with my first.
Know that your baby is more efficient than a pump when you are exclusively breastfeeding.
I say this because while your pump might only be able to remove an ounce of milk, your baby is probably removing at least double that
I used to stress so much about having low production, but understanding this really helped and let me focus on other areas outside of feeding.
I hope you find this information helpful. As a disclaimer, please consult with a healthcare practitioner or lactation specialist if you do suspect you are having production issues. Remember, fed is best, whether you choose to breastfeed or bottle feed!
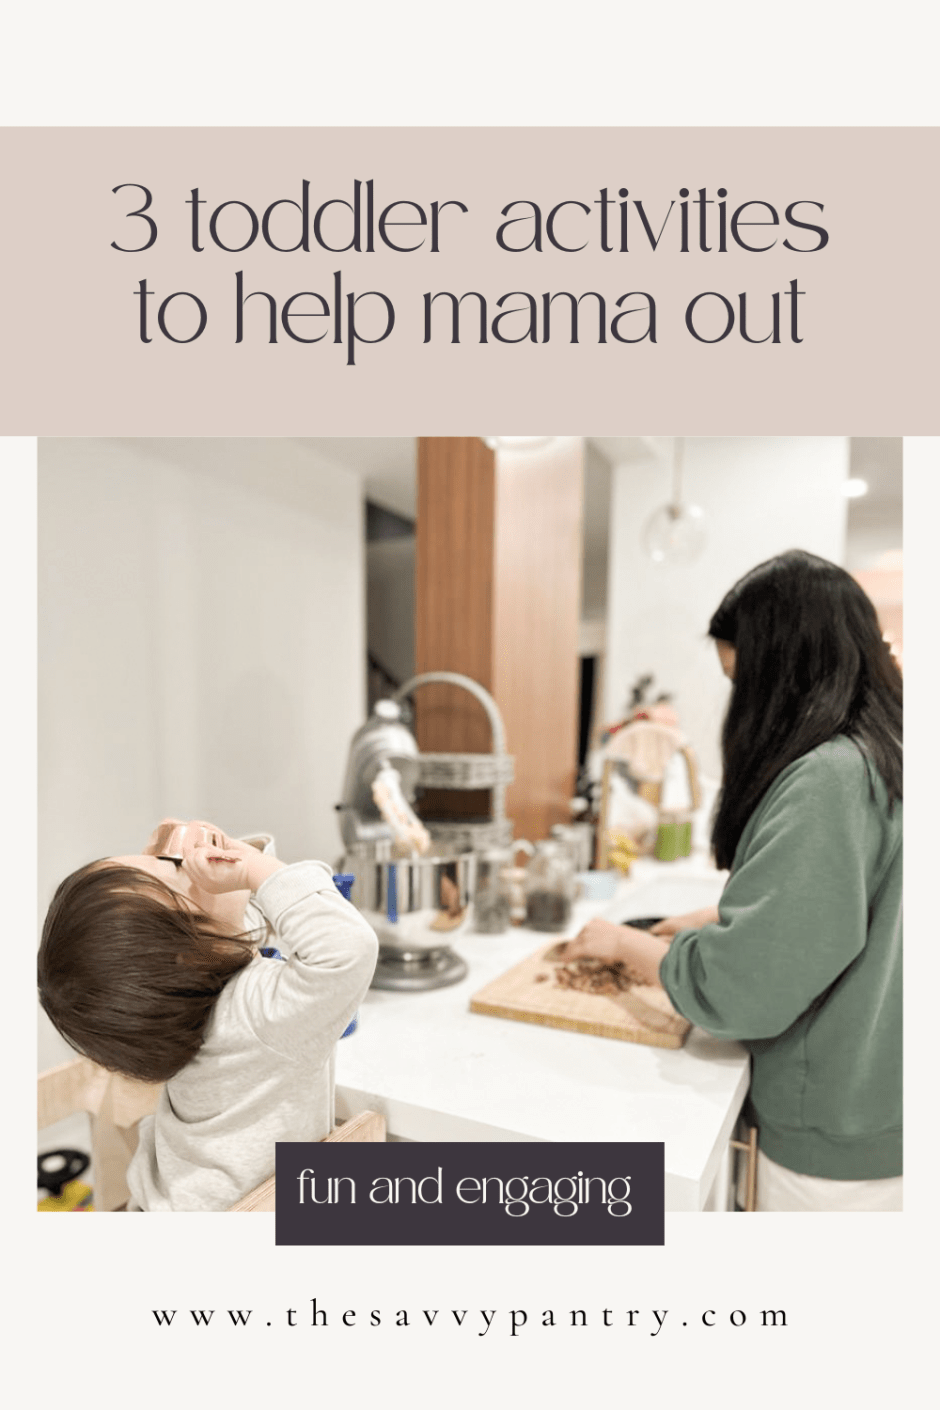
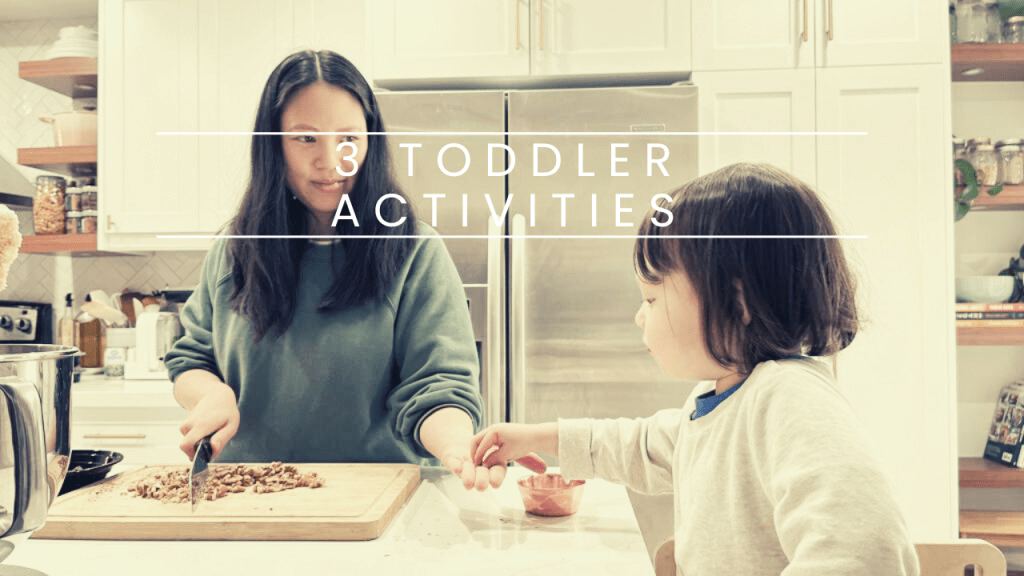
Toddlers are naturally curious and always want to lend a helping hand. Whenever we are doing chores around the house, we see this as an opportunity to engage our toddler by allowing him to “help us”. Not only are we able to continue on with our weekly chores, but it allows us to bond as well as burn some much-needed energy, especially during the winter months when it’s hard to get outdoors!
See below for 3 toddler friendly activities you can include your toddler in!
I don’t know about your toddler, but my toddler is absolutely obsessed with water. In the summer time, we have a water table that he likes to play with in the backyard, however during the winter months, it’s hard to get some water play. Since I water my plants once a week, I decided to include him in this activity! With a spray bottle or a small measuring cup, I allow him (with supervision) to help water the plants. It also allows me to teach him the importance of taking care of plants!
I reserve my intensive meal preps for the weekend when my husband is home and can watch the little ones. But sometimes during the week, especially when my toddler has a lot of energy, I like to bake with him. This is a great way for me to share my passion of cooking with him while also teaching him life long skills. I like to set out all of my ingredients on the counter and we will measure the ingredients together. His job is dumping and taste tester!
The third activity is usually one he helps out with my husband, since my husband does the majority of the cleaning around the house. We will allow him to help wipe down any spills and press the on button for the vacuum. It’s also great because it teaches him the importance of cleaning up after yourself. We’re lucky because our toddler loves to clean up his own toys after he is finished playing.
I hope these activities help inspire you to look for opportunities to include your toddler in your daily routine. Not only will it serve as great bonding time but it will also help teach your little one life long skills!
Comment below on what activities you like to share with your toddler!
I have been making this lasagna for years and have finally been able to put the recipe down on paper for you! This pumpkin lasagna recipe uses the pumpkin puree I have frozen from my Halloween Jack-O-Lantern Pumpkin, but you can use store bought pumpkin puree in this recipe as well.
This lasagna recipe has such a subtle pumpkin flavour while still having the heartiness of a traditional tomato-based lasagna. The pumpkin cream sauce makes this dish really decadent and goes perfect along side garlic bread or a salad. My little one really loves eating this as well since there are so many textures from the vegan tofu ricotta to the TVP meat filling.
Hope you guys try out this recipe. It is one of my favourites to make and you can surely make it ahead for an easy weeknight meal!
Now set forth and be savvy!
Ingredients
1 block of firm tofu, drained (420 G)
1 tbsp nutritional yeast
1 tbsp apple cider vinegar
1 tsp granulated garlic
1 tsp dried basil
1 tsp dried parsley
1/2 tsp salt
¼ tsp black pepper
1 package frozen chopped spinach, thawed and drained (300 g)
¼ cup non-dairy milk
Ingredients
1 package beyond meat or lightlife ground
1 onion, diced
3 cloves of garlic, minced
2 tsp fennel seed
2 tsp dried Italian seasoning
1 tsp dried basil
2 tbsp soy sauce
2 cups TVP, rehydrated
1 tsp salt
½ tsp black pepper
1 can 28-ounce diced tomatoes
Ingredients
2 tbsp vegan butter
¼ cup flour
2 cups non-dairy milk
3 cloves of garlic
1 cup pumpkin puree
2 tbsp nutritional yeast
2 tbsp apple cider vinegar
1 tsp dried parsley
1 tsp salt
½ tsp black pepper
½ tsp nutmeg
You will also need:
9 lasagna noodles
1 cup shredded vegan mozzarella style cheese
Directions
Cook 9 lasagna noodles according to package directions. If you are using no-boil noodles, then you can start making the lasagna filling
Vegan Ricotta Filling
Blend all of the ingredients in a food processor until smooth
Set aside and prepare the meat sauce
Meat sauce:
Heat a sauce pan over medium heat
Add the veggie ground and let it brown, about 3 minutes as you break up the pieces with a potato masher or a wooden spoon
Add in the onion and garlic and sautee together until fragrant, about 2 minutes
Add in the spices and toss until fragrant, about 1 minute
Add the soy sauce and the rehydrated TYP and mix until it is well incorporated into the veggie ground mixture
Add the salt, pepper and canned diced tomato and let simmer over medium-low as you prepare the pumpkin sauce mixture
Pumpkin Sauce:
Make your roux by melting the butter over medium heat
Once the butter is melted, add in the flour and mix until the flour is combined
Add in the rest of the ingredients, whisking until there are no clumps over medium high
Once the sauce comes to a boil, turn the heat down to medium low and continue whisking until you get a smooth sauce
To layer the lasagna:
Preheat oven to 375 degrees
Add a thin layer of the meat sauce to the bottom of a 13 x 9 in baking dish
Add a layer of noodles
Add half of the ricotta tofu mixture on top of the noodles
Add 1/3 of the meat sauce on top of the tofu mixture
Pour ½ of the pumpkin sauce on top of the meat mixture
Add another layer of noodles
Add the rest of the ricotta mixture on top of the noodles
Add 1/3 of meat sauce on top of the ricotta mixture
Pour the rest of the pumpkin sauce
Add a final layer of noodles
Add the rest of the meat sauce
To bake the lasagna:
You can make this ahead of time and bake it when you are ready to eat – just be sure to put the cold lasagna tray into the oven as you are preheating it to prevent the tray from cracking
Place the baking dish on top of a cookie sheet to prevent spillage in your oven
Place another cookie sheet on top of the lasagna dish to create a lid
Bake at 375 for 45 minutes
Remove the cookie sheet lid and sprinkle the vegan cheese on top, bake for 15 minutes
Remove the lasagna from the oven and let it sit for 15 minutes before serving
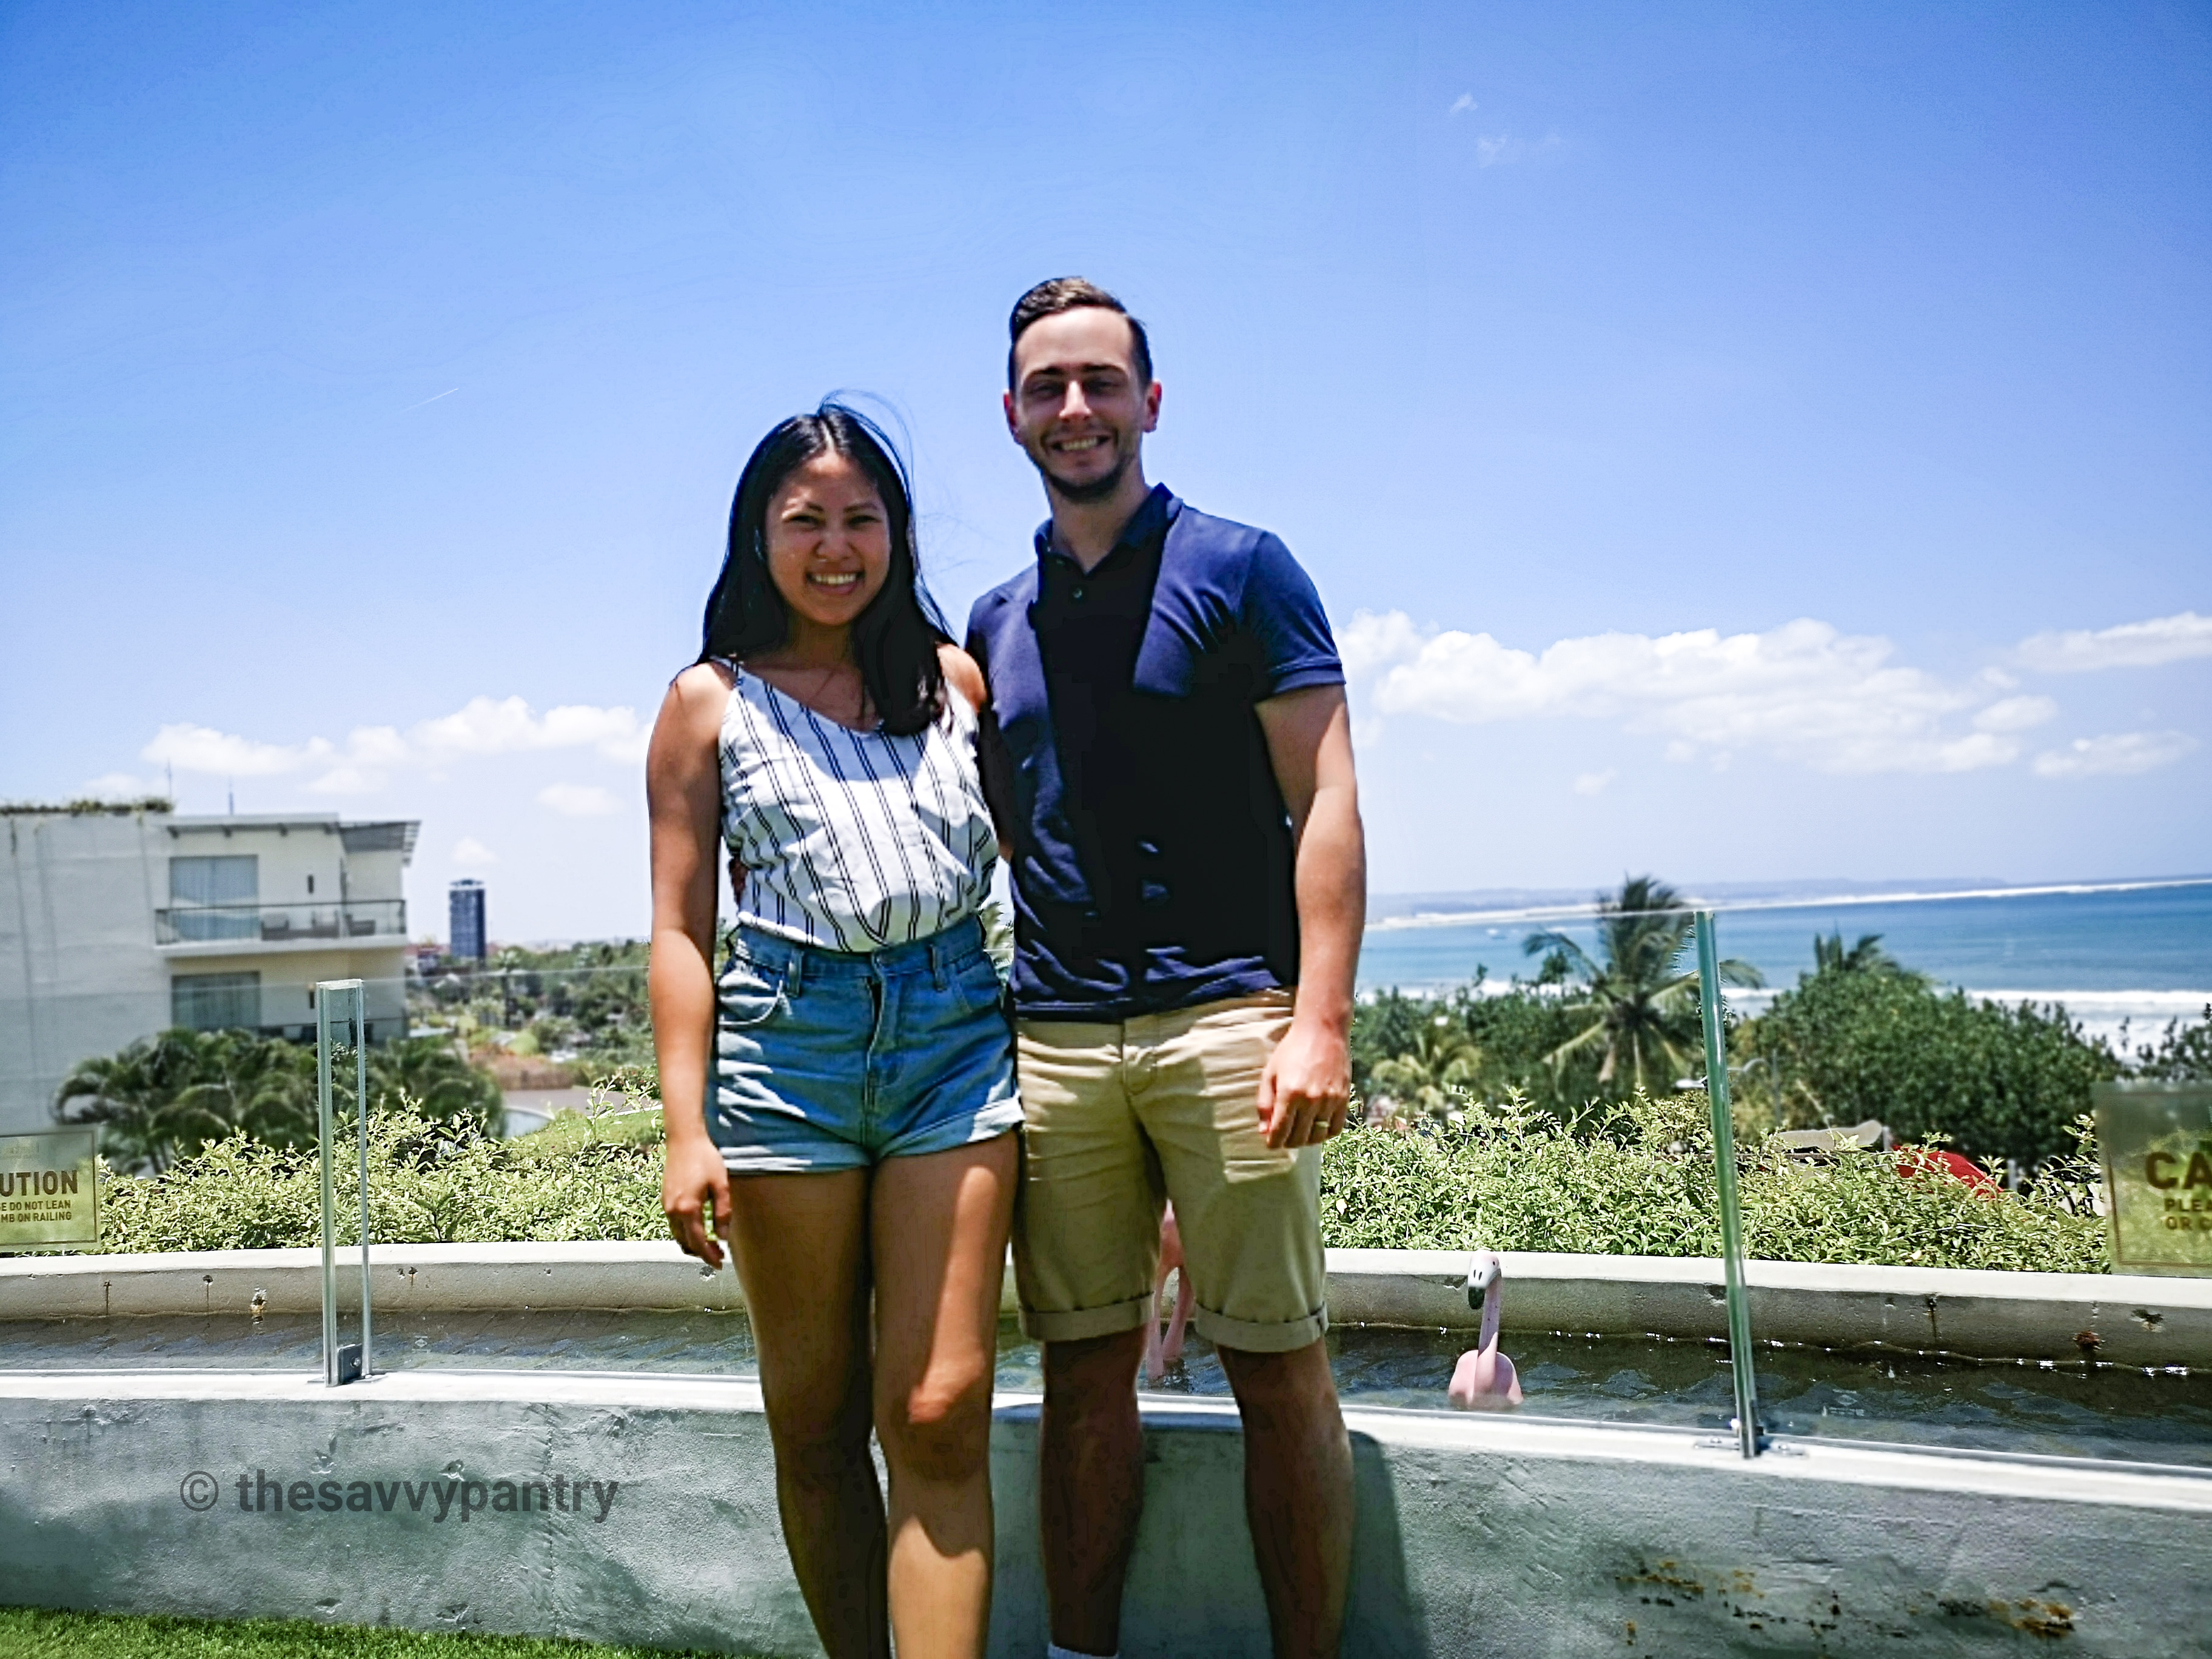
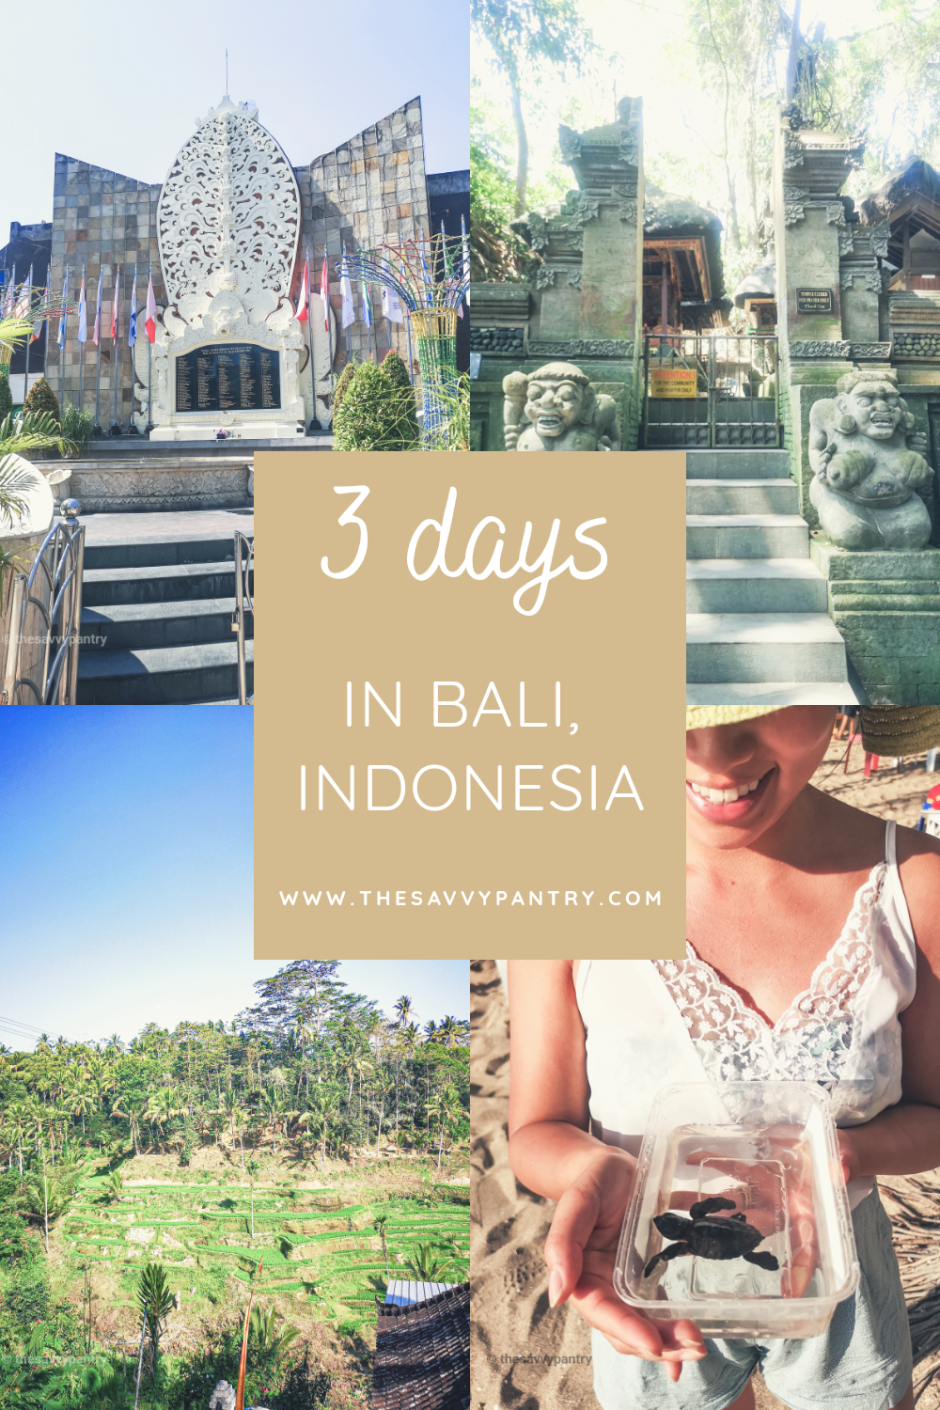
If you read my previous post where I shared my 1-day itinerary in Kuala Lumpur, Malaysia, then you already know that this is the final country we visited on our 16-day Asia trip that spanned 4 countries and 6 cities! As mentioned, we had started and ended our trip in Singapore because it was the cheapest way to travel to Asia from Canada (Toronto specifically). We had decided to spend 3 days in Bali just to get a taste of the city while we were on this side of the world. To get to Bali, we flew from Kuala Lumpur, Malaysia via Air Asia.
Here is some general information of our time in Bali, Indonesia:
Transportation from the Airport to our Hotel: We had arrived to Bali International Airport Airport (DPS) at around 1AM. Since we had arrived really late at night, I decided to book a round trip taxi service which cost about $33 CAD. Luckily, we had our international SIM (more details below) since we needed access to WhatsApp to reach our taxi driver. You could also take a grab or a taxi, but after reading about the taxi service in Bali (more specifically the taxi mafia), I was a bit weary and was more comfortable with the taxi service.
Transportation in and around Bali: Bali itself is quite large and there are many areas where you can stay. We stayed in the Kuta area. We chose this location because we were able to walk to the beach, restaurants and the mall. However, when we took our day trip to Ubud, we did book a private taxi which was convenient because we got to see many things in and around Ubud.
WIFI Access: I will leave the same comments as my previous post as it is still relevant here. Connection was only available in our hotel room and some public establishments. To get around this, what I have done in the past, and also implemented on this trip, was to load our itinerary on Google maps and download the map for offline navigation. This method works most of the time, however sometimes the GPS gets confused and doesn’t know where you and ends up restarting. You end up having to use the map the old way (aka without a GPS and finding your own directions like a traditional map). However, I do recommend just purchasing an international SIM card that you can use and be connected to at all times (if you need to). Personally, for me, I preferred to be connected the entire time since the offline google maps kept restarting and was unable to locate us. It is also useful if you plan on using Grab while in the city. This was the first time travelling internationally where we had purchased an international SIM to be able to be connect to internet and I must say that now I am a converted. The international SIMs are very affordable and offer a lot of data (we would also turn it off if we were going to be in a given location for an extended amount of time to preserve data and batter power) and we were able to use the same SIM for the remainder of our entire trip in all of the other countries. We did end up using 3 different types of connection, but I recommend the last option so that you can be connected the entire time:
International SIM(purchased at the airport) – Once we left Singapore and arrived to Phuket Airport, there were lots of boots that were selling international SIMs. We ended up purchasing one of these at a booth called Smile and they connected it for me – it was super easy to use however kind of confusing because I couldn’t understand how much data I had left so we used it sparingly during our visit in Phuket and Chiang Mai. Because we paid in cash, I unfortunately do not recall how much we spent, but it was definitely less than $10 CAD.
Rented WIFI Device – I had actually rented a device when we were in Singapore for our visit in Bangkok since we were going to be here for 3 days without any excursions. We rented a pocket WIFI which we picked up at the BBK airport via Klook. In total it cost $26 for the 3 days (which at the time we thought was a bargain) – they do have to hold a deposit which is refundable once you return the device, so make sure you have enough cash to avoid the change in exchange rates on your credit card. It was also not clear how much data we had but I think it was unlimited. I didn’t mind the hand held device since we had used one when we visited Tokyo, however I definitely would recommend an international SIM when possible.
International SIM (purchased online and picked up at airport) – After doing more research while in Bangkok and realizing that the convenience of being connected to data became a growing need, which was already 6 days into our trip, I did more research on Klook. I found SIMs available for 15 countries in South East Asia, which meant that for the remainder of our trip (still 7 days), we could be connected in all of the countries (Malaysia, Indonesia and Singapore) and not have to worry about finding WIFI. We found a great deal with the SIM only costing $8.90 for 4GB of data from Klook. This option ended up being the best because not only is it a one-time purchase (no need to return anything like we had for the rented WIFI device), but you can actually download an app that came in English that tracked how much data you had. If you did go over the allotted data, you had to option of adding more data if necessary. I really liked the convenience and visibility of this option the best and felt in full control.
Hotel in Bali:
We stayed at the White Rose Kuta Resort. We had different expectations since the previous 10 days were spent at hotels in the city, so it was a very nice change of pace staying at a resort. We had never stayed at a resort in South East Asia before and didn’t realize that it is very similar to staying at resorts in the Caribbean. Even though we arrived very late, at around 1:30 AM, there was someone at the front desk to greet us. I really liked the villa feel of the resort, and it was quite large that you didn’t really run into other patrons on the premises. They also had a lovely breakfast buffet that was included in our room rate. I enjoyed the congee, noodles and fresh fruit every morning of our stay. We had also visited the spa on our last day which was actually quite affordable and very relaxing. The location of the resort is great as well – they had security that checked all of the cars and vans coming in and you could only enter if you were actually a guest of the resort. It was also in walking distance to the beach and restaurants. We really enjoyed our stay here and would highly recommend in the future.
Budget: We had budgeted $88 CAD cash per day, which was meant to be used for food, transportation and shopping. We knew credit card wouldn’t be readily available in most establishments so we carried more cash than Thailand. Again, I also used Budget your Trip to gauge how much expenses to expect per day. See below for the breakdown of our actual expenses (keep in mind this is for 2 people):
Airfare from Kuala Lumpur to Bali for 2 people: $300
Hotel: $197 (for 3 nights)
Cash (mostly for meals): $265 CAD
Meals (on credit card): $85
Shopping and other expenses (on credit card, which includes our excursion, souvenirs and laundry): $258
Transportation (credit card): $33 (Shuttle taxi)
Total cost of trip for 3 days: $1138
Excluding airfare, we actually spent $280 per day, or $139 a person. If we exclude the cost of the excursion, laundry and souvenir (we bought a painting), we actually only spent $97 per day per person, which is closer to the $88 per day approximation found on Budget your Trip, however we did splurge on some of our meals which we charged to our credit card, so I still highly recommend this website as a great resource in budget planning.
See below for the full details. Don’t forget to also check out some highlights from our trip (video above).
For the itineraries from the other areas we visited, see below:
Since we arrived after midnight, our first day was a true full day and we intended to take full advantage of it. Since our hotel included breakfast, we decided to walk over to Kuta beach right after breakfast to take advantage of the morning. From our hotel, it was less than a 10-minute walk. The beach itself is huge and even though it was really sunny, we had a nice breeze. We spent about 2 hours here relaxing and soaking up all of the sun.
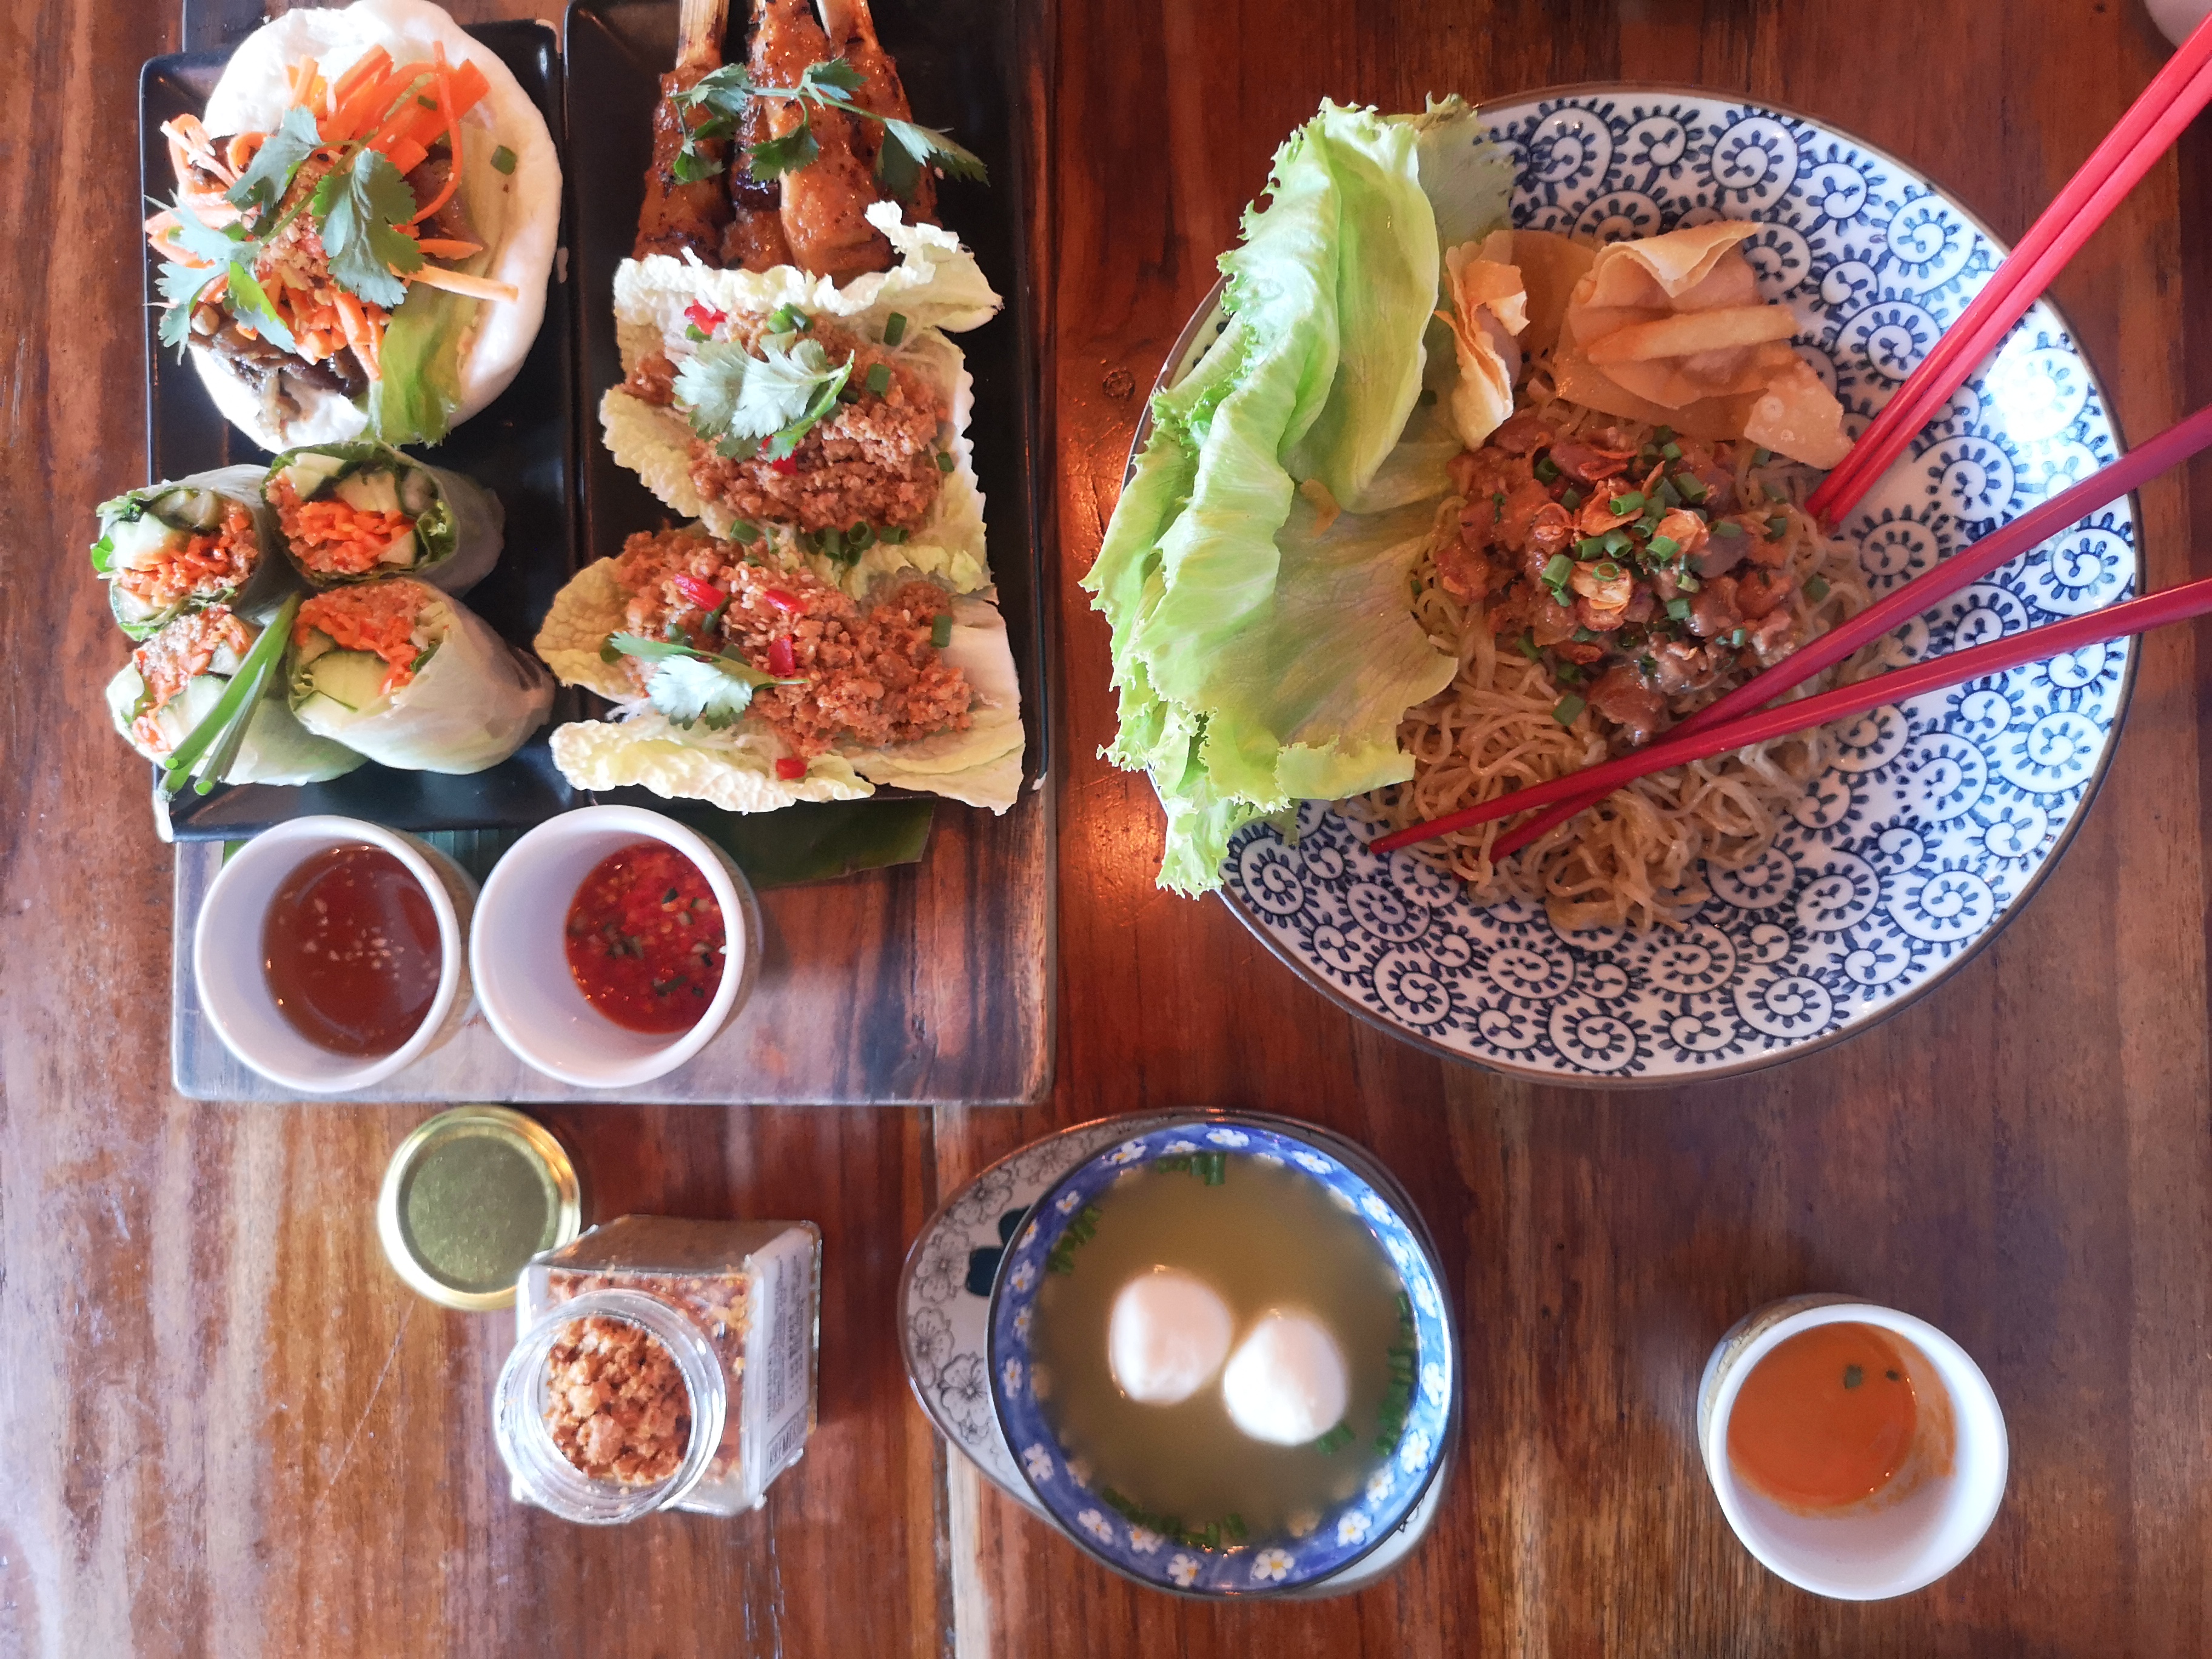
Around 11:30 AM we were getting hungry for lunch so we decided to walk around to look for a place to eat. We stumbled upon Paper Boy. We loved that they had vegan options and a patio where we could sit outside and enjoy the sun. It is beautifully decorated and the owner came and spoke to us for a bit as well. We each ordered a smoothie and shared an avocado toast and tofu poke bowl. I highly recommend visiting here.
rpt
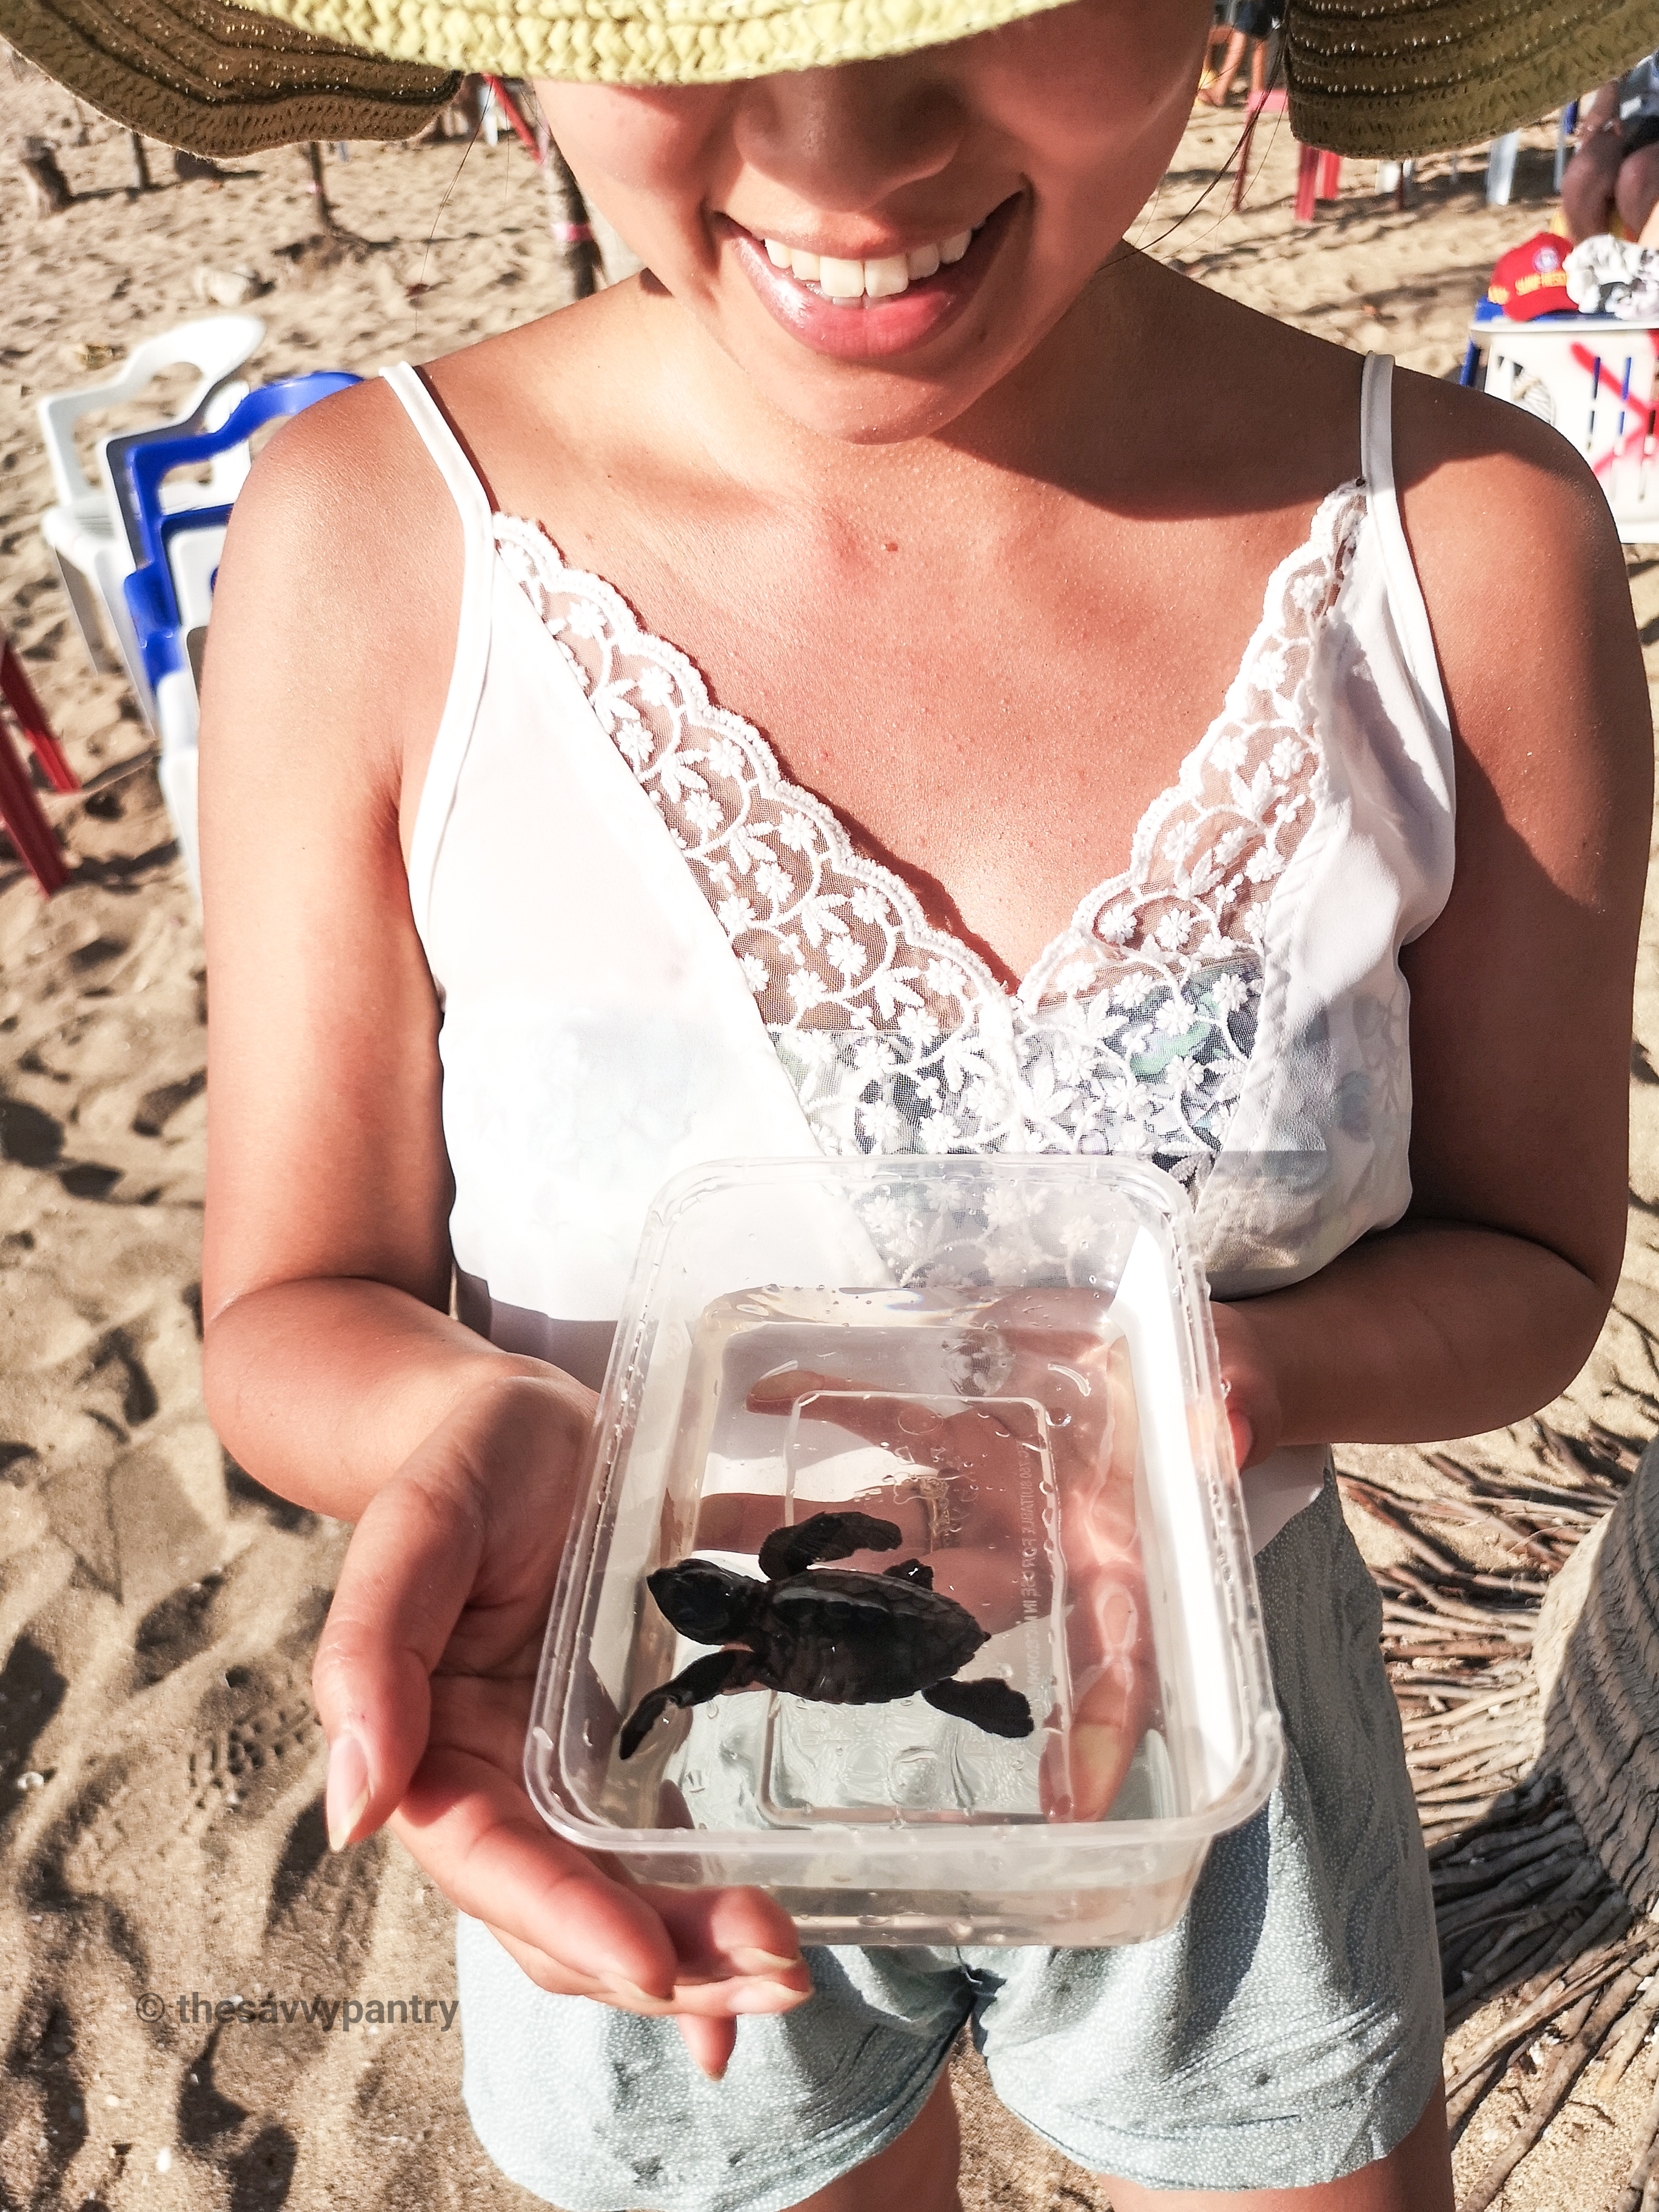
After lunch, we walked around a bit for some sight seeing and also went back to Kuta beach. We have planned to visit the Bali Sea Turtle Society where they release baby sea turtles back into the ocean daily, however this was later in the afternoon. You will need to follow their facebook group to get the exact times and days they release the baby turtles as it can vary based on how many turtles hatched. The day we were going to visit, it was scheduled to start at 4:30 PM however it was recommended that we arrive 1 hour before since it is first come first serve. When we arrived, there was already a huge crowd of people. It is a lottery system that they had set up, and everything is by donation so you have to line up and wait until they hand out tickets to be able to participate in releasing the baby turtles. I also really liked that while we were waiting, they also demonstrated how they wait for the turtles to hatch and provided background on why they are an endangered species.
After releasing the sea turtles, we went back to the hotel to wash up before heading over to Gabah Restaurant for dinner. Gabah was on the higher end and we ended up paying for our dinner with credit card, but it was well worth it. We had their Sayur Mebrata, which is a vegetarian dish, as well as their Ayam Betutu.
When we had planned to come to Bali, I knew I wanted to spend a day visiting Ubud. When researching, it was recommended that we spend the night here however since our time was limited, we opted for a day tour. We booked our tour through Get your Guide and it included a visit to the Waterfall, Rice Terraces and Monkey Forest, to name a few.
We hadn’t realized this but the tour ended up being a guided private tour. Our driver picked us up at our hotel at 9 AM and we began our trip to Ubud. We really like the idea of having a driver since they’re able to give us history and background information of the sites we were going to visit.
Our first stop was to visit the Tegenungan Waterfall. It is quite touristy here with lots of shops and photo ops. We had the option of bringing our bathing suits and swimming in the falls (which we did not do on this trip), however it was quite packed with other tourists. The falls itself are wonderful and it was a nice visit here. They also had monkeys on the premises playing in the water as well.
After a 30 minute visit to the waterfalls, we headed over to Teba Sari Bali Agrotourism where we learned about local herbs, spices, teas and coffee. It seemed that a lot of guides add this as a stop to their tour, which was quite informative and a nice break especially if you were swimming in the waterfalls. When we arrived, we were met by another private guide where he talked about the various trees and plants that were grown. After that he brought us to a shaded picnic bench where we got to have a tea and coffee tasting. We enjoyed this very much because we were able to bring back some tasty teas for our families to enjoy back in Canada.
rpt
After about a 45-minute visit, we headed to our private van. Since it was still pretty early for lunch, our tour guide asked us if we were interested in artwork. My husband has made it a goal to pick up a piece of art on every trip that we take, so we decided to opt for a visit at Semar Kuning Artist Cooperative. This place is huge with many different halls with different styles of paintings, ranging from modern to traditional. We picked up a traditional painting of an Indonesian dragon that cost about $100 (there is also room to bargain at these places). We were both quite pleased about this purchase and excited to hang it up in our home.
We headed straight over to the Sacred Monkey Forest Sanctuary before heading over to lunch. We learned that one of the reasons that the forest was built was to keep the monkeys safe after the area was industrialized. It was to prevent the monkeys from being harmed when roaming around Ubud looking for food – this way food is brought to them daily and they are left to roam free as they would in the wild. When visiting, our guide did warn us not to look the monkeys directly in the eyes as to not show aggression – it was also interesting to see how familiar all of the guides were with the monkeys, such as knowing that they love papaya leaves and will go through your bags looking for food.
rpt
rpt
For lunch, our guide dropped us off at Bebek Teba Sari Restaurant for about an hour. This restaurant was full of other tourists and was quite busy when we arrived. We did have to wait about 20 minutes before our food arrived, however we didn’t mind since our day was very busy so it allowed us time to relax and unwind. We were seated at the top level of the restaurant, which is set up almost like a tree house. We got to see the great views of the farm while we enjoyed our lunch.
After lunch, we headed over to the Tegalalang Rice Terrace. It was actually very serene to see all of the greenery and flowers grown on the premises. There was also lots of tourist activities, such as biking or swinging over the rice terrace. Even though there were lots of other tourists, this place is huge with lots of paths that you can walk along. It was a great ending to the packed day that we had. After this, we headed back to our hotel where our day trip to Ubud ended.
After our day trip to Ubud, we decided to walk over to Warung Nusantara for dinner. Since we had an extravagant meal the night before, we were looking for a local restaurant with simple food that showcased what Bali had to offer. Most of the food here was fried, and it went really well with their hot sauce. The food was delicious, cheap and fast. It was a great way to end the day.
This was our last day in Bali. We had a return flight at 7:30 PM to Singapore, so we really only had a half day. We decided to head over the Kuta beach again after breakfast to soak up the last bit of Bali before leaving. After the beach, we headed over to the Beach Walk Shopping Mall for some well-deserved AC and exploring. This mall is huge and had lots of floors, with the top floor dedicated to food.
We spent about an hour here before heading over to Fat Chow for a late lunch. We had actually come here twice the day before to try to get a table for lunch and dinner but they were always packed. Because we came here at an odd time (around 2 PM), we didn’t have to wait at all. The food was so delicious and if we had more time here, I definitely would have visited again. I loved their fried shallot condiments so much that I brought back 3 jars for myself and my sister to enjoy.
After lunch, we headed back to our hotel where we had each booked a massage. The only thing I regret is not getting more massages while visiting South East Asia since we had done a lot of walking and would have benefited from more relaxation. After our massages, we headed over to the airport for our final trip to Singapore.


")
")

")
")
")
")
")


")
")
")
")
")
")
")


")
")
")
")
")