Blueberry Cookies – I used this recipe and swapped out the chocolate chips for blueberries. It made more a softer, denser cookie, more similar to a muffin top rather than a cookie, but my boys loved them
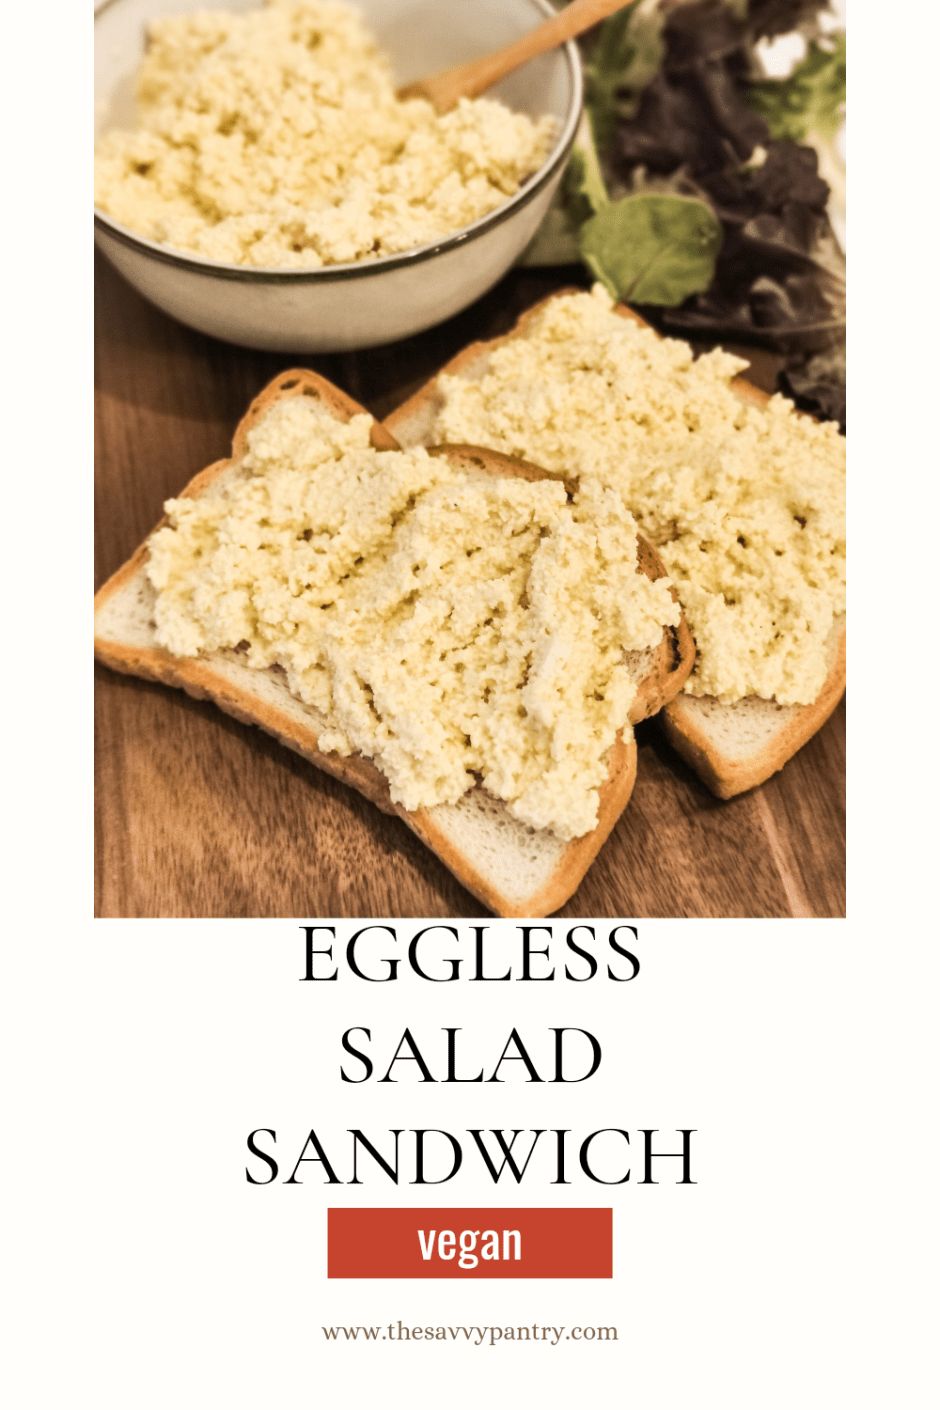
It’s finally summer, which means it is officially picnic season! We love to have picnics with the family either in our backyard or at the park because it’s a good way to get some fresh air, and honestly everything tastes better when it’s eaten outdoors! My family is currently loving this Eggless Salad Sandwich recipe and I’m happy to have partnered with Little Northern Bakehouse to bring you a gluten free sandwich you can share with your loved ones! In my recipe, I am using The White Wide Slice but you can use whichever gluten-free bread from Little Northern Bakehouse that you desire.
I use extra firm tofu and vegan mayo as a base and like to add different seasonings to switch things up. In this recipe I am using curry powder, but you omit and add other dried herbs such as chives, dill and parsley.
Leave me a comment on your favourite way to enjoy this gluten free eggless salad sandwich!
Now set forth and be savvy!
Ingredients
Makes 4 sandwiches
8 slices of The White Wide Slice Gluten-Free Bread from Little Northern Bakehouse
1 package extra firm tofu (340 g), drained
½ cup vegan mayo
2 tbsp Dijon mustard
½ tsp black salt (kala namak, optional)
1 tsp curry powder
1 stalk of celery, diced
1 stalk of green onion, sliced
Directions
Crumble the extra firm tofu into a food processor
Add the vegan mayo, Dijon mustard, black salt and curry powder to the food processor
Pulse until combined and resembles ricotta cheese. You don’t want to completely blend it smooth, otherwise you will end up with tofu dip!
Fold in the celery and green onion
Spread evenly onto 4 slices of toasted bread
Serve with favourite veggies, such as cucumber, lettuce or tomato
This can be kept in the fridge for up to 4 days, making it a great meal prep recipe
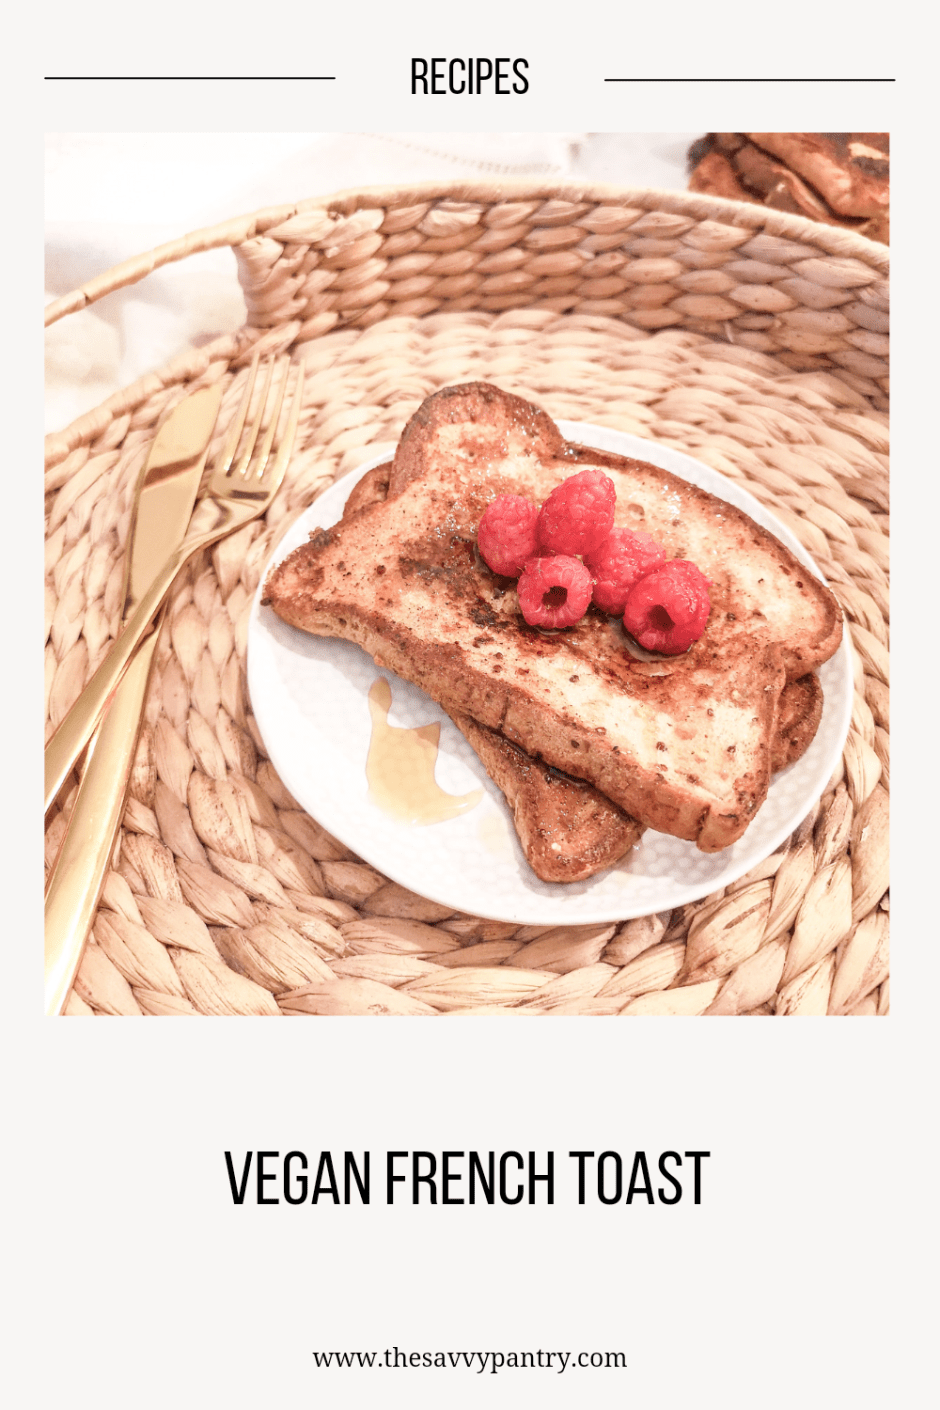
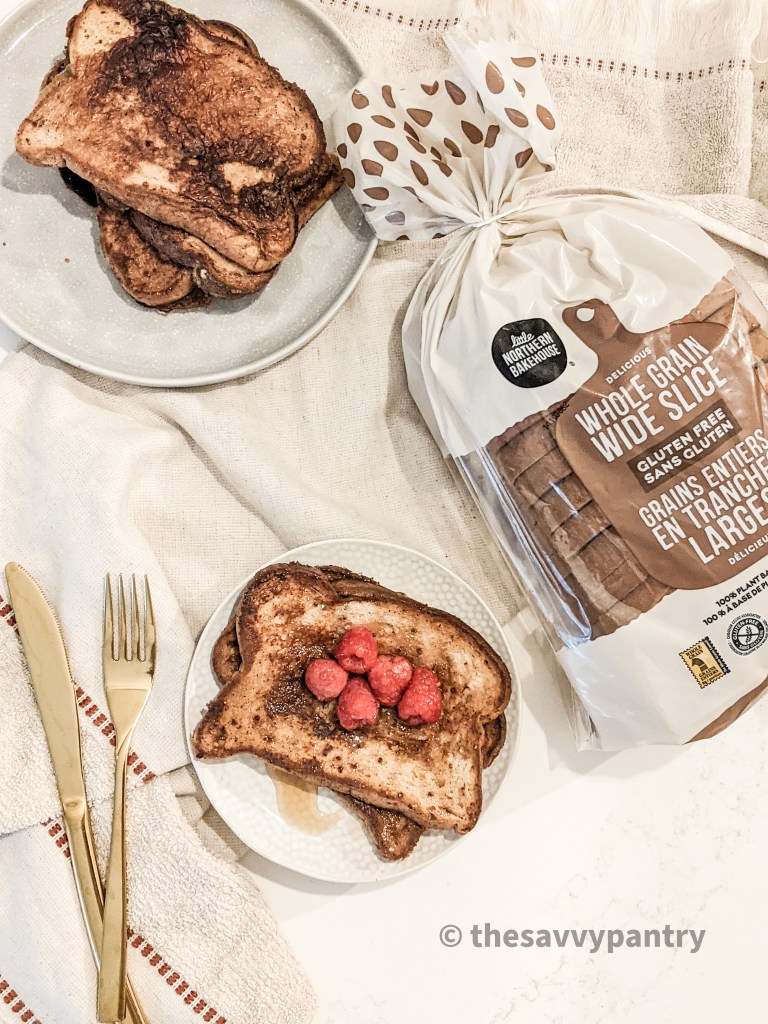
With the holidays right around the corner, I wanted to share an easy recipe you can include with any holiday breakfast or brunch! I’ve partnered with Little Northern Bakehouse who is sponsoring this post to bring you a super easy, gluten free vegan French toast recipe.
I love using the Whole Grain Wide Slice Gluten Free Bread in this recipe as it is both sturdy enough for frying and soft enough to absorb all of the French toast goodness.
Little Northern Bakehouse products are certified gluten-free, allergy-friendly (peanut and nut-free), non-GMO, and plant-based, making it suitable for any lifestyle. They can easily be found in your freezer section of the grocery store and in most natural food retailers. They are also certified as Glyphosate Residue Free and display the Bio-Checked Non-Glyphosate Certified seal, ensuring that consumers can feel confident that Little Northern Bakehouse products use third-party testing to confirm the absence of this chemical which The World Health Organization classifies as a “probable carcinogen,” or cancer-causing substance.
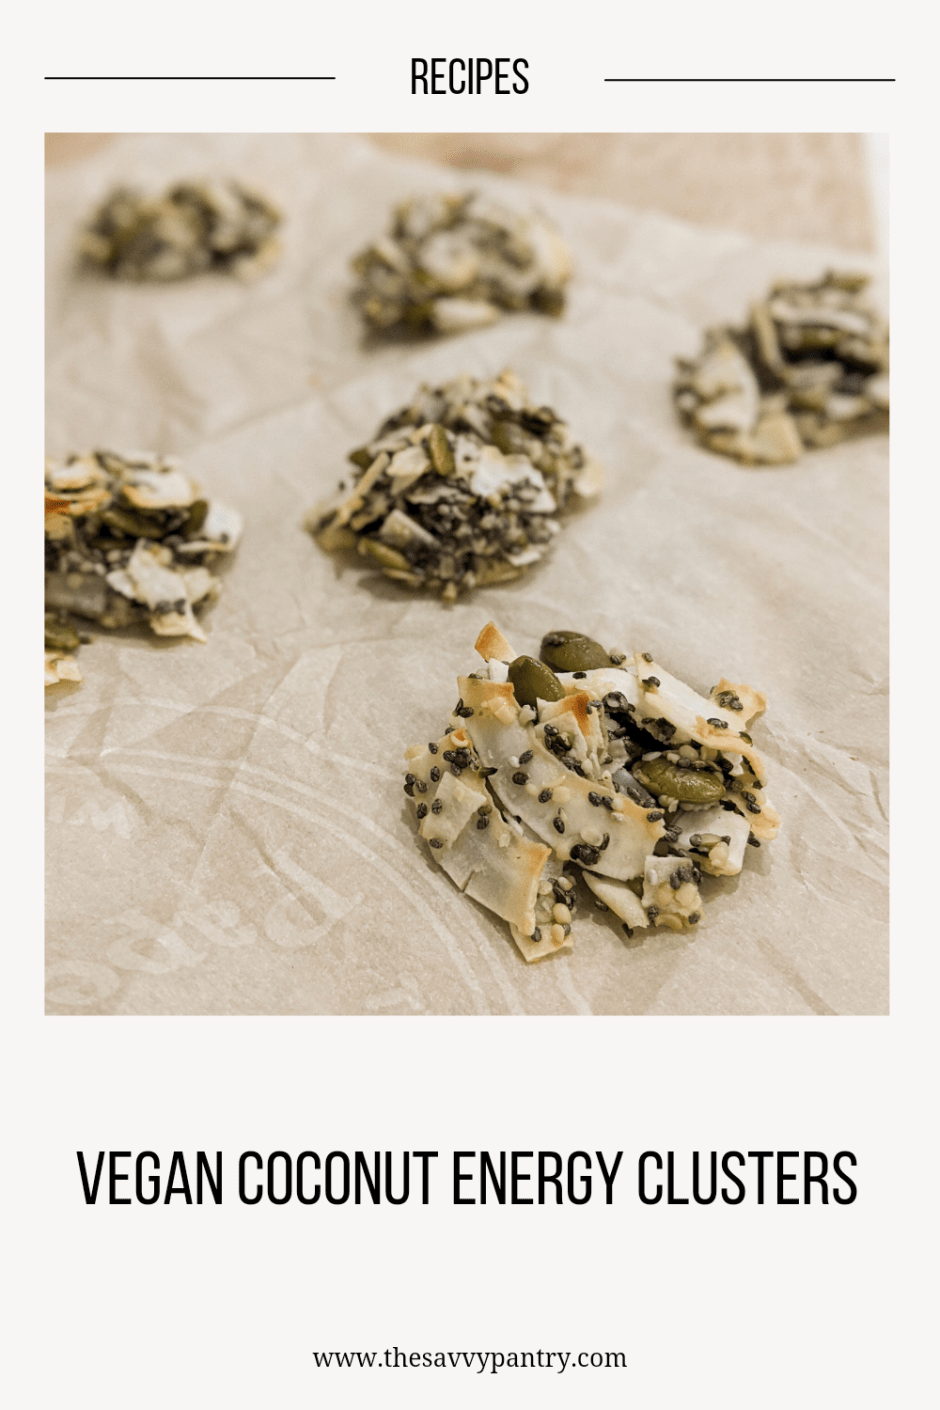
Having healthy snacks around the house for me is key to ensuring we don’t buy junk food impulsively. I created this recipe after seeing so many people rave about the Costco coconut clusters and knew I wanted to try making it for myself. I’ve never tried the Costco version, but I’m sure mine stands up to it well!
This recipe uses aquafaba (a.k.a bean water) as a binder along with chia seeds. I always have an abundance of aquafaba in the freezer from when I cook dried chickpeas, so I make a conscious effort to try to use it up.
These clusters are a perfect road trip snack and stays crunchy for days (if they last that long)!
I hope you enjoy this recipe as much as I do!
Now set forth and be savvy!
Ingredients
¼ cup maple syrup
¼ cup aquafaba
1 ½ cups flaked coconut, unsweetened
½ cup pumpkin seeds
¼ cup chia seeds
¼ cup hemp seeds
Directions
In a large bowl, combine the maple syrup and aquafaba and whisk until well combined.
Add the rest of the ingredients and mix until fully incorporated.
Let the mixture sit while you pre-heat your oven to 350 degrees.
Line a cookie sheet with parchment paper
Using a spoon, scoop out about a tablespoon (or 2) of mixture onto the parchment paper, about an inch apart.
Bake at for 10-12 minutes
Let cool completely before eating and placing them into a container for storage.
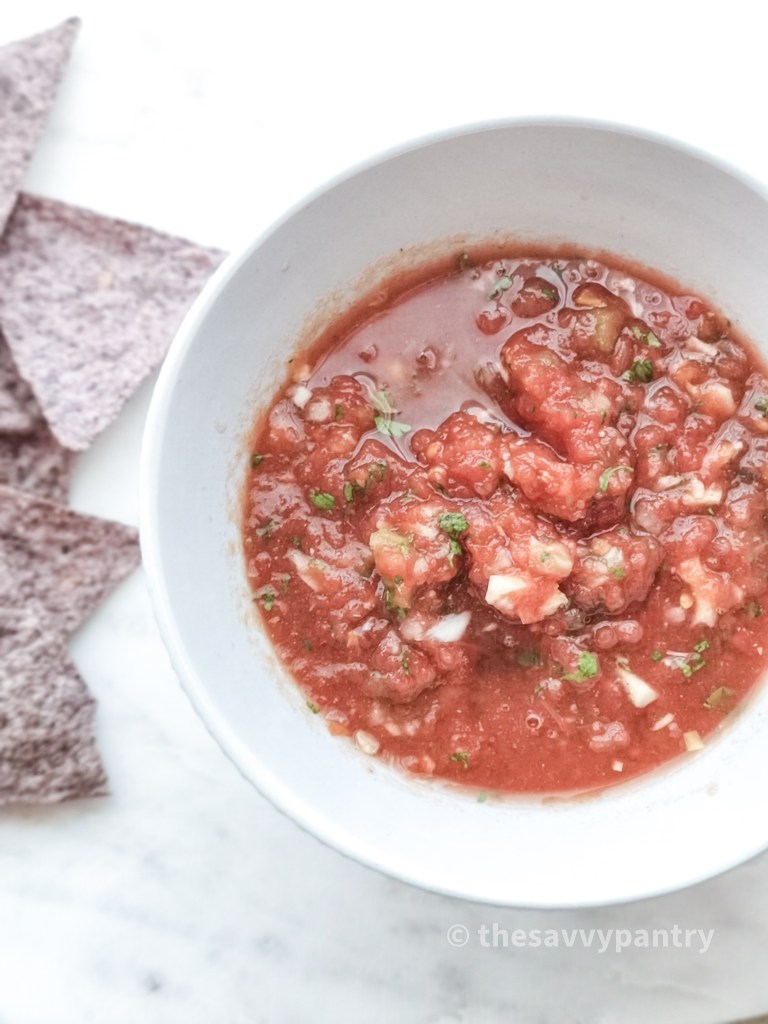
I love having a well stocked pantry so that I can whip up any recipe that my family is craving that week without having to go to the grocery store. One of my pantry staple recipes is this easy 5 ingredient salsa. The base of this salsa is canned diced tomatoes, and it uses ingredients that are already in my fridge and pantry. The only ingredient that we may or may not have is cilantro, but a quick hack is to save some in the freezer for last minute recipes like this one.
All of the ingredients are thrown into the food processor and is ready in less than 5 minutes. I love using this salsa to eat with tortilla chips, as a topping to tacos or even as a sauce for casseroles. Can be jarred and frozen for up to 3 months!
Leave a comment below on what you like to use this salsa with!
Now set forth and be savvy!
Ingredients
1 28 oz can of whole or diced tomatoes
3 cloves of garlic
1 jalapeno (seeded if you prefer less heat)
1 red onion
1 handful of cilantro
1 tsp cumin
½ tsp salt
Directions
In a food processor, add all of the above ingredients
Pulse for 30 seconds, ensuring that the salsa is chunky
You can freeze half of the salsa for a later use for up to 6 months in the freezer
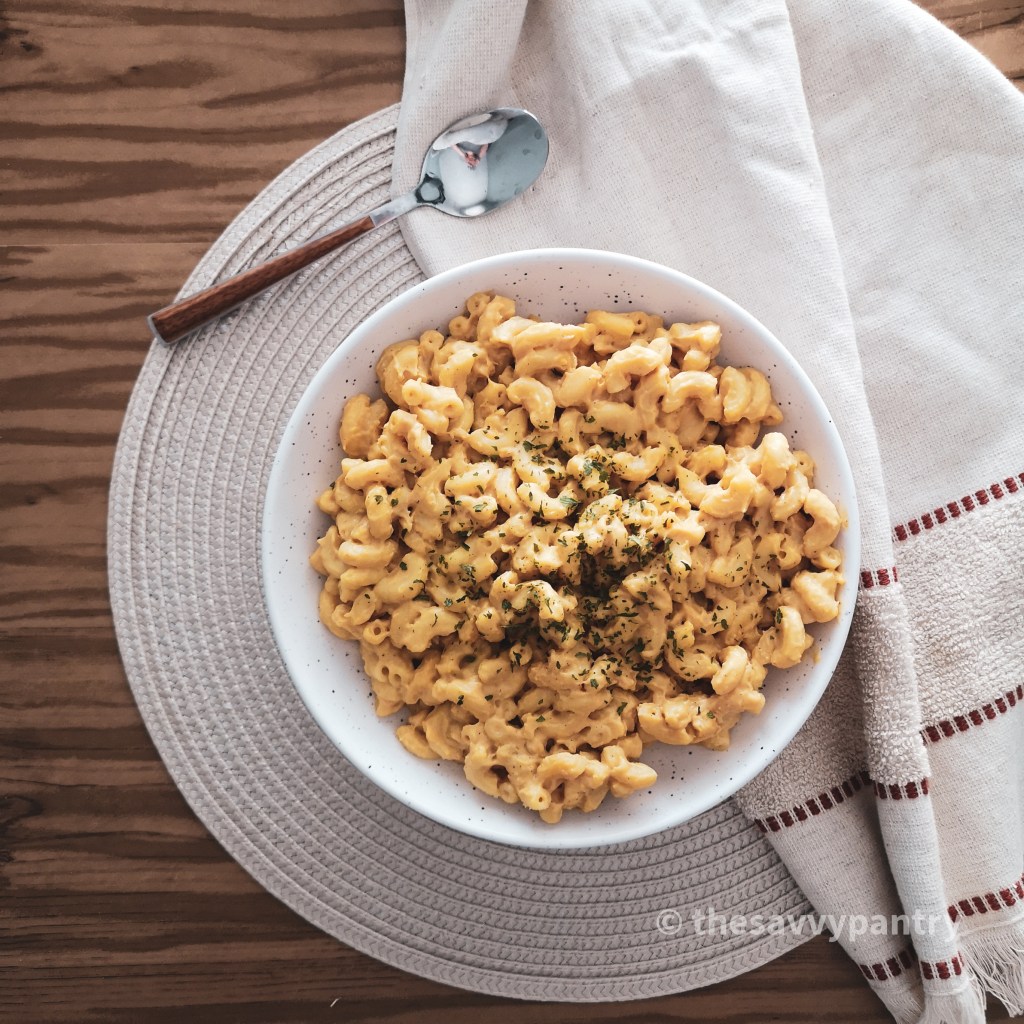
I am still making my way through using that frozen pumpkin from roasting my pumpkin from last Halloween. If you haven’t seen that blog post, be sure to check it out for the full tutorial.
This vegan pumpkin mac and cheese is creamy and earthy. You can serve it right out of the pot, or go the extra step and bake it with a nice crunchy top. I also served this to my 7 month old and he loved it!
Check out both variations down below!
Now set forth and be savvy!
Makes 4-6 servings
Ingredients
3 cups of elbow macaronic pasta (or pasta of your choice), dry
1 package silken tofu (300 g)
2 cups of pumpkin puree
¼ cup nutritional yeast
1 tbsp arrow root
1 tsp onion powder
1 tsp garlic powder
1 tsp dried mustard (or use 1 tsp Dijon mustard)
½ tsp dried sage
½ tsp salt
¼ tsp black pepper
2 cups vegan cheese
Topping (optional)
¼ cup panko bread crumbs
2 tbsp vegan parm (you can also just use 2 tsp nutritional yeast)
2 tsp dried parsley
1 tsp dried onion flakes
¼ tsp salt
Directions
Bring a large pot of water to a boil, and cook the pasta according to package instructions
In the mean time, blend the rest of the sauce ingredients in a blender until smooth
In a medium sized pan, heat the sauce mixture over medium heat until it just comes to a bubble, and heat through for about 5 minutes, stirring constantly so that it doesn’t stick to the bottom of the pot.
Add the cheese and stir until it is fully melted.
Take the sauce mixture off the heat, add the drained pasta. Mix to combine.
Serve with fresh parsley on top.
For the baked variation, pour the mac and cheese into a baking dish.
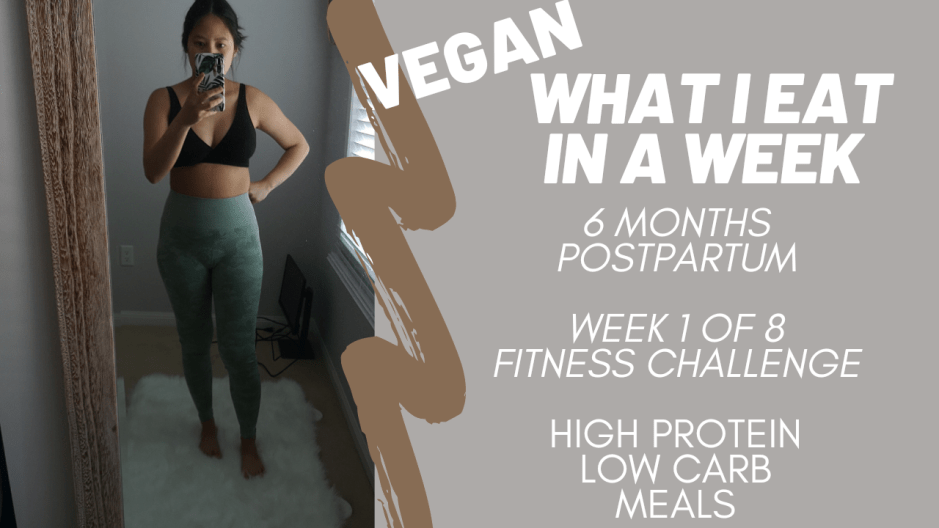
Fitness has always been an important part of my daily routine, even throughout my entire pregnancy. I worked out from 12 weeks of pregnancy all the way till I was 41 weeks pregnant! I’m glad that I did because I believe it helped me with the delivery and recovery of the pregnancy.
Although I had to modify my workouts while I was pregnant, I knew I wanted to really challenge myself and gain my strength back after 3 months postpartum. I began by working out every day and slowly building up my strength. When I was about 6 months postpartum, I decided to join Muse Fitness on an 8-week Beta Butt and Abs Challenge.
Follow me on my 8-week fitness journey as I regain my strength, endurance and most importantly my identity.
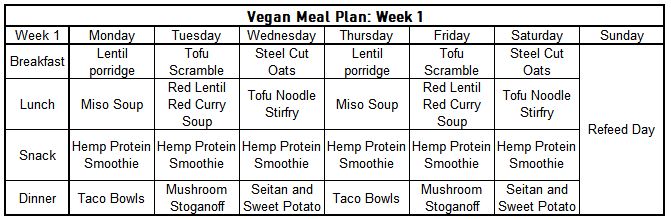
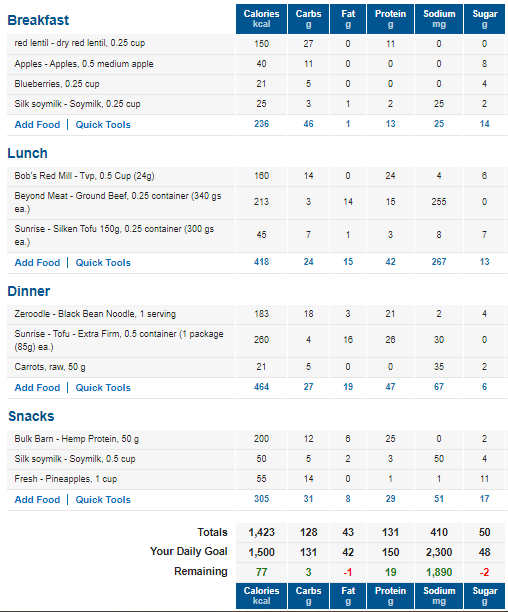
This week’s blog post and video showcases the 1st week of the challenge. See below for the meal plan I had during the week, which features high protein, low carb vegan meals, all while I am still exclusively breast feeding!
I have also included the macros break down for each day below!
Don’t forget to subscribe to watch my full transformation!
Serve immediately or can make it the night before.
Enjoy!
Makes 4 portions
Ingredients
1 cup red split lentils
2 cups water
2 apples, your choice, peeled, cored, diced and divided into 2 portions
1 tbsp ground cinnamon
2 tsp ground cardamon
1 tsp ground nutmeg
1 cups soy milk
Blueberries (optional)
Directions
Soak the lentils for 2 hours – red lentils do not need to be soaked longer than this, especially the red split lentils
When you’re ready to cook the lentils, drain and rinse the lentils until the water runs clear (about 3 times)
I like to use my rice cooker to cook this porridge and setting it to cook for 20 minutes. You can also do it over the stove top.
Stove top method:
Place lentils into your pot and add the rest of the ingredients except for the blueberries and diced apples pieces from 1 apple
Bring the pot up to a boil over high heat, stirring occasionally to prevent the lentils from sticking.
Turn the heat down to medium as soon as the pot comes to a boil and simmer the contents for about 20 minutes, until the lentils become tender.
Divide into 4 portions and top with the remaining apples and blueberries (optional)
I like to prep this in advanced and freeze it in portions so it’s easy to have in the morning.
Makes 1 portion
Ingredients
1 portion of Black Bean Noodles
1 tbsp white miso paste
1 ½ cups of water or homemade veggie broth (no sodium or oils)
½ block of extra firm tofu (175 g)
¼ cup shredded carrots (50 g)
3 head of baby bok choy, sliced in half
½ pack of enoki mushroom (your choice)
Handful of pea shoots, spinach or kale
handful of green onion for garnish
Directions
Book the black noodle pasta according to package directions, drain and set into a large soup bowl
Dissolve the white miso paste into ½ cup of the water/veggie broth in a medium sized pot
Once the miso is dissolved, add the rest of the veggie brother and the remaining ingredients (except for the green onion)
Bring to a simmer and cook until the veggies are cooked through
Pour over the noodles and garnish with green onion
Ingredients for bowl – Makes 4 portions
2 cups dried TVP, rehydrated in water
1 package of beyond meat ground beef
2 tbsp taco seasoning (I use homemade taco seasoning to control the salt)
½ cup water
1 tbsp soy sauce
1 tsp salt
Ingredients for sauteed mushroom and peppers – Makes 4 portions
1 red onion, sliced
1 clove of garlic, minced
2 bell peppers, sliced
1 package of mushrooms sliced
1 tsp dried oregano
1 tbsp soy sauce
¼ tsp salt
¼ tsp ground black pepper
Ingredients for cauliflower cilantro lime rice – Makes 4 portions
1 head of cauliflower
Juice of 1 lime
Handful of cilantro, chopped
½ tsp ground black pepper
Ingredients for vegan sour cream – Makes 4 portions
1 package of silken tofu (300 g)
Juice from 1 lemon
1 tbsp ACV
½ tsp salt
Directions for Taco Meat
To cook the taco meat, start by rehydrating the TVP in water, set aside
In a large frying pan, cook the beyond meat grounds over medium-high heat. I like to use a potato masher to break up the grounds.
Stir the meat so that it browns evenly, for about 5 minutes.
Drain the TVP and add it to the meat mixture. Stir to combine.
Add the rest of the ingredients for the taco meat and cook until the water is dissolved, about 5 minutes.
Portion into 4 equal portions
Do not clean out the pan – continue to the next step to cook the mushroom and peppers
Directions for Mushroom and Peppers
Using the frying pan from the taco meat (we will want to use the residual fat to cook the mushrooms and peppers), add the onion and garlic and cook over medium-high heat for about 3 minutes, just so that the veggies become fragrant
Add the sliced mushrooms and peppers and cook for about 5 minutes, until the veggies get a nice color on them. Depending on your stove top you might need to turn the heat down to medium.
Add the rest of the ingredients and cook for about a minute until all of the seasoning is well incorporated.
Portion into 4 equal portions adding it to the bowl of the taco meat
Directions for Cauliflower Cilantro Rice
Chop the cauliflower into bite sized pieces
Add it to the food processor and pulse until you get a rice consistency
In a clean pan, add the riced cauliflower along with the remaining ingredients and stir until the cauliflower is cooked. You might need to add a splash of water to help steam and cook the cauliflower rice – about 7 minutes
Portion into 4 equal portions and add it to the bowl of the taco meat, mushrooms and peppers
Directions for Vegan Sour Cream
Add all of the ingredients into a food processor and blend until smooth
Portion into 4 equal portions and serve on top of the taco bowls.
Enjoy!
See below for the full day of macros for Monday/Thursday:
Ingredients – Makes 3 portions
1 tsp oil
1 clove of garlic, minced
1 package extra firm tofu (350 G), crumbled
3 tbsp nutritional yeast
½ tsp ground turmeric
½ tsp black salt
¼ tsp ground black pepper
1 tbsp water
Directions
Heat oil over medium heat in a large frying pan
Add the garlic and cook for about 3 minutes
Add the rest of the ingredients except for the water, and stir to combine.
Continue to cook the tofu mixture over medium heat for about 7 minutes
Add the water and cook until the water has dissolved
Portion evenly into 3 containers
Ingredients – Makes 6 portions
2 cups red lentils
1 can full fat coconut milk
2 tbsp garam marsala
½ tsp ground coriander
½ tsp ground ginger
½ tsp ground turmeric
1 tsp salt
1 tbsp soy sauce
4 cups of water
Directions
Rinse the lentils in a strainer until the water runs clear, about 3 times
In a large frying pan, heat the coconut cream from the can of coconut milk by taking a spoon and scooping a spoonful of cream from the top layer
Sautee the spices (except the salt) in the coconut cream over high heat until fragrant, about a minute
Add the lentils, the rest of the coconut milk, salt, soy sauce and water and bring up to a boil.
Once the pot is boiling, turn it down to a simmer and cook until lentils are fully cooked, about 20 minutes.
Divide into 6 portions. You can also serve this with cauliflower rice.
Ingredients – makes 4 portions
1 package of silken tofu (300 g)
1 ½ cup vegan beef broth
1 package vegan ground beef (I used lightlife for this recipe)
2 cups dried TVP, rehydrated in water
1 onion, diced
3 cloves of garlic, minced
1 package mushrooms (227 g)
2 cups chopped kale
2 tbsp soy sauce
1 tsp black pepper
1 package high protein pasta (I used Liviva Soy Fettuccini)
Directions
In a blender, blend together the silken tofu and vegan beef broth – set aside
In a large non-stick skillet over high heat, add the vegan ground beef
Break apart so that they resemble a crumble and sautee for 3 minutes
Add in the onion and garlic and sautee for another minute
Add in the mushrooms and continue to sautee for 2 minutes
Lower the heat to medium and add in the rehydrated TVP (if there is extra water, drain the TVP before adding the mixture)
Mix the protein until it is well combined
Add in the kale, soy sauce and black pepper and continue to stir until the kale is wilted and well incorporated
Add in the silken tofu mixture and mix until well combined with the meat mixture – it should be creamy and not watery
Add salt to taste
Divide equally into 4 portions
Serve on top of high protein pasta
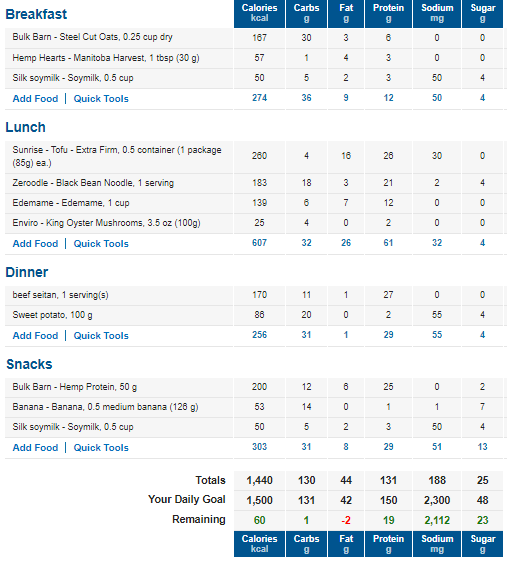
See below for the full day of macros for Tuesday/Friday:
Ingredients – makes 4 portions
1 cup steel cut oats
2 cups soy milk
2 cups water
¼ cup hemp hearts
Directions
I like to cook my steel cut oats in a rice cooker, but you can use a slow cooker or instant pot as well
Pour all of the ingredients into the container of a rice cooker, slow cooker or instant pot
For rice cooker and instant pot method: Select the function which automatically cooks oats
For slow cooker method, cook on low for 6 hours
Portion evenly into 4 containers, heat in the microwave or stove top with water before serving. Can be frozen for easy breakfasts as well!
Ingredients – makes 1 portion
1 serving of high protein black bean noodles
1 cup edamame
1 king oyster mushroom, sliced (or mushroom of your choice)
Handful of spinach, kale or bok choy
1 tbsp soy sauce
½ block of extra firm tofu (about 175 G), cut into cubes
Directions
Cook the black bean noodles according to packed directions. Cook the edamame in the same pot to save time and water
Once the pasta is done cooking, drain and set aside
In a non-stick frying pan, add the sliced mushrooms and cook over medium heat until it gets color, for about 3 minutes
You may need to add a splash of water if your mushrooms are sticking
Add in your greens, the sou sauce and the tofu and cook until the greens are wilted and the tofu is cooked through, about 5 minutes
Add the pasta and edamame to the pan and toss until combined.
Serve hot or can be eaten cold. Goes great with hot sauce on the side!
Original seitan recipe found at Connoisseurus Veg – makes 4 portions
Ingredients for seitan dough
1 cup vital wheat gluten
¼ cup quinoa flour
1 cup water
Ingredients for beef flavour broth
5 ½ cup homemade veggie discard broth
½ cup red wine vinegar
2 tbsp vegan Worcestershire sauce
1 tsp dried thyme
½ tsp onion powder
½ tsp granulated garlic powder
1/3 tsp black pepper
Directions to make seitan
In a large bowl, mix the vital wheat gluten and quinoa flour together
Add in the water and stir with a wooden spoon until a soft dough forms
Knead the dough for 5 minutes by hand, or in a stand mixer
Let rest while you prepare the broth – you can also prepare the seitan the night before and let it rest in the fridge overnight
Place all of the ingredients for the broth in a medium sized pot (not too large since you will need enough liquid for the dough to be submerged)
Set the temperature to high and let the broth come to a boil
Meanwhile, divide the dough into 4 equal portions, shape into mini loaves
Once the pot comes to a boil, lower the heat to low so that there is a steady simmer
Carefully lower each piece of dough int the simmering broth and let simmer for 1 hour, with the lid slightly ajar
The dough should double in size during the cooking process
Once an hour has passed, remove the seitan from the pot and let cool on a rack.
I stored the seitan immediately in the freezer after I let it come to room temperature.
Take out the night before serving
Can be sliced, cut into chunks, marinated. I left it as a “steak” and served it with a mix of soy sauce and miso, baked in the oven over medium
Tip for the left-over broth – store it in a jar and save it to be used in the vegan stroganoff recipe above
See below for the full day of macros for Wednesday/Saturday:
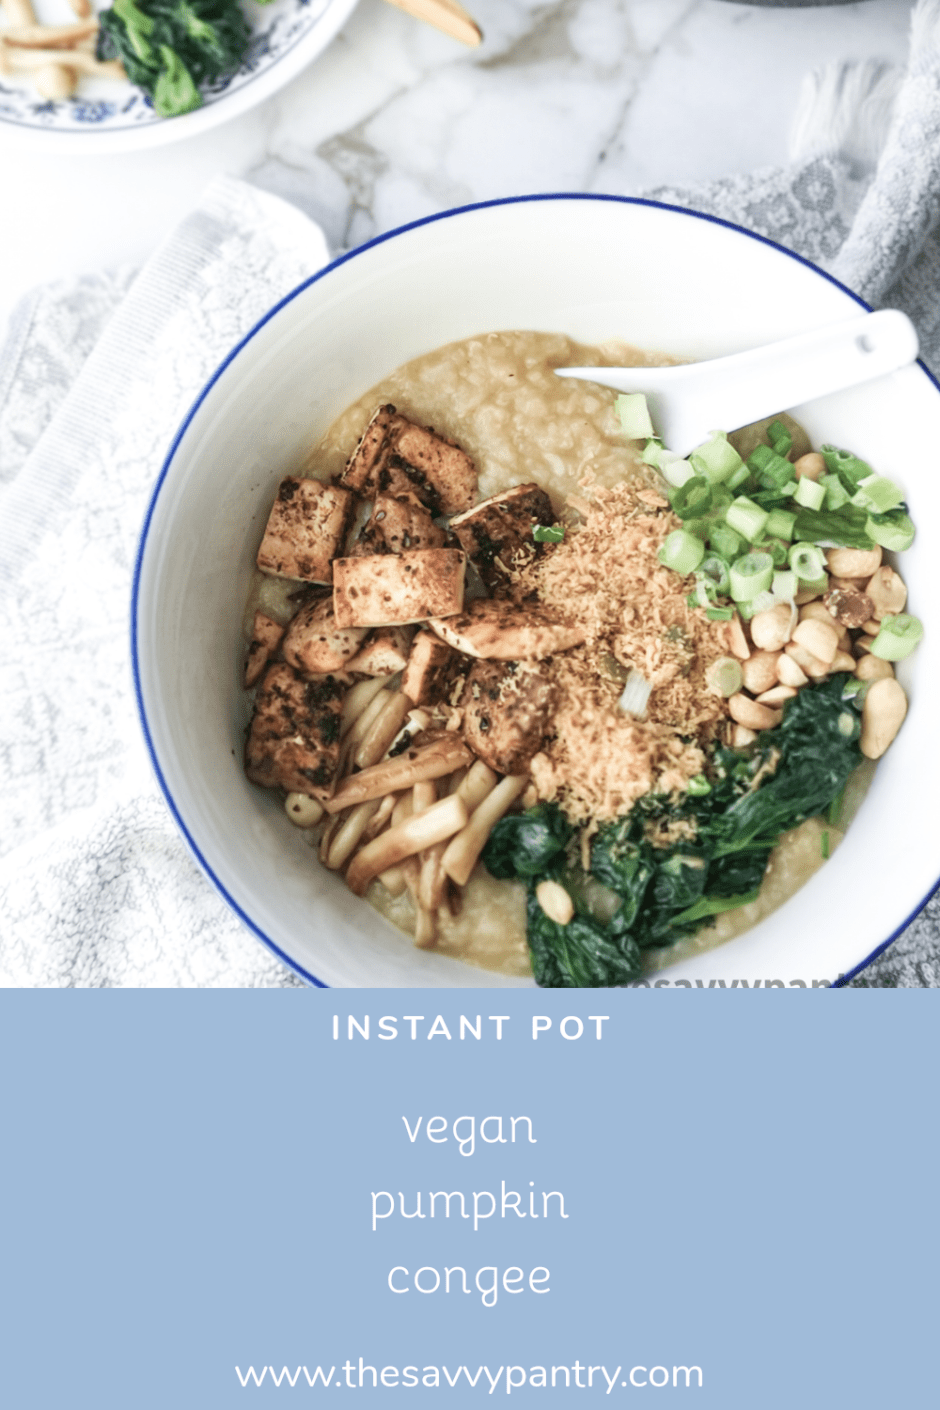
Winter is now upon us, which means it is congee season in my household. If you haven’t heard of congee before, it is a Chinese rice porridge, usually made with leftover rice. Growing up, my grandparents made congee almost every weekend in the wintertime, and we could expect a big batch after major holidays, when they would make the congee using leftover Turkey meat and bones.
Since we don’t usually have leftover rice and are primarily plant based in our home, I like to use half uncooked rice and half lentils to bulk up the protein and nutrients. I also like to add shiitake mushrooms to really give the congee a depth of flavour.
This congee can easily be made in an instant pot the day of or a slow cooker the night before so that it’s ready for breakfast/lunch.
If you haven’t seen my last video on how I roast a Jack-O-Lantern pumpkin, check it out here (https://bit.ly/34it2mq). I repurposed the pumpkin by adding it to this congee recipe to add extra creaminess and nutrients. I also love topping it with Chinese fried donut, sauteed snow pea shoots and peanuts. Let me know in the comments below what your favourite toppings are!
Now set forth and be savvy!
~makes about 8 large servings
Ingredients
6 dried shiitake mushrooms
1 cup uncooked jasmine rice (or whatever rice you have)
1 cup red lentils
12 cups water
1 2-inch nub of ginger
2 tbsp soy sauce
1 tbsp mushroom powder
2 cup pumpkin puree
Salt to taste
Directions
Re-hydrate the dried shiitake mushrooms by placing them in a bowl and cover with hot water – set aside for 30 minutes
Place 1 cup of uncooked jasmine rice in your instant pot container and rinse 3 times until the water runs clear. To rinse, fill the pot with some water so that you have room to massage the rice for 30 seconds, pour out the water (or reserve the water to water your outdoor plants) and repeat 2 more times.
Once the rice is washed, place the container into the instant pot machine and add the water, red lentils, ginger, soy sauce and mushroom powder
Slice up the shiitake mushrooms and add to the pot along with the water
Place the lid on and ensure that the nob at the top is set to “sealing” and not “venting”
Turn the instant pot on and select the “Porridge” function, increase the time to 30 minutes
Once the instant pot is done cooking, allow the pressure to decrease naturally – you will know that there is no more pressure once the red nob has descended. You can also turn the nob to “venting” to ensure there is no more pressure.
Remove the lid and stir the congee – it can be served immediately
Every year, like so many other households, I like to purchase the biggest pumpkin that I can find to signal to trick-or-treaters that we are giving out candy. If the pumpkins are really cheap, like a few dollars cheap, I like to purchase 2! I don’t carve the pumpkins or decorate them, but sit them on my porch since they are a decoration piece in itself.
Once Halloween is over, I love to cut them open and roast the seeds as a healthy snack. You may not have already known this, but you can actually roast the meat of a Jack-O-Lantern pumpkin as well! These pumpkins have been cultivated to grow larger, and therefore have a larger water content than pie pumpkins, however they are still full of nutrients even if the pumpkin flavour is more subtle.
Of-course being the eco-warrior that I am, I never let a Jack-O-Lantern pumpkin go to waste! Because they are high in fiber, vitamin C, potassium, vitamin E and iron, to name a few, they are perfectly fine to eat in sweet or savoury recipes.
I like to roast the flesh, puree it in my Vitamix and freeze it so that I always have roasted puree on hand! I use the puree in various recipes, such as the below:
Follow the directions below on how you can roast your own Jack-O-Lantern pumpkin and enjoy it long after Halloween is over. Also check out my video tutorial to see how easy it is.
Now set forth and be savvy!
Ingredients
1 Jack-O-Lantern pumpkin
Oil
3 Baking Dishes
Directions
Pre-heat oven to 400 degrees
Cut the pumpkin in half and scoop out all of the seeds – reserve for roasting and snacking
Cut each half into smaller segments to allow the pieces to fit into the roasting pans
Coat the bottom of 2 (or 3, depending on the size of your pumpkin) roasting pans with oil
Drizzle some oil onto the flesh of each pumpkin segment and rub generously
Place each pumpkin segment flesh side down (skin side up) onto the roasting pan
Feel free to season with salt and pepper – however, since I like to use the roasted pumpkin for both sweet and savoury recipes, I leave out the salt and pepper
Roast in the center of the oven for 50-60 minutes, rotating at the halfway mark; you may also want to put a baking sheet on the lowest rack in case there is spillage from the pumpkins when roasting
Once done, remove from the oven and let it cool down enough so you can handle it, overnight if you can (I just leave it in the oven over night and deal with it in the morning)
Carefully scoop out the flesh from the skins with a spoon and add to a blender or food processor – blend/process until smooth, about 30 seconds; discard the pumpkin skins
Note that there could be liquid at the bottom of the roasting pans from the pumpkins– you can keep this liquid and add it to soups or stews as a broth or add it to smoothies
Store in the freezer for up to 3 months
I was able to get about 14 cups of pureed pumpkin! Can be stored in the fridge for up to a week, or in the freezer for 6 months.
In a recent attempt to clean out my pantry, I noticed a small jar of macadamia nuts that I had purchased but never used. Since my husband is currently laid off and watching the babe, I decided to bake some cookies. Since my husband has lots of interviews this week, I decided that it would be best to get as much baking done while I can and to have them readily available in the freezer, since my time will be all consumed with watching the little one again.
1 cup softened unsalted vegan butter (I like to use Melt or Becel sticks)
1 cup brown sugar
1/2 cup granulated sugar
1 tsp vanilla extract
2 cups all purpose flour
1 tbsp arrowroot starch (optional, I find it adds chewiness)
1 tsp baking soda
1/2 tsp salt
1 cup white chocolate chips
1 cup chopped macadamia nuts
Directions
Preheat your oven to 350 degrees
Make your flax egg by mixing the ground flax seed and hot water in a bowl, set aside
In a stand mixer (or by hand), cream together the unsalted vegan butter with the brown and granulated sugar.
Add in the vanilla extract and the flax eggs and mix until well combined, scraping down the sides of the bowl
Add in your flour, arrowroot starch, baking soda and salt and continue mixing until the flour is well incorporated
Taking it off the stand mixer, mix in your white chocolate chips and macadamia nuts.
With a mini cookie scooper, scoop out the dough onto a baking sheet lined with parchment paper. Make sure to space the cookies about 2 inches apart since they will spread
Bake for 12 minutes, rotating the trays halfway through
Let the cookies cool on the baking sheet for about a minute before transferring onto a cooling rack