
Hey Savvys!
With spring finally in the air, there will undoubtedly be many events such as baby showers, bridal showers, weddings and birthdays. I myself recently hosted my sister’s bridal shower in May where she requested a garden themed shower. This would have been so easy and perfect to host in our parent’s backyard, however being in Canada where the weather is very unpredictable, we decided to host it indoors. This decision made my creative and savvy side perk up as I hunted for easy and budget friendly garden inspired DIY’s.
The need for easy and budget friendly garden inspired DIY’s has given rise to this series of 4 DIY’s worth making for any engagement this spring and summer.
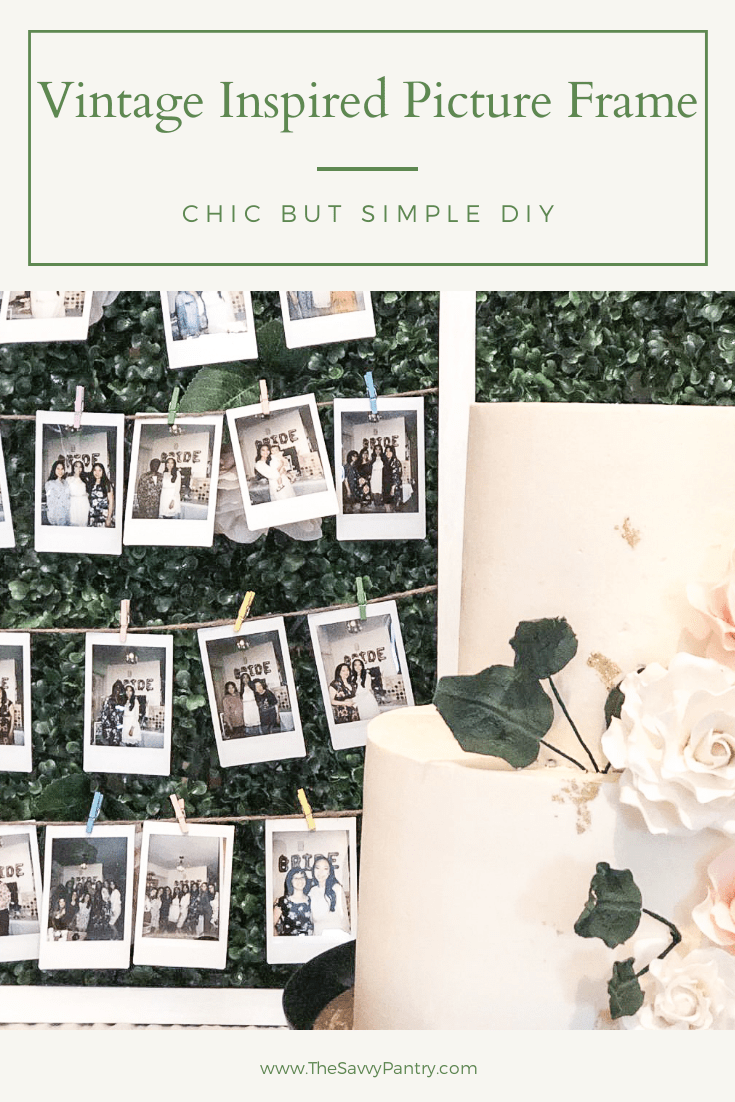
The first DIY of this series is this vintage inspired picture frame to hold your photos in. This idea came to mind when I was trying to come up with a low waste yet memorable activity that the guests can participate in while allowing my sister to have a keepsake of. The thought of a photo booth came to mind, but since I wanted my sister to have a keepsake that she could remember the day by, a picture frame was the perfect solution to both providing the guests with a way to be engaged at the shower while creating a gift of memories for my sister to have and reflect on.
This frame was super easy to make using a thrift store frame and some craft supplies. It was also super convenient because a couple of our cousins already owned Polaroid cameras so all we had to do was purchase the film. I was also happy that this project’s total cost was approximately $28, though I would probably say it actually cost $10 since I can reuse the other materials for future DIYs.
Materials you will need for this project:
- Picture frame, any size and color of your choice. I purchase a 16 in x 20 in frame for $7 from the Salvation Army
- Paint brush
- White latex paint, $10 from Walmart (only needed if you didn’t purchase a white frame)
- White push pins, $5 from Walmart
- Twine, $5 from Michaels
- Mini wooden photo pins, $1.25 from Dollarama
- Hot glue gun and glue stick
Directions
- I used a 16 x 20 in frame but you can use which ever size that suits your needs. Carefully remove the cardboard backing and glass from the frame since we want only the frame part. When removing the classy, carefully pop it out from the frame as it could be sharp, and save it for another DIY. I tapped the glass with the cardboard backing to protect the glass from breaking and stored it in my basement for another DIY. Using a butter knife, flatten out the metal pieces that help keep the glass in place and smooth out any sharp edges by making it flush with the frame.
")
")
")
- If you’re frame is already white, you can skip this step. When painting indoors, I like to tape a garbage bag to my dining room table to protect it from any paint stains. To make my black frame white, I used 2 coats of white paint. Don’t forget to paint the other side so that the entire frame is white. Let dry for 2 hours.
- After the frame is dried, you will need to measure out the space you want between each piece of twine. You will want this space to be wide enough for the clothes pin and the picture. Since my frame is 20 in long, I wanted 4 rows so I made 5 inch spaces between each row. Measure along the long side of your frame and mark with a pen where you want your rows of twin to be. Don’t forget to measure twice to be sure that that is where you want the rows.
")
")
")
- Cut enough twine so that you make a knot on each end (since the frame is 16 in wide, you can probably cut 16 in pieces. Pin the knot to the frame using the white push pins. The knot helps secure the push pin to the frame and prevents the twine from falling out. For extra measure I had also hot glued around the pin to make the twine sturdy. Don’t forget to test the mini pin and photo to ensure you have enough space in between before proceeding with the next row.

Hope you guys enjoyed this DIY. Don’t forget to tag me @thesavvypantry in your DIY so that I can see your projects.
Now set forth and be Savvy!

One thought on “Vintage Inspired Picture Frame”