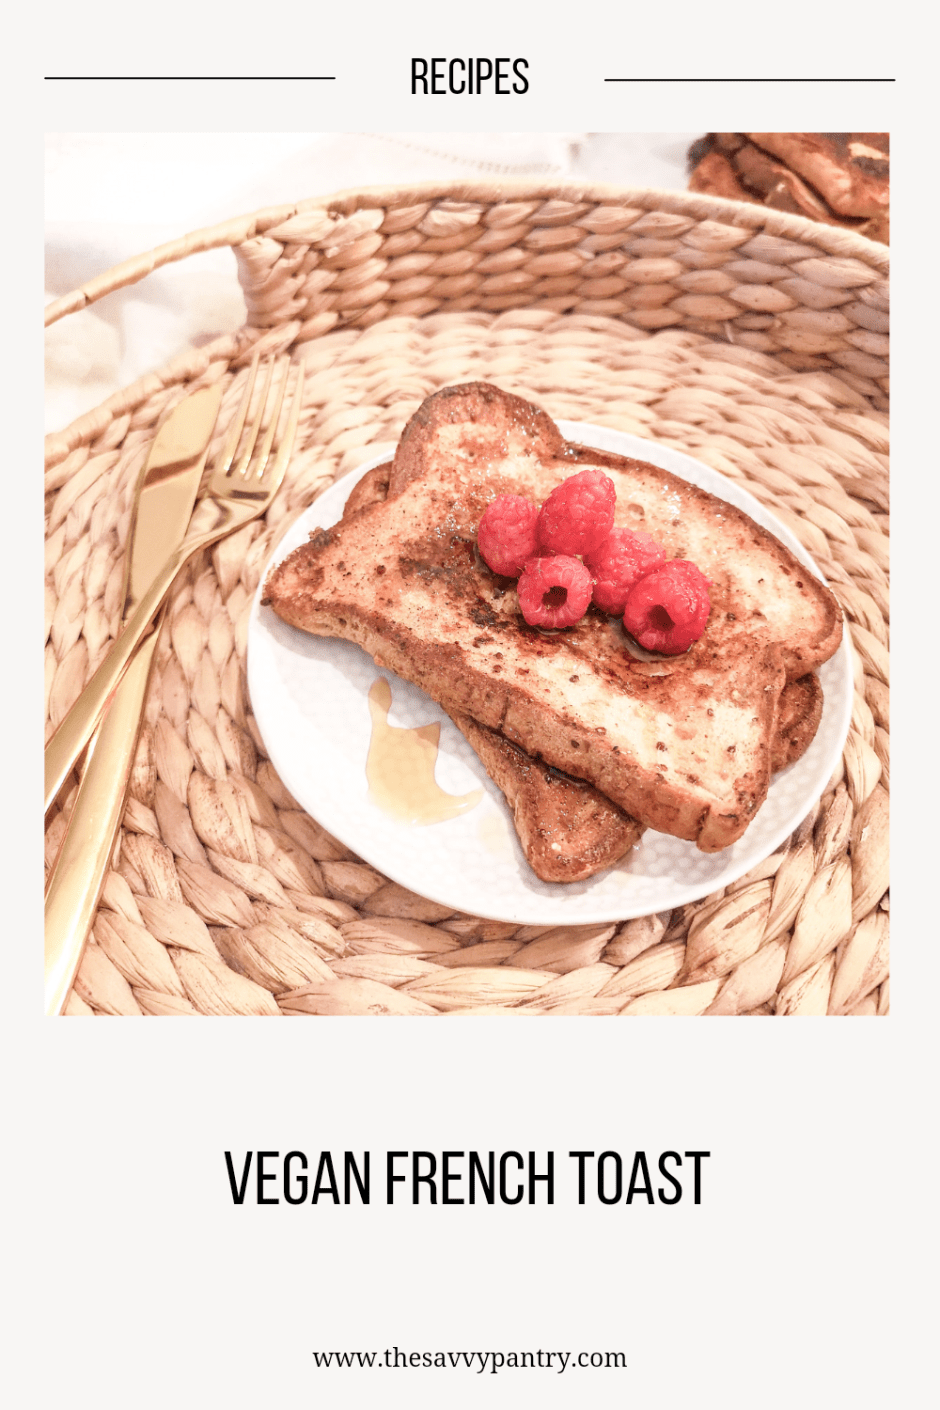
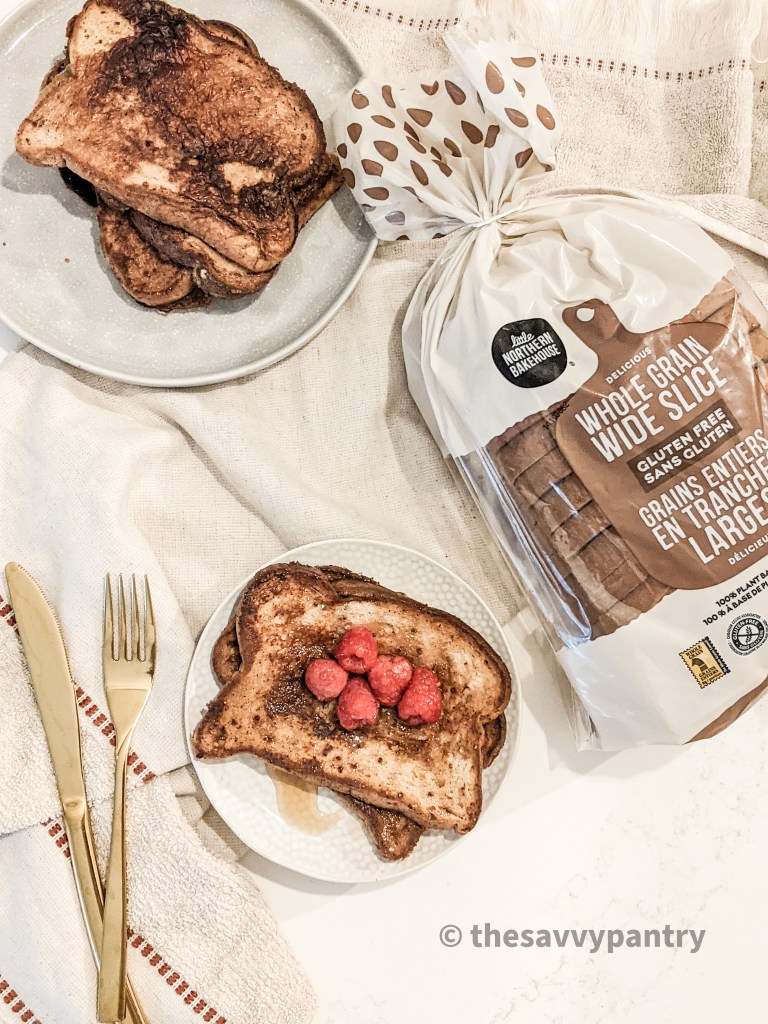
With the holidays right around the corner, I wanted to share an easy recipe you can include with any holiday breakfast or brunch! I’ve partnered with Little Northern Bakehouse who is sponsoring this post to bring you a super easy, gluten free vegan French toast recipe.
I love using the Whole Grain Wide Slice Gluten Free Bread in this recipe as it is both sturdy enough for frying and soft enough to absorb all of the French toast goodness.
Little Northern Bakehouse products are certified gluten-free, allergy-friendly (peanut and nut-free), non-GMO, and plant-based, making it suitable for any lifestyle. They can easily be found in your freezer section of the grocery store and in most natural food retailers. They are also certified as Glyphosate Residue Free and display the Bio-Checked Non-Glyphosate Certified seal, ensuring that consumers can feel confident that Little Northern Bakehouse products use third-party testing to confirm the absence of this chemical which The World Health Organization classifies as a “probable carcinogen,” or cancer-causing substance.
This pregnancy has been so different when compared to my first – I have more aches and pains, less energy, felt more nausea in the first trimester, to name a few symptoms. I am also craving more sweets than before, which is very new because I usually prefer savoury snacks.
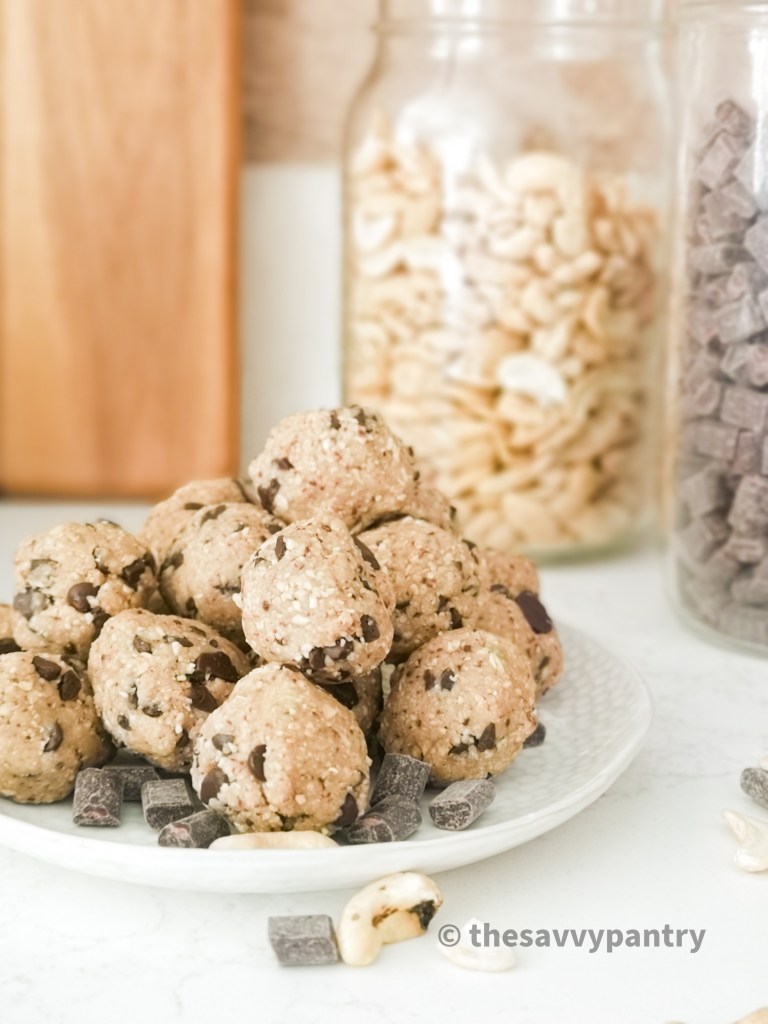
Because I strive to have healthy treats in the house, I decided to make this Cookie Dough Energy Ball recipe to have readily available in the fridge and freezer for all of those mid-afternoon sweet cravings. These are especially delicious alongside a matcha or raspberry leaf tea (to help prepare for birth). Ezra even loves these, calling them “cookies”, so the name is well suited!
Usually energy balls require nut butters, but I wanted to make something more accessible with things I had already in my pantry, such as whole roasted cashews, oats and mini chocolate chips.
Try out this recipe and be sure to have a stash in the freezer for when you’re also craving something sweet, but healthy!
Now set forth and be savvy!
Makes about 20 energy balls
Ingredients
1 cup unsalted cashews (roasted or unroasted, use whatever you have on hand)
3 tbsp maple syrup
½ cup almond flour
¼ cup rolled oats
¼ cup mini chocolate chips
Directions
Start by creating the base, which is essentially a cashew butter. In a food processor, add the cashews and maple syrup and process until a smooth butter forms, about 1 minute
Add in the rest of the ingredients except for the mini chocolate chips and process until a dough forms
Once a dough forms, you can either mix in the chocolate chips by hand or pulse them into the dough just until incorporated
Using a mini cookie dough scoop, make the energy balls by rolling them out in your hand
Store in the fridge for up to 1 week or in the freezer for even longer (we usually ate them up in a month!)
I am finally getting around to putting together a blog post about the details around our kitchen renovation that we completed back in September 2021.
I am so happy that we finally did it after living in our small 1100 sq foot townhouse for over 5 years. Originally, since Milton, Ontario was seeing huge increases in sale prices of homes, especially in townhomes , we were looking to upgrade our home during the pandemic. However there were so many bidding wars and even if we were able to sell our house, it was very hard to find a home that we wanted to upgrade to.
The pandemic allowed us to save loads of money we would have otherwise used for travel and decided to invest it in our kitchen and our home when we decided to stay, at least for a little bit longer. Even though Ezra was only a year old when we started construction, as well as us working from home full time. he actually adapted really well and it worked out for us in the end. We had set up a little station where we were able to to live on the top floor and utilize our bedrooms as different play stations for him. I was especially proud because out of the 6 weeks that it took to complete our kitchen renovation, I was able to make the majority of our meals at home – I think we only ended up ordering once or twice during the entire process!
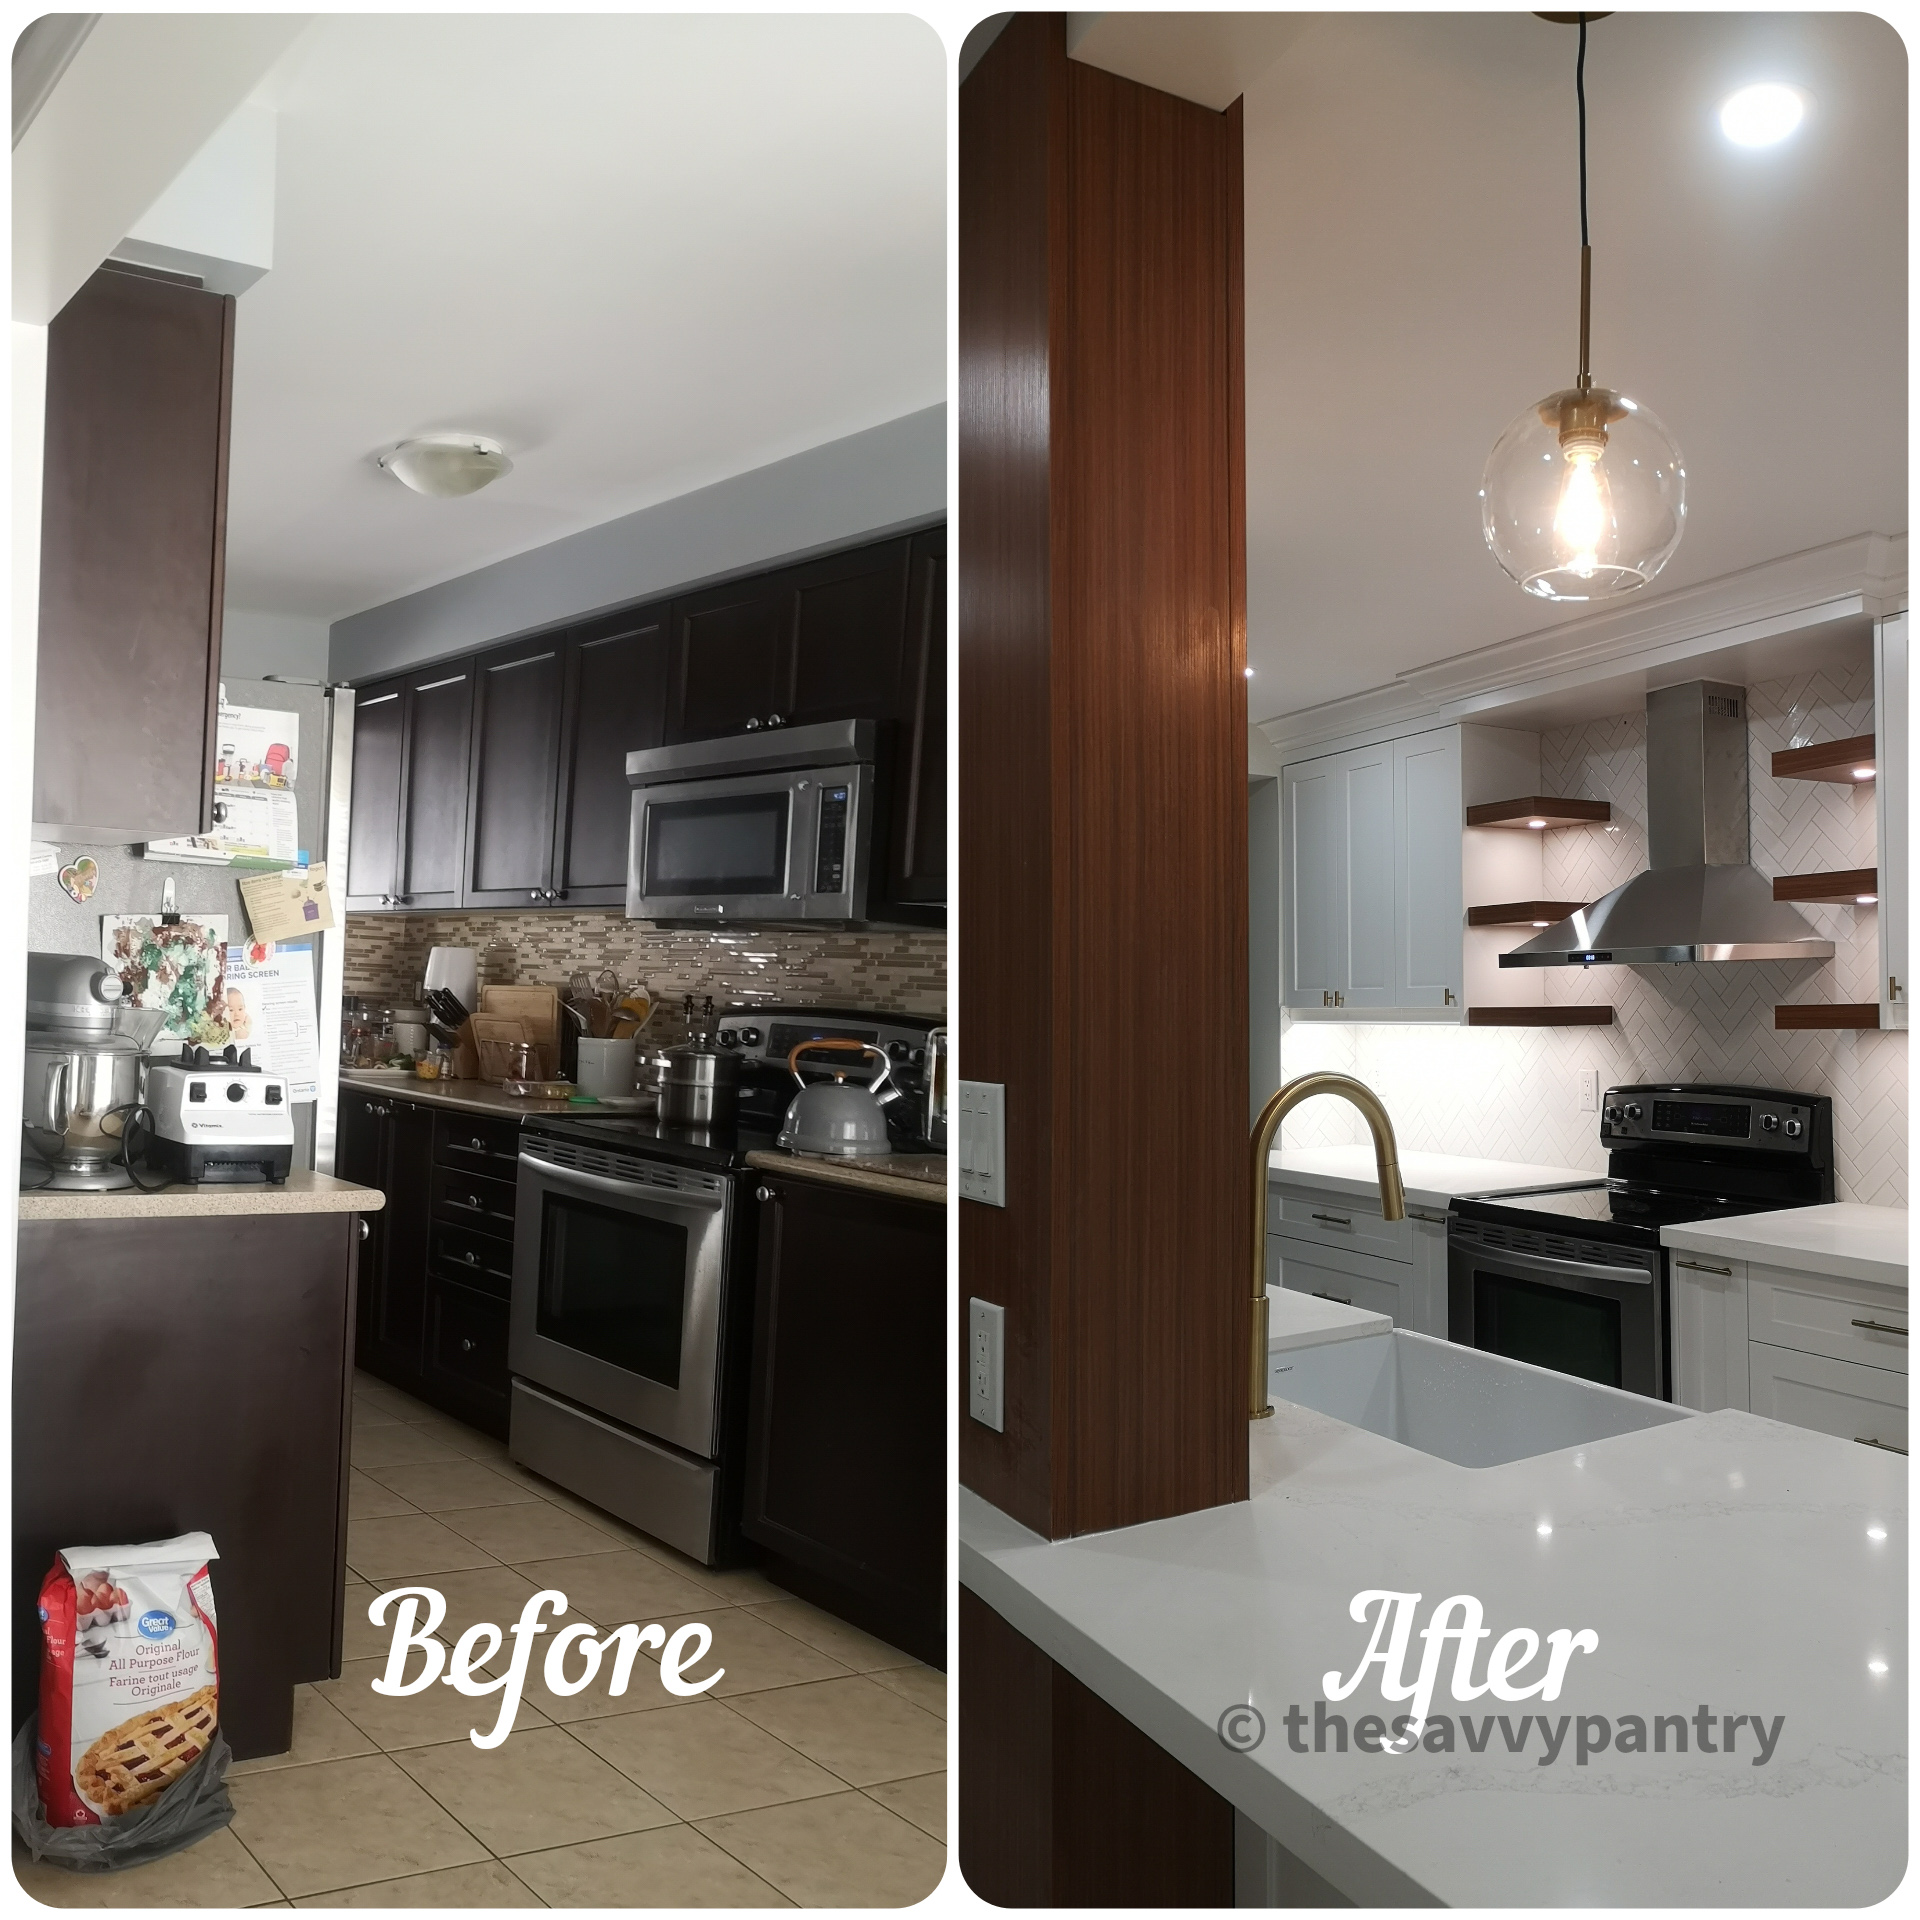
See below for the details of our before and after!
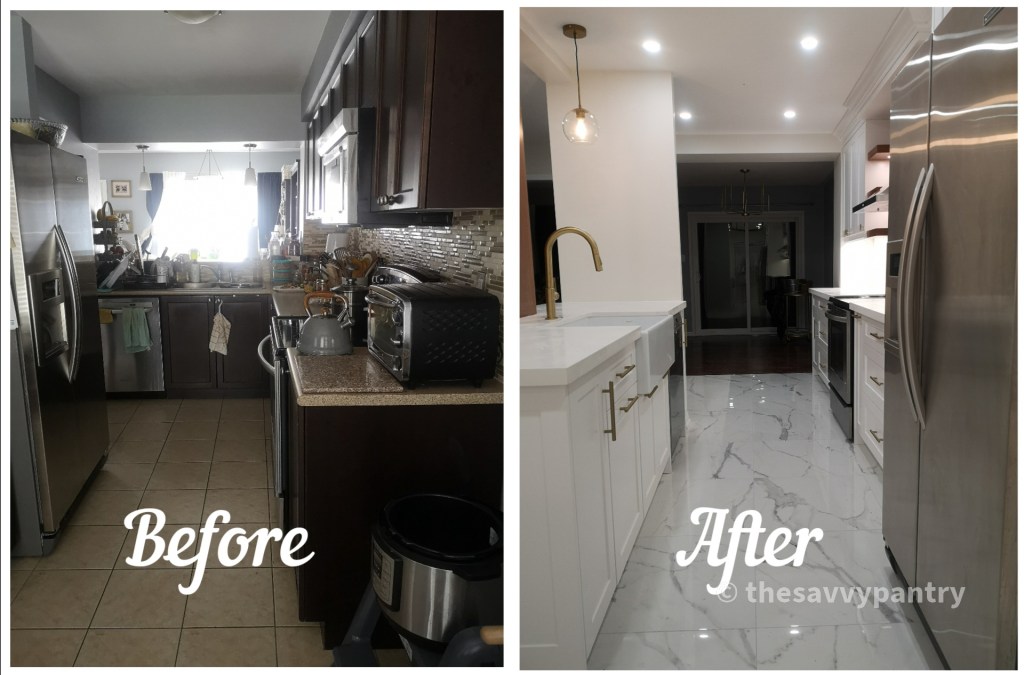
Our Old Kitchen:
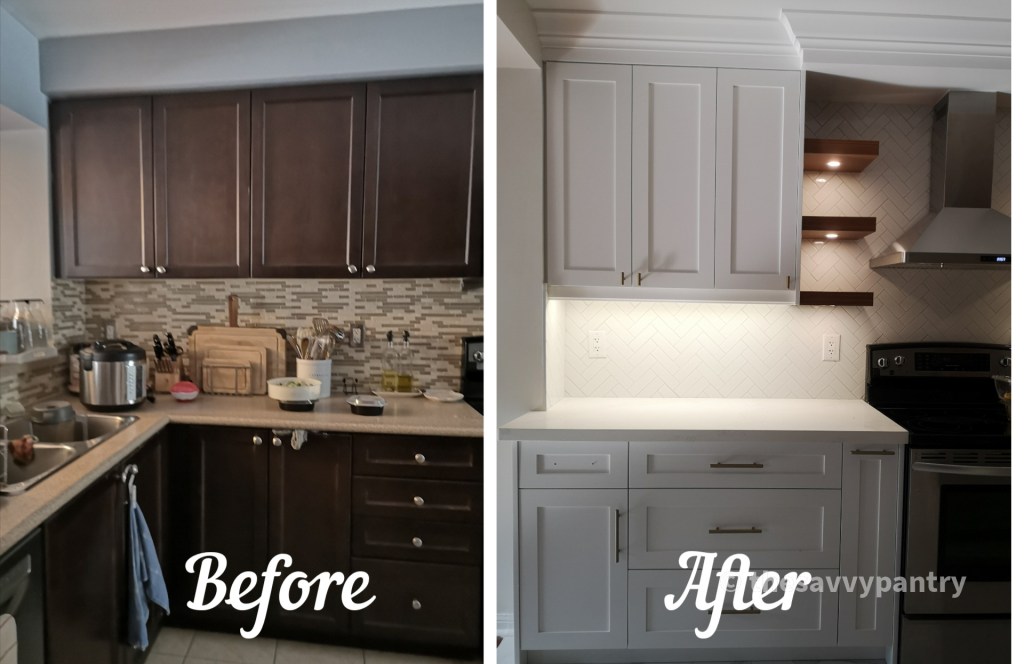
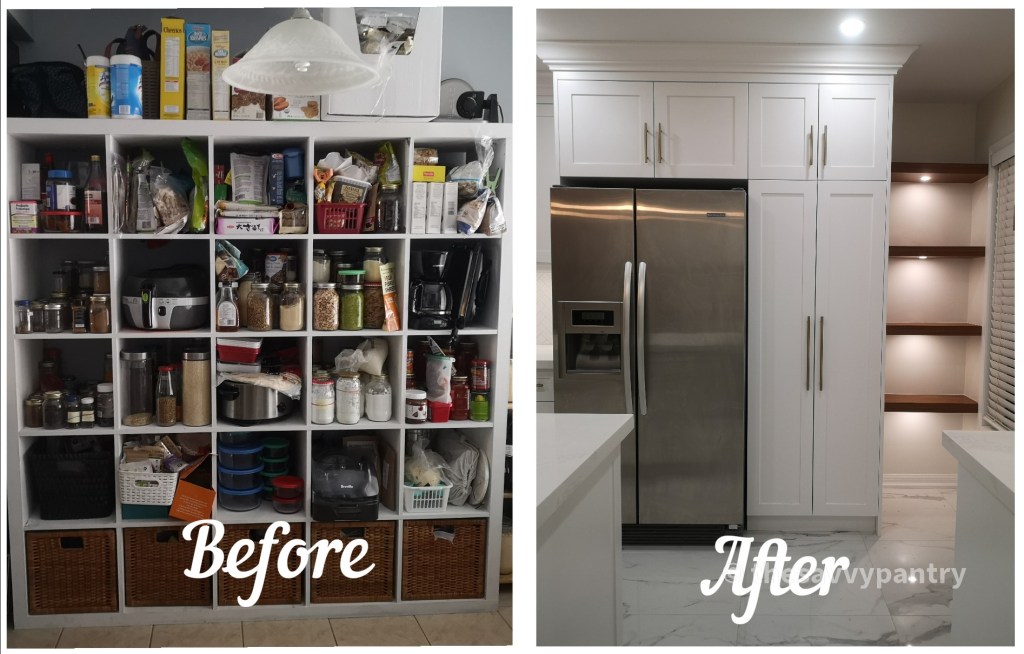
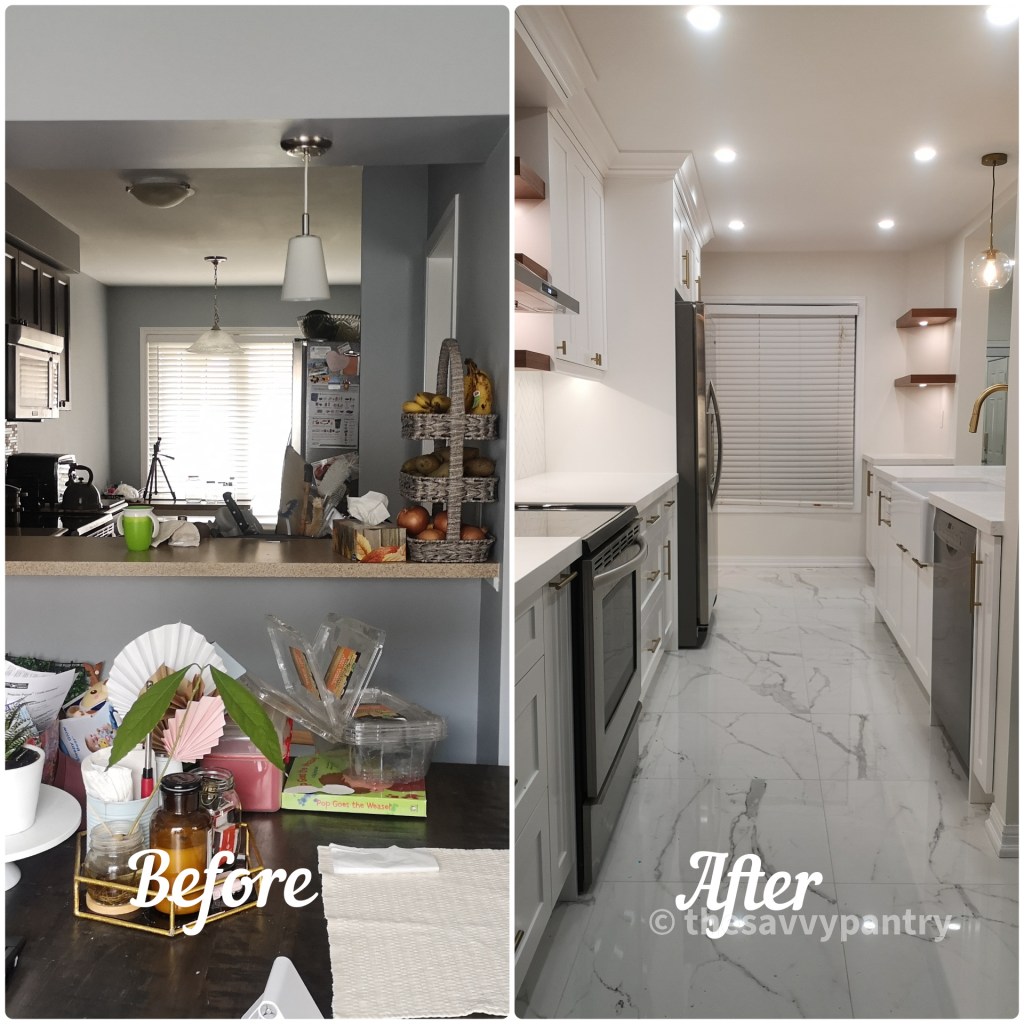
The original layout of our kitchen wasn’t very optimal – there was a wall that created a hallway from our front door to the dining room / living room area. The kitchen itself had dark cherry wood cabinets and had a kitchenette that faced the front of the house. The space wasn’t optimal as we hardly ever used the kitchenette and there was a lack of sufficient pantry space so we had a large 5 x 5 Ikea Kallax unit that I got of Kijiji to hold all of our kitchen necessities. The floors were also very dated and overall the kitchen wasn’t really my style. Honestly, when we had originally bought the house, I had certain things on my wish list and literally nothing on it was met, so this kitchen was really getting on my last nerve especially spending so much time in it during the pandemic.
Originally I was going to DIY and paint the cabinets white and change the counter tops ourselves, however the space itself was still not an optimal layout and we decided that we would just invest in a rennovation as it would increase the value of the hosue, whether we were going to sell or rent it – either way, it was a plus!
The Interviewing Process:
I knew I wanted a farmhouse inspired kitchen with gold elements as well as a large farmhouse sink. Luckily for me, this is the style of most modern kitchens so when we were researching contractors, it was very easy to show them inspo photos for a quote.
We started the research for a contractor in May 2021 and had received quotes from 4 companies with the description of our dream kitchen in mind. We received a range from $30K to $80K for what we wanted to accomplish.
This included a full demolition, knocking down walls as well as changing our floors. The best advice I received when we interviewed different companies was that you didn’t want to necessarily go with the cheapest or the most expensive, and to choose the company where you could build a good relationship with.
In the end we decided to choose Eureka Kitchen & Bath for those reasons. They ended up being mid range and we decided to choose them because we got along really well with our designer, Annie. Annie really brought our vision to life and we worked together to incorporate things that were both functional and decorative as well as practical for our growing family.
Our New Kitchen:
The majority of the materials were included in our quote and I liked how the cabinets were also made locally in their facility in Oakville. The only materials that were not included was the flooring and light fixtures – however the flooring company, Milton Factory Tile Depot did give us a great discount.
We had implemented some upgrades, such as removing our popcorn ceiling, installing pot lights as well as lights under the cabinets, which was well worth it because it really helps to elevate the kitchen.
Originally we wanted a subway file for the backsplash, but decided to go with a herringbone pattern which I think elevates the look of the kitchen even further. We also upgraded our hood range (no more microwave for us! That’s right, we do not have a microwave in our home) and installed a drink station which is perfect for our family.
Our budget in the end was $50K and the kitchen cost us under $45K. We are very happy with the end results and even almost after a year later, the kitchen still feels very new and fresh! Can’t wait for our next potential renovation!
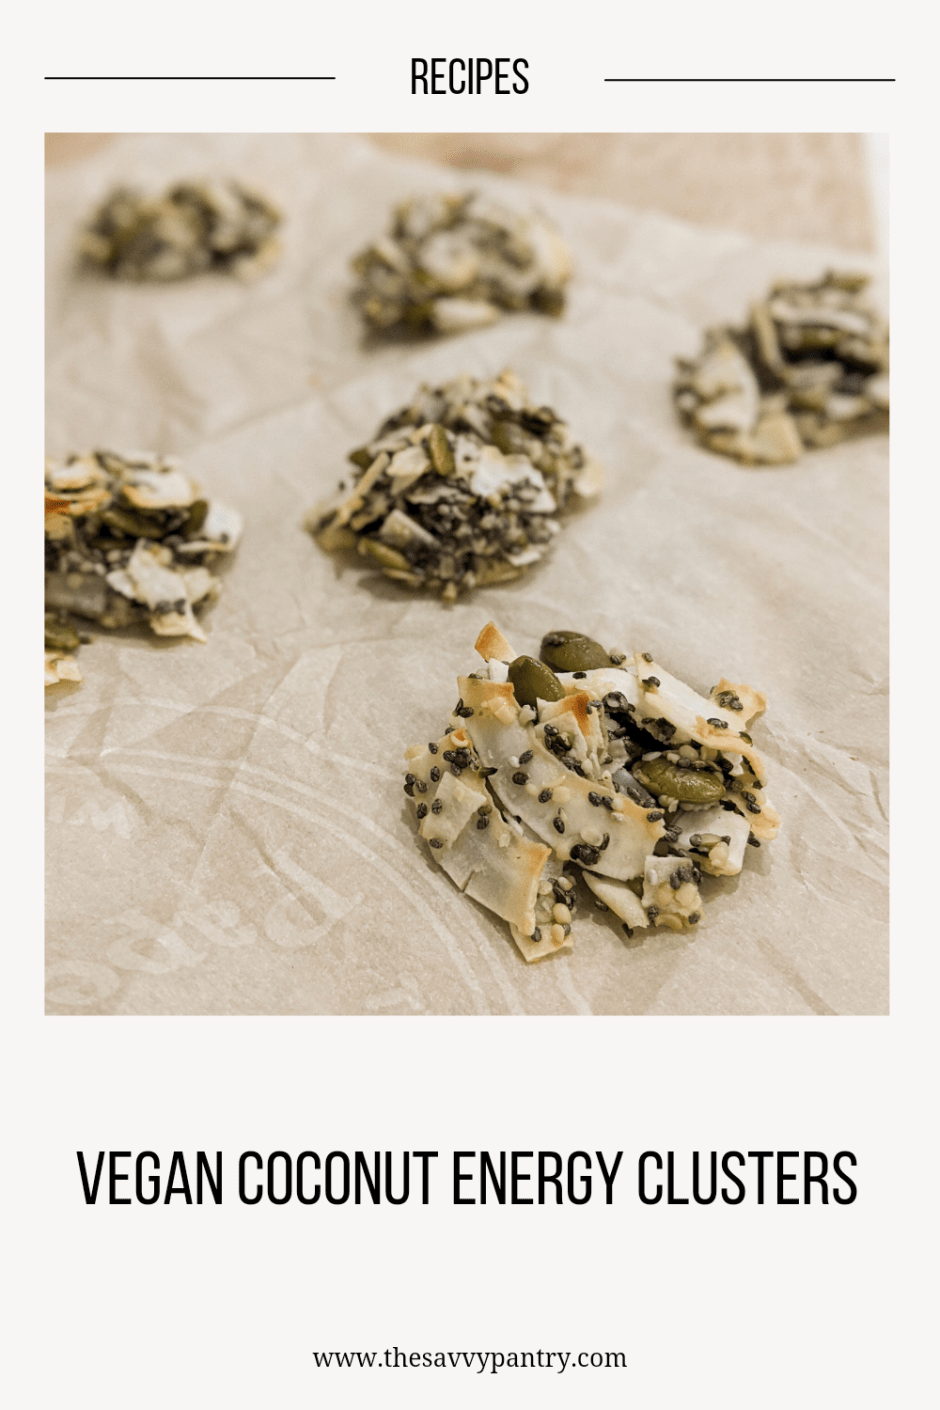
Having healthy snacks around the house for me is key to ensuring we don’t buy junk food impulsively. I created this recipe after seeing so many people rave about the Costco coconut clusters and knew I wanted to try making it for myself. I’ve never tried the Costco version, but I’m sure mine stands up to it well!
This recipe uses aquafaba (a.k.a bean water) as a binder along with chia seeds. I always have an abundance of aquafaba in the freezer from when I cook dried chickpeas, so I make a conscious effort to try to use it up.
These clusters are a perfect road trip snack and stays crunchy for days (if they last that long)!
I hope you enjoy this recipe as much as I do!
Now set forth and be savvy!
Ingredients
¼ cup maple syrup
¼ cup aquafaba
1 ½ cups flaked coconut, unsweetened
½ cup pumpkin seeds
¼ cup chia seeds
¼ cup hemp seeds
Directions
In a large bowl, combine the maple syrup and aquafaba and whisk until well combined.
Add the rest of the ingredients and mix until fully incorporated.
Let the mixture sit while you pre-heat your oven to 350 degrees.
Line a cookie sheet with parchment paper
Using a spoon, scoop out about a tablespoon (or 2) of mixture onto the parchment paper, about an inch apart.
Bake at for 10-12 minutes
Let cool completely before eating and placing them into a container for storage.
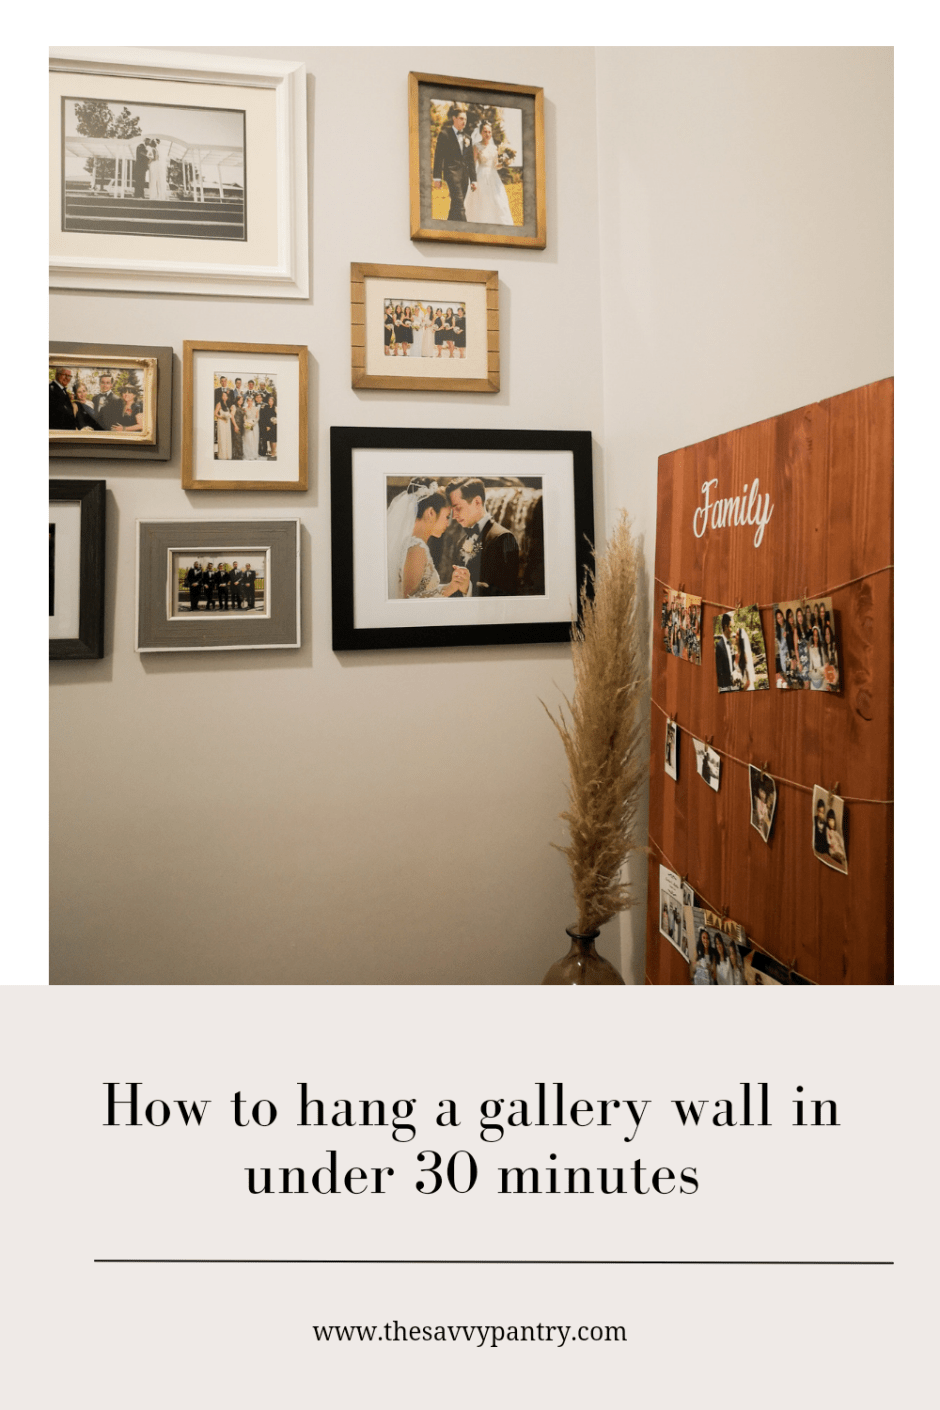
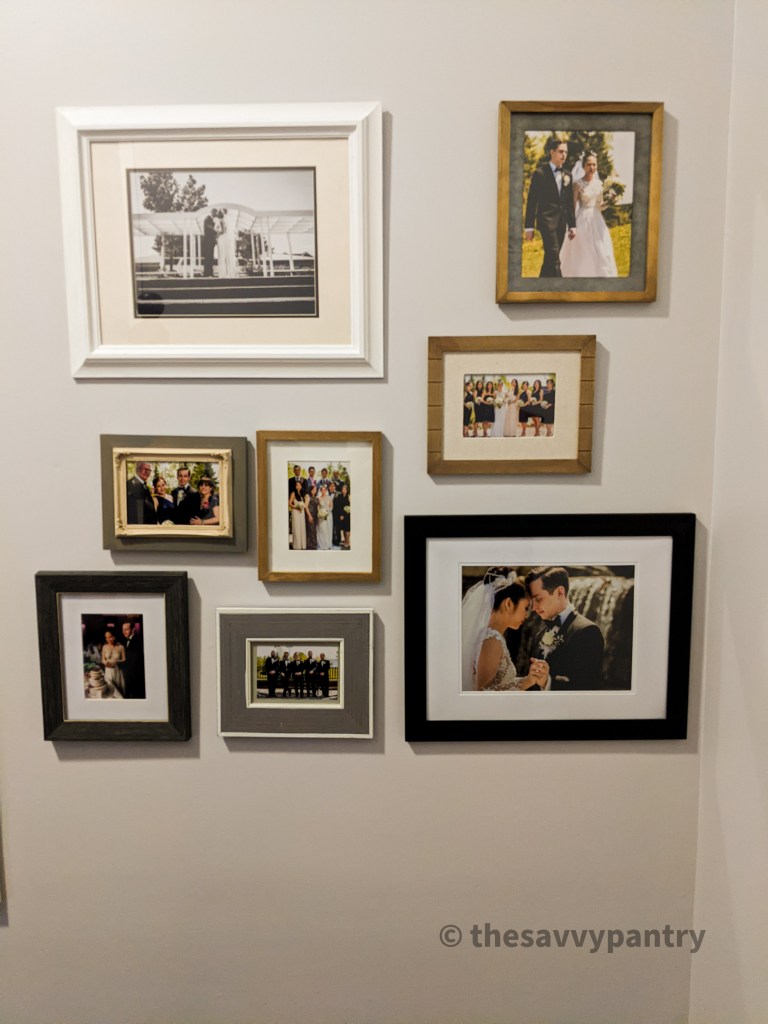
I am no stranger to hanging up gallery walls around my home. I love the look of they look on our wall as it serves both home décor as well as memory keep sakes. Since we renovated our kitchen, we had to take down our Wedding memory wall that was in our living room and had waited for months before finding the perfect place to relocate our memories. We decided to hang it on our staircase, and since we have a process down, I wanted to share that with you!
I remember the first gallery wall I put up was not exactly the best, it was a bit crooked and not spaced out as I had envisioned. After hanging up many gallery walls around our home, we have a process that can get it up in under 30 minutes, even with a toddler running around!
Equipment that you will need:
Step stool/ladder
Level
Stud finder
Power Drill or Screw Driver (though I highly recommend investing in a power drill, even helpful for putting together Ikea furniture!)
Nails and Nail Anchors (if you will be hanging in drywall and not a stud)
Pen
Scrap Paper/News paper to serve as “templates” for your frames
Tape
Frames for your memory wall
Here are the easy steps to hang your gallery wall up in under 30 minutes:
Step 1: Arrange your frames on the ground in a way that you would want them displayed on the wall. This step is honestly the longest step because you can play around with so many variations of how you want your gallery wall to look.
Step 2: Turn the frames around so that you can see the back of frames and where the hooks are.
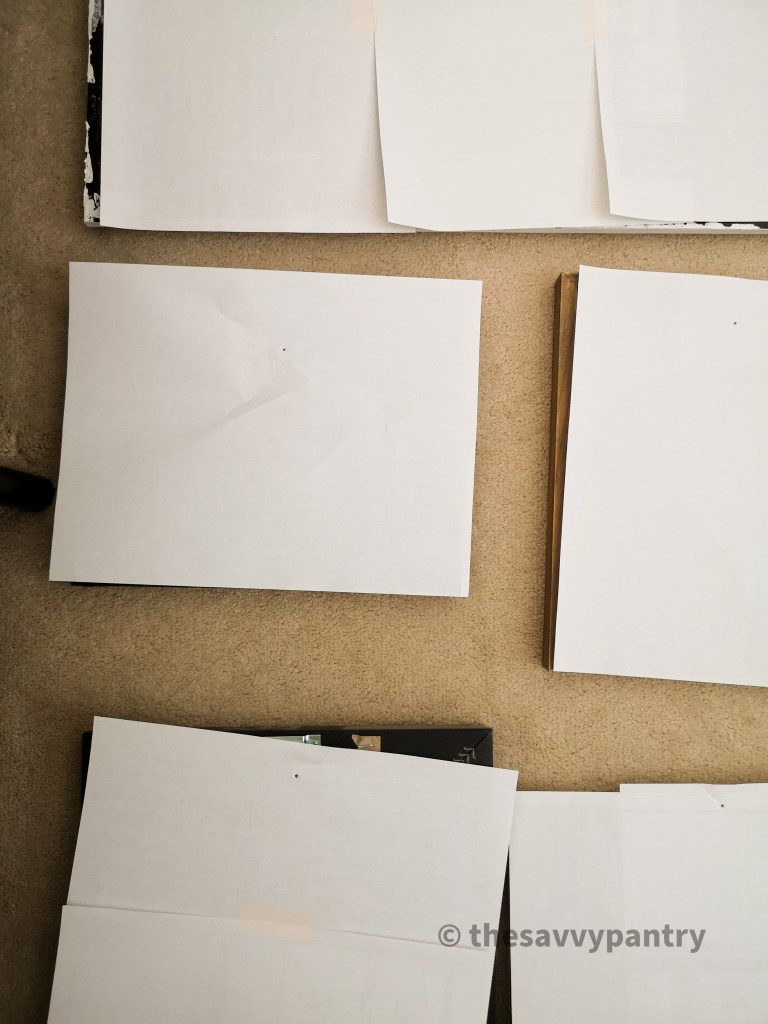
Step 3: Using scrap paper or newspaper, create templates for each of your frames by measuring out/cutting out/taping together pieces of paper that will match the same size of each frame. Place the templates onto each frame.
Step 4: For each “template”, using a pen, mark off where the nail looks are – this will be your guide for when you drill your nail into the wall
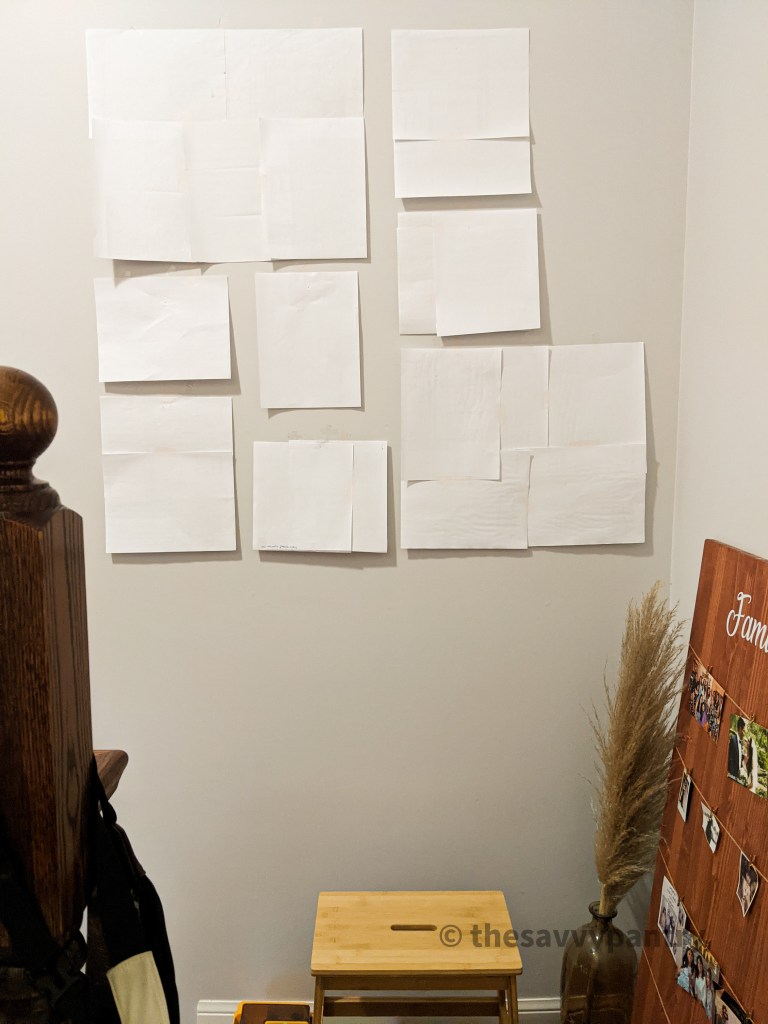
Step 5: Now that you have your frames laid out along with their associated template on top, transfer the templates onto your wall and secure using tape. This is where the time saving comes because you can rearrange the templates on the wall or adjust the spacing based on the amount of wall your have.
Step 6: Once all of your templates are on the wall, you can start drilling holes and installing nails into where you have indicated in your template. Note that you should use nail anchors if you are drilling the holes into only drywall and not a stud. Use a stud finder to locate the studs.
Step 7: Hang your frames
Step 8: Step back and admire that you had just completed this in under 30 minutes!
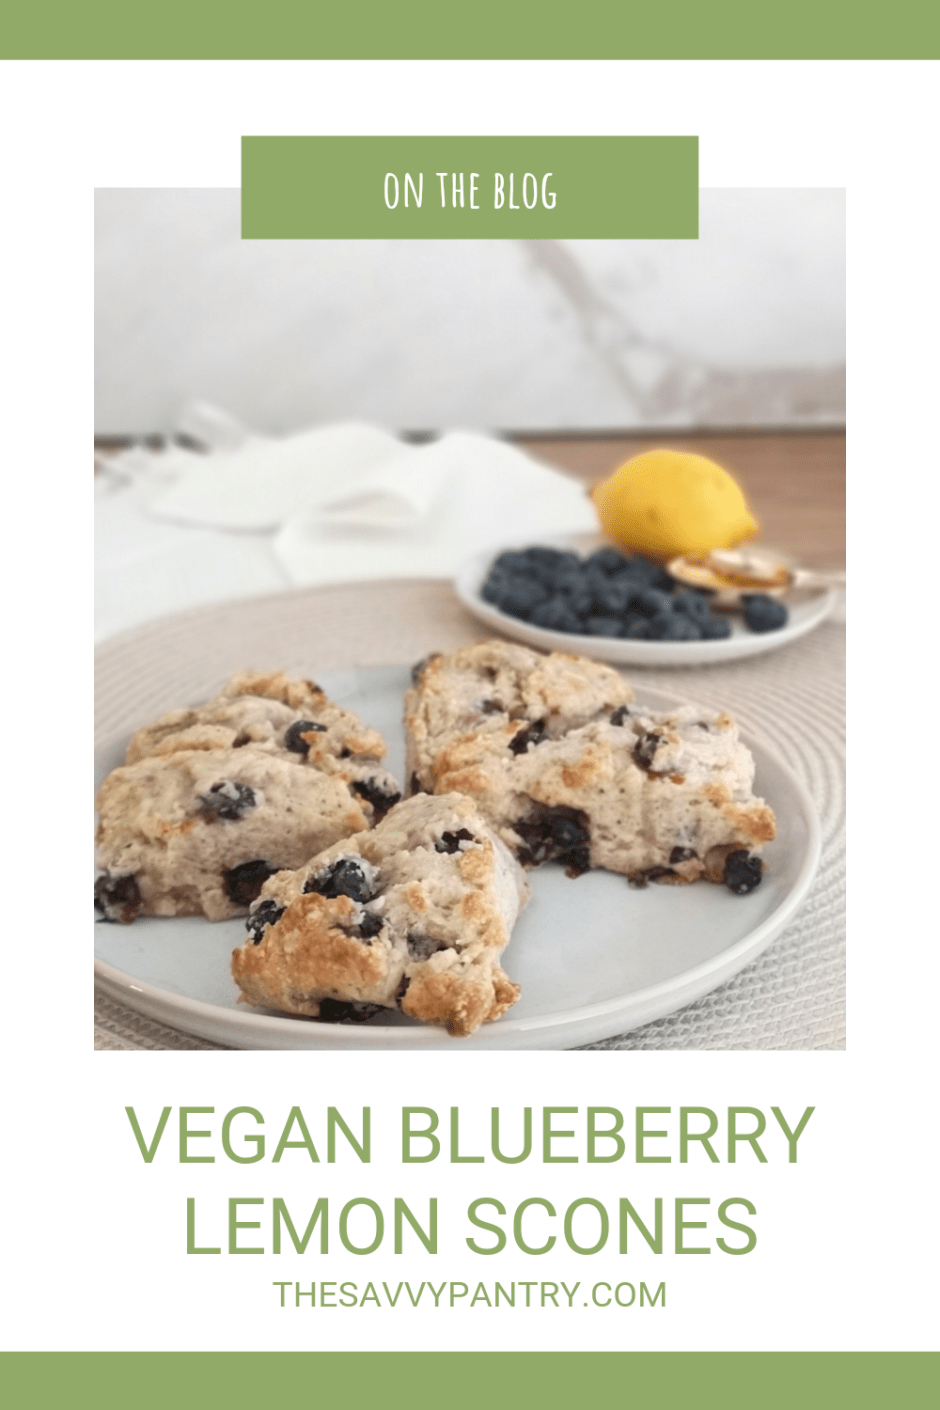
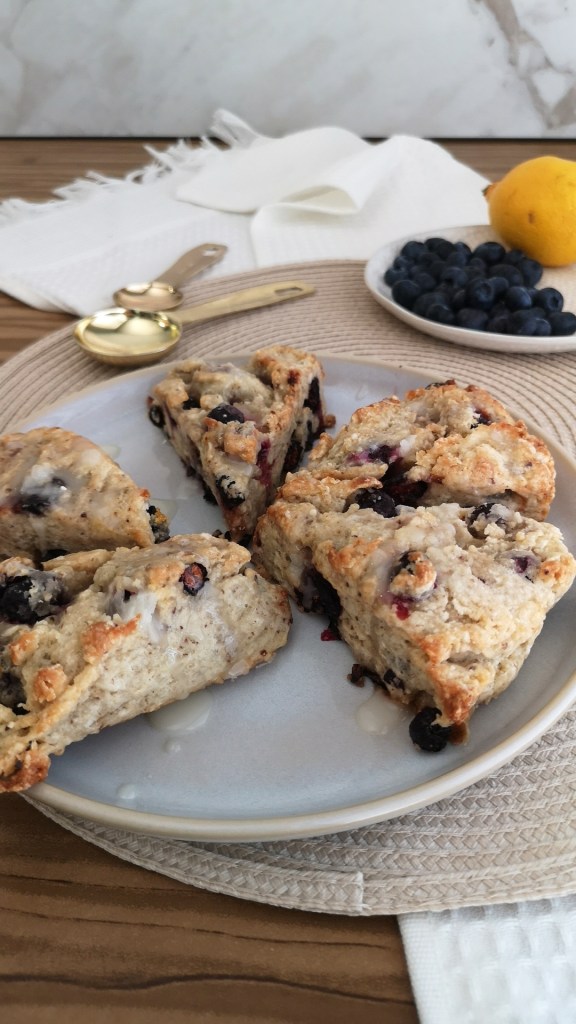
I have been obsessed with scones ever since I tried the famous scones from Cobs many years ago. I’ve missed the buttery yet subtle sweetness from these scones and knew I wanted to make my own vegan version. These blueberry scones take literally minutes to put together and is very easy to freeze. I always have a few in the freezer to satisfy any cravings.
You can easily change the fruit in these and make your own custom scones by using my recipe as a base. I have a few other flavours I am testing out and can’t wait to share them when they’re done!
Hope you enjoy my easy Vegan Blueberry Scone recipe with a lemon glaze.
Now set forth and be savvy!
Ingredients for Scones
½ cup soy milk + 1 tsp acv
1 flax egg (1 tbsp ground flax seed and 3 tbsp hot water)
2 cups all-purpose flour
1/3 cup granulated sugar
1 tablespoon baking powder
½ teaspoon salt
½ cup unsalted vegan butter
2 tsp vanilla extract
1 cup fresh or frozen blueberries
Zest of 1 lemon
Ingredients for Lemon Glaze
¼ cup powdered sugar
2 tsp lemon juice
Directions
Make your flax egg by mixing the water and ground flax seed in a small bowl, set aside.
Make your vegan buttermilk by mixing your non-dairy milk and ACV in a bowl, set aside.
Mix the flour, sugar, baking powder and salt in a large bowl until well blended.
Using a fork or a pastry blender, cut the vegan butter into the flour mixture until the mixture resembles large pea sized crumbles.
In another bowl, mix the flax egg, vegan buttermilk and vanilla extract together.
Add the wet ingredients, blueberries and lemon zest to the flour and butter mixture. Mix until it comes together.
Shape the dough into a large circle about 1 inch thick – I also like to shape them using a round takeout container that’s been coated in flour.
Place the dough into the fridge while you pre-heat the oven to 400 degrees.
You can also pre-make this dough and store it in the fridge overnight so you can bake them first thing in the morning.
To bake, cut the round dough into 8 wedges and place on a cookie sheet lined with parchment paper.
Bake for 30 – 35 minutes.
While the scones are baking, make the glaze by mixing the powdered sugar and lemon juice together.
When the scones come out of the oven, let them cool slightly before drizzling he glaze over top.
The holidays are quickly approaching and it’s time for baking season to commence! I don’t really have much of a sweet tooth, but I do like things that are both sweet and savoury. My vegan raisin and pistachio shortbread cookies are perfect for me because they are not too sweet but savoury because of the pistachios and vegan butter.
These cookies are so easy to make and you can easily make the dough and store it in the freezer until ready to bake! I hope you make them and enjoy them with your family.
Now set forth and be savvy!
Ingredients
1 cup vegan butter, softened
¾ cup icing sugar
Zest from 1 orange
2 cups all purpose flour
¾ cup raisins
¾ cup chopped unsalted pistachios
Pinch of salt
Directions
Pre-heat oven to 350 degrees
In a stand mixer fitted with the paddle attachment, cream together butter, icing sugar and zest from 1 orange until smooth
Scrape down the mixture from the sides of the bowl, add flour and mix until just incorporated
Add in the rest of the ingredients and continue to mix until well incorporated
Grab 2 pieces of parchment paper approximately 12×16 inches
Separate the dough in half, and place on top of each piece of parchment paper
Starting with the first sheet, being to roll the parchment paper over the dough to form a log that is about 2.5-3 inches thick
Fold the ends of the parchment paper around the ends of the log and continue to roll the dough over itself to form a seal (you want the parchment paper to completely encase around the dough)
Repeat with the 2nd piece and dough
Let chill in the fridge for about 30 minutes
Once chilled, it will be easy to slice – using a serrated knife, you should be able to get about 15 cookies per log
Arrange cookies on a cookie sheet lined with parchment paper (you can use the parchment paper you used to wrap the logs in the fridge) – the cookies will not really expand so they do not need to be space too far apart, but make sure they are not touching as they will stick as they bake.
Bake for about 15 minutes or until golden brown
Let cool before serving or packaging for the holidays!
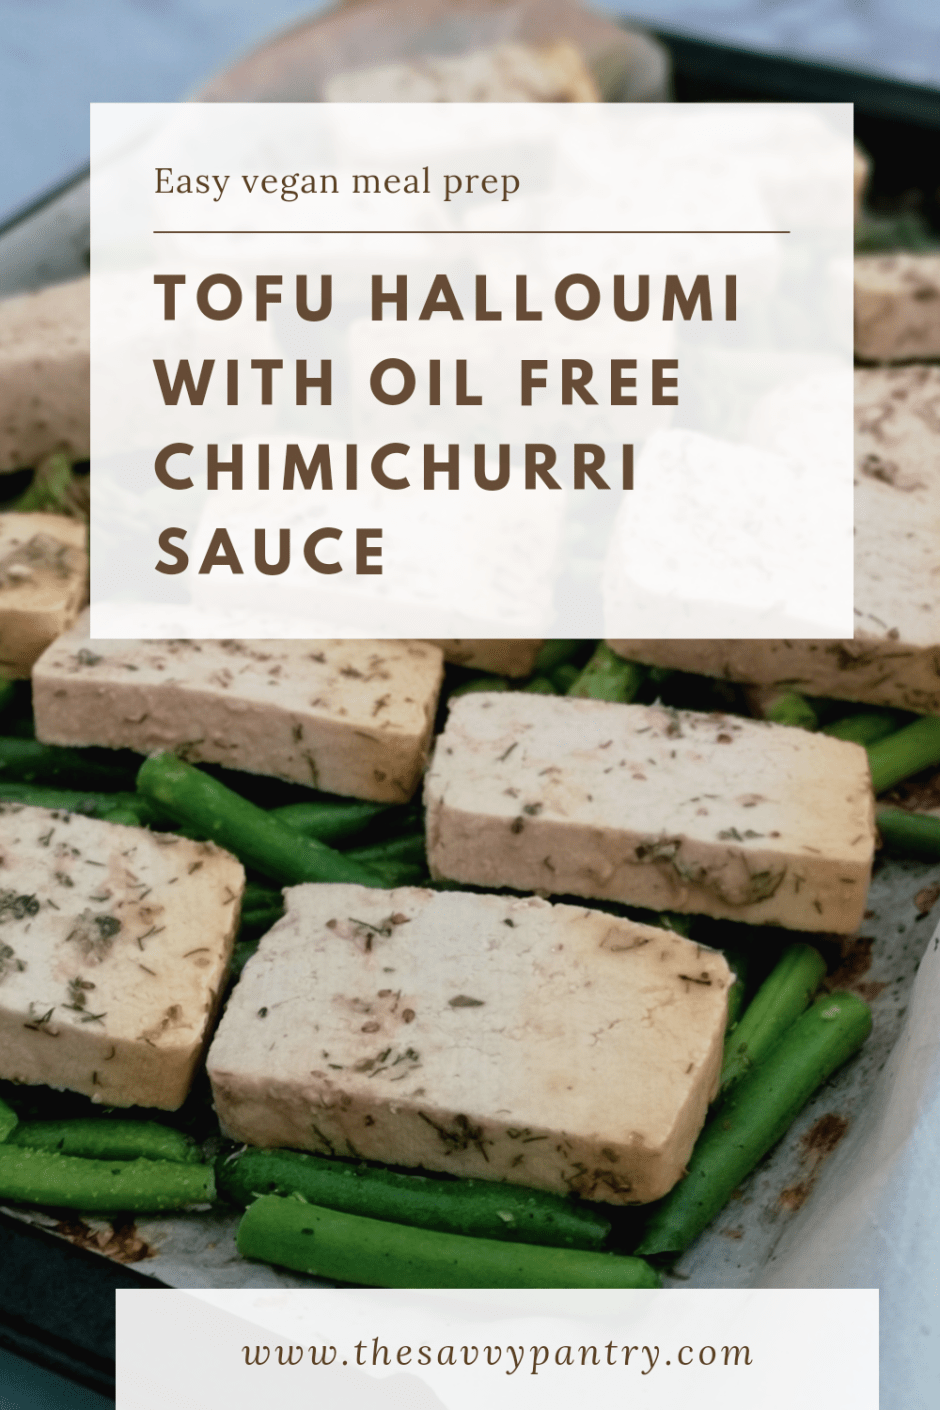
I have been on a craze with meal prep since my fitness challenge back in January of 2021. But especially since going back to work full time, it is so important for me to have meals prepped for the week so that I can concentrate on work and spend all of my extra time with my son!
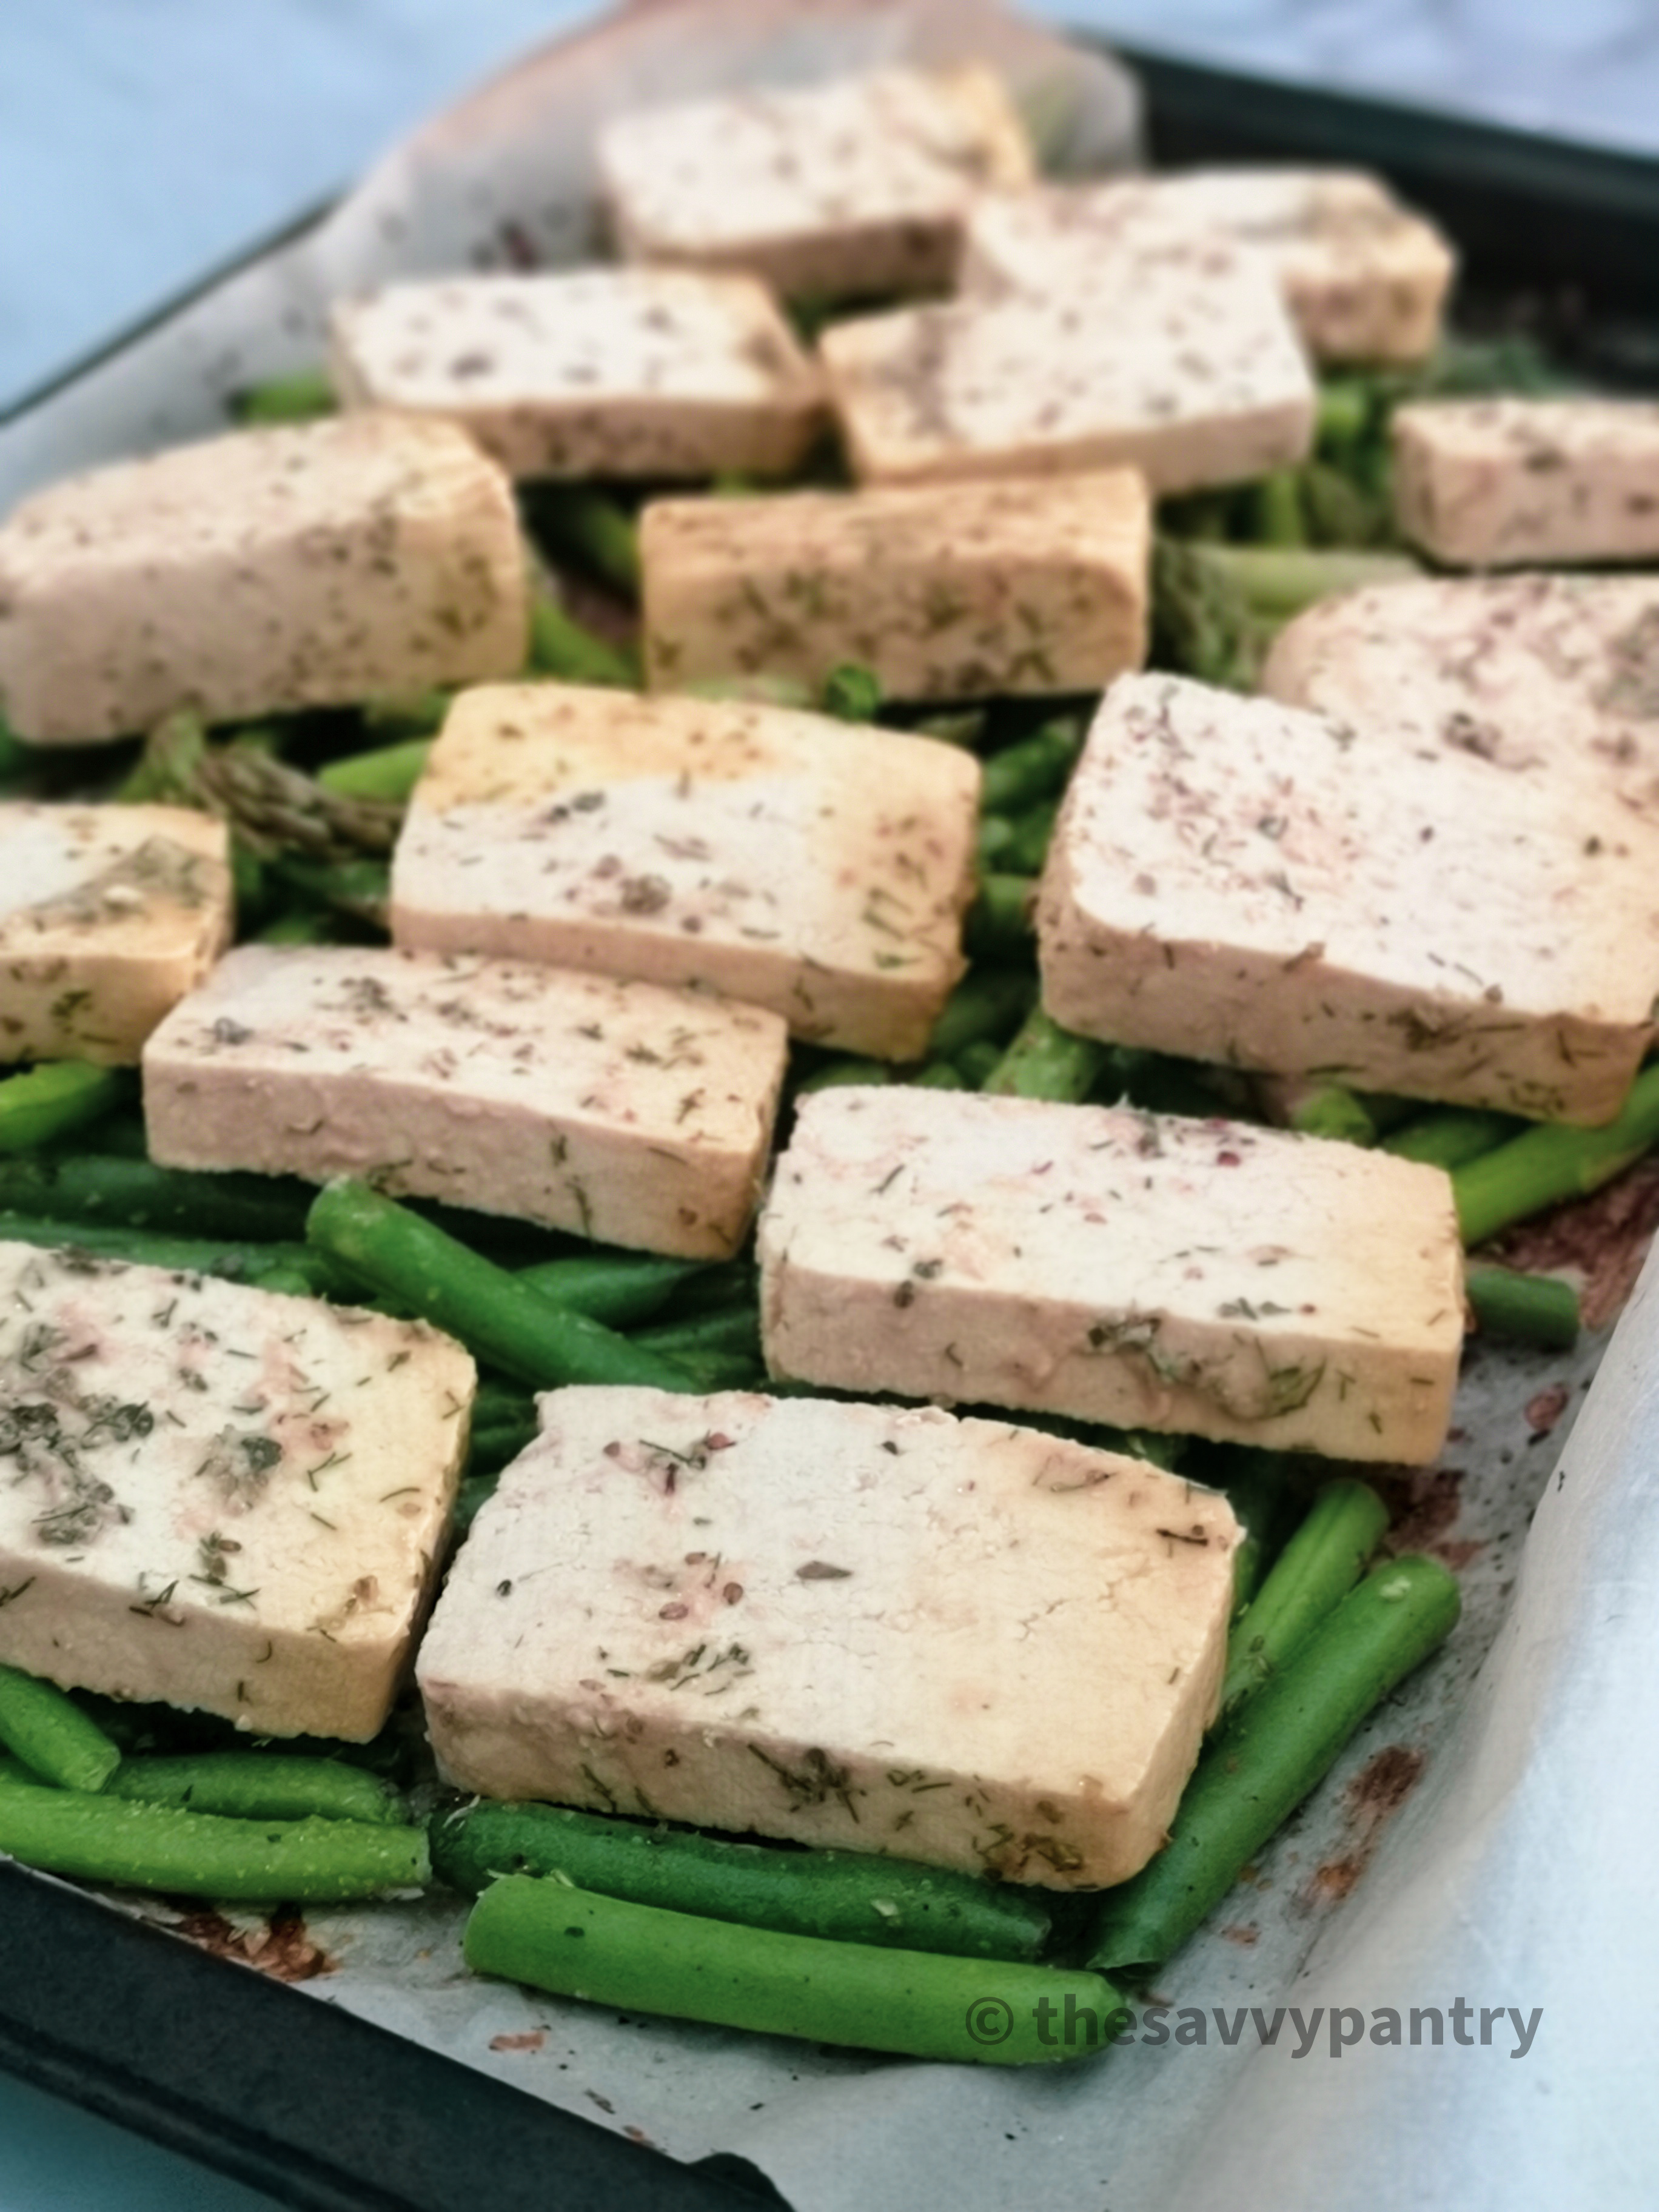
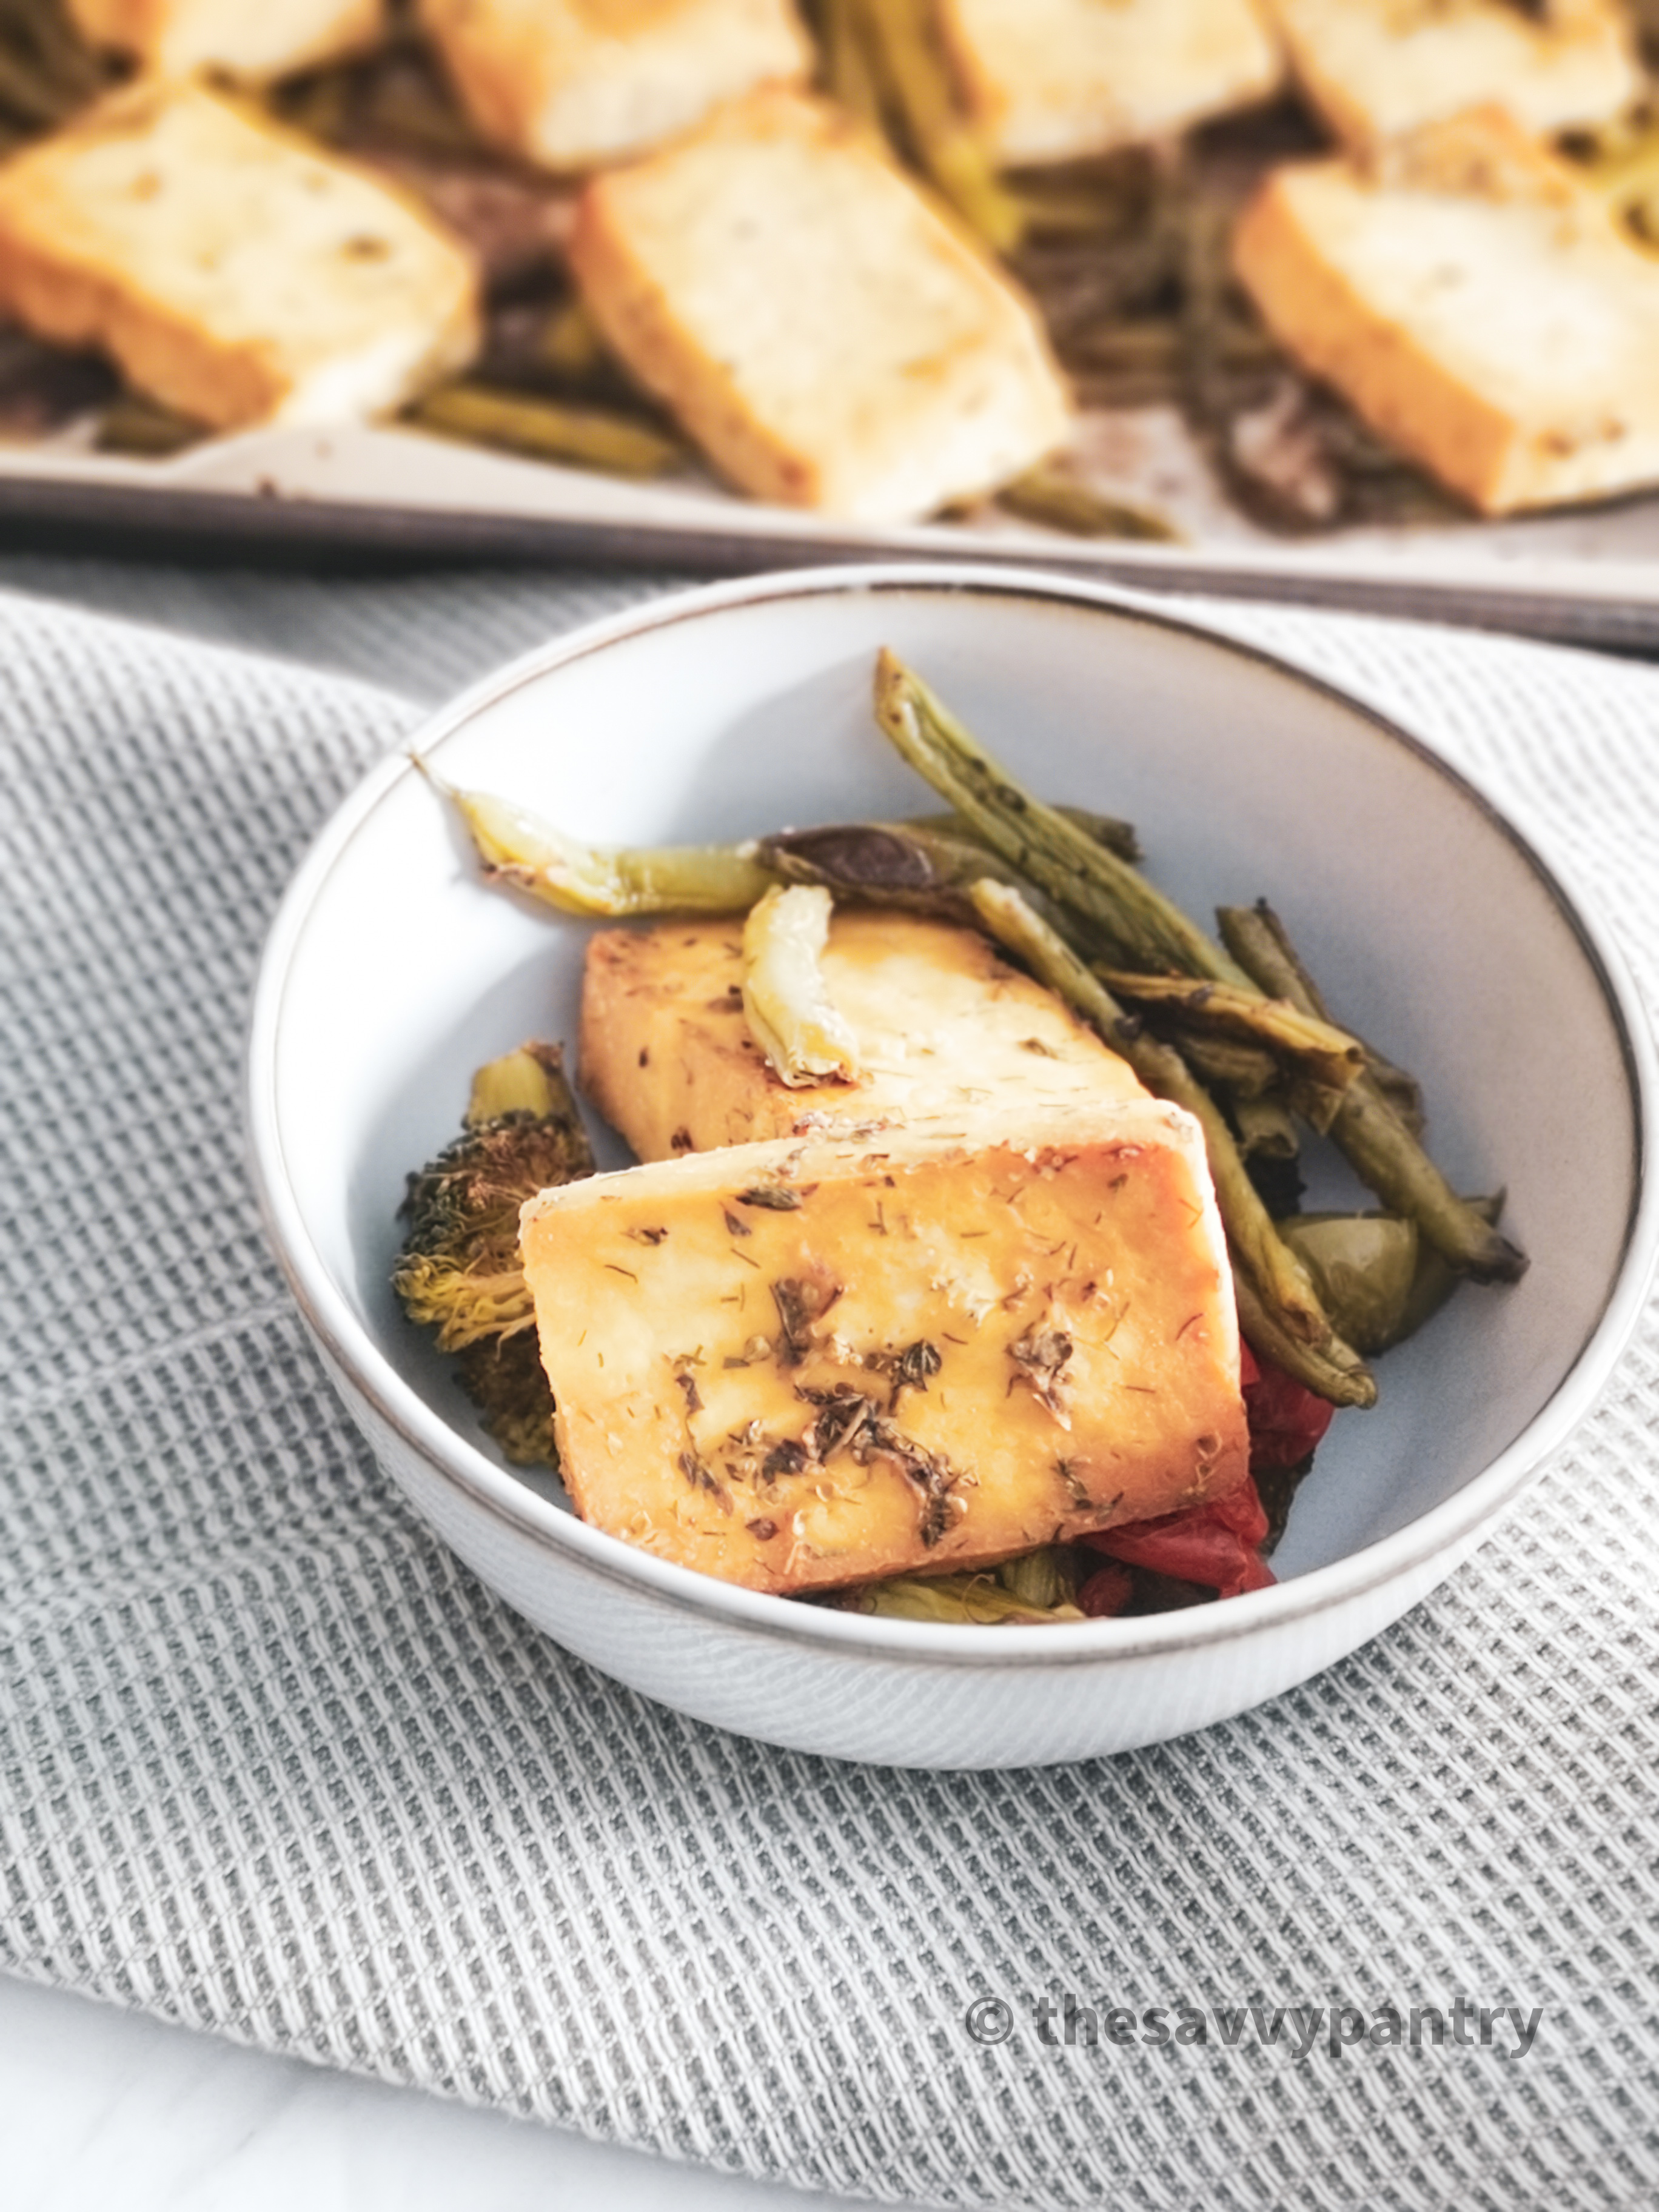
This has made me want to utilize sheet pan means! Not only are sheet pan meals so easy to prepare, but you can make so many different dishes with minimal effort! I especially love this tofu halloumi with chimichurri sauce because it can be eaten on rice, in a salad or even a wrap!
Check out the full recipe below!
Now set forth and be savvy!
Makes 4 servings
Ingredients
Juice from 1 lemon
4 tbsp nutritional yeast
1 tbsp dried oregano
2 tbsp white miso paste
3 tbsp water
1 tsp garlic
1 tsp dried dill
½ tsp salt
1 block of extra firm tofu
Directions for the Tofu Halloumi
Press the block of extra firm tofu by placing it I the bottom of a salad spinner or strainer, placing a plate on top of the tofu and then a heavy pot on top of the plate to press. Continue to the next step.
To the bottom of a shallow glass container, mix all of the marinade ingredients until smooth
After about 20 minutes, cut the tofu block into 16 even pieces
Place the tofu pieces into the marinade and gently coat each piece of tofu.
Cover and let marinade for 4 hours – it’s even better over night
Ingredients
1 cup packed mint
1 cup packed cilantro
1 cup packed parsley
½ cup packed basil
3 stalks of green onion, chopped into 1-inch pieces
1 tbsp dried oregano
½ cup water
¼ cup red win vinegar
3 cloves of garlic
1 tsp salt
½ tsp black pepper
Juice from 1 lemon
1 tsp chili flakes
Directions for oil free Chimichurri Sauce
Add all ingredients into a food processor and blend until smooth
Store in a class jar
This sauce can be kept in the fridge for up to a week – I also like to divide in 2 and freeze a portion for later use
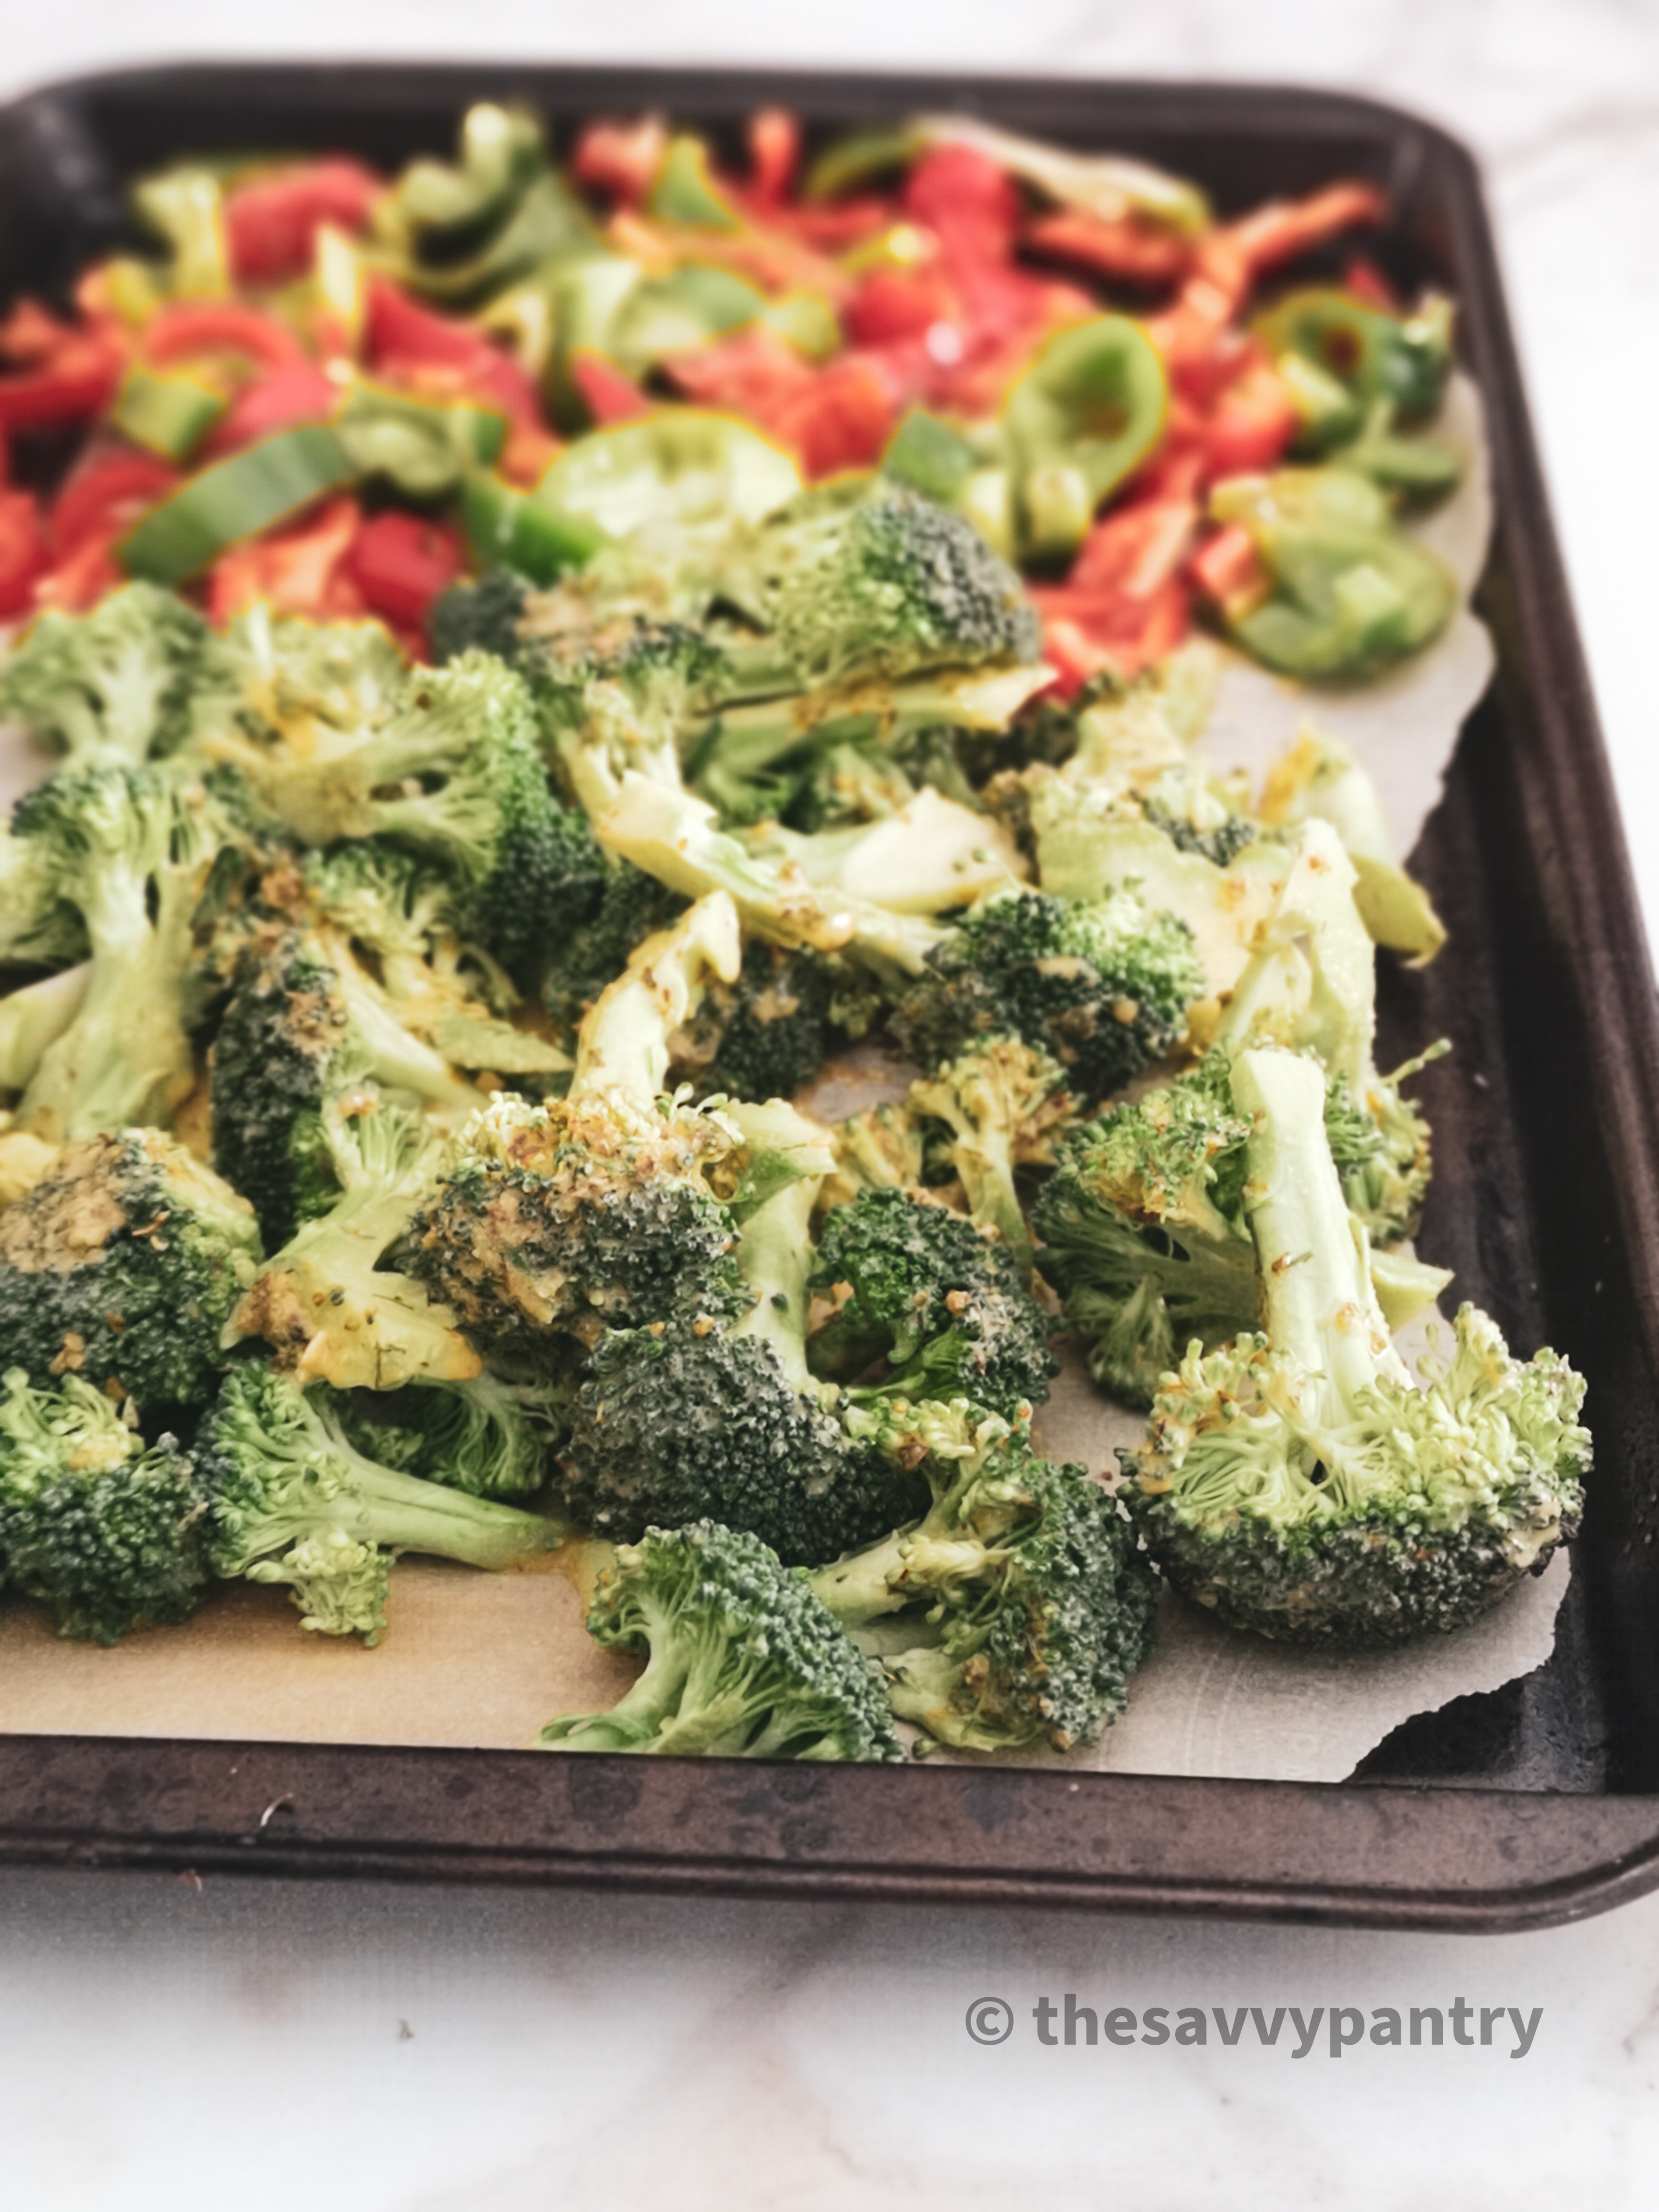
Directions for tray bake
Pre-heat oven to 350 degrees
Line a baking tray with parchment paper
After the tofu is done marinading, place them evenly onto the tray
Bake for 20 minutes, flipping half way
Optional: at the same time, you can also roast some veggies to go along side for a full meal!
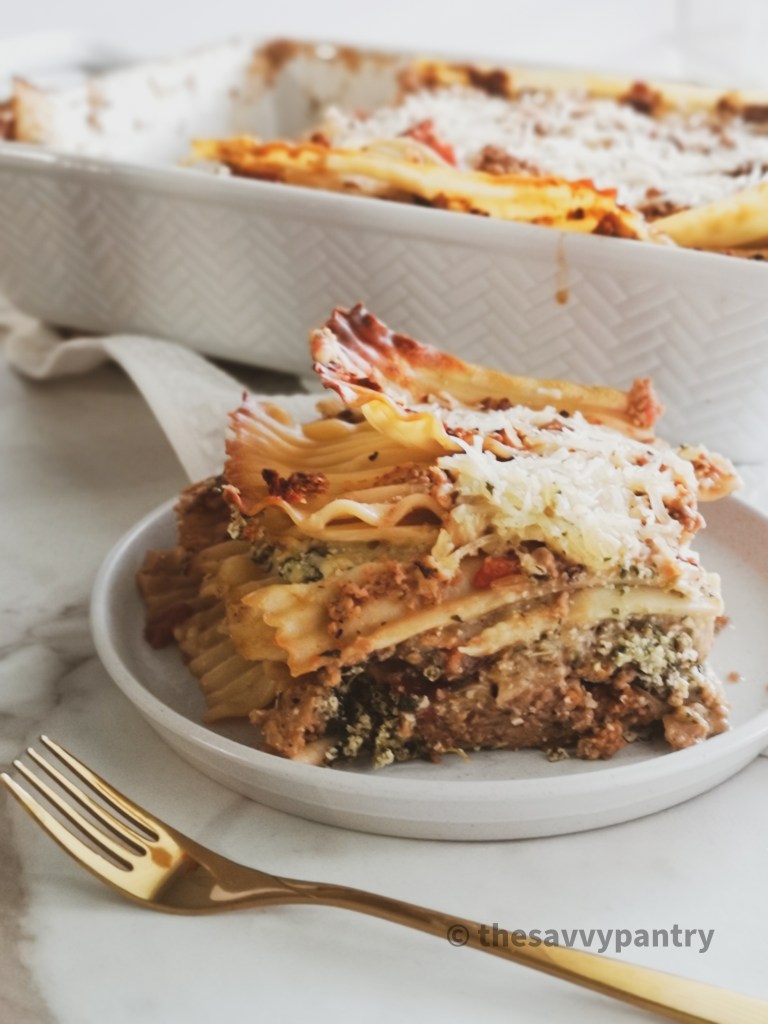
I have been making this lasagna for years and have finally been able to put the recipe down on paper for you! This pumpkin lasagna recipe uses the pumpkin puree I have frozen from my Halloween Jack-O-Lantern Pumpkin, but you can use store bought pumpkin puree in this recipe as well.
This lasagna recipe has such a subtle pumpkin flavour while still having the heartiness of a traditional tomato-based lasagna. The pumpkin cream sauce makes this dish really decadent and goes perfect along side garlic bread or a salad. My little one really loves eating this as well since there are so many textures from the vegan tofu ricotta to the TVP meat filling.
Hope you guys try out this recipe. It is one of my favourites to make and you can surely make it ahead for an easy weeknight meal!
Now set forth and be savvy!
Ingredients
1 block of firm tofu, drained (420 G)
1 tbsp nutritional yeast
1 tbsp apple cider vinegar
1 tsp granulated garlic
1 tsp dried basil
1 tsp dried parsley
1/2 tsp salt
¼ tsp black pepper
1 package frozen chopped spinach, thawed and drained (300 g)
¼ cup non-dairy milk
Ingredients
1 package beyond meat or lightlife ground
1 onion, diced
3 cloves of garlic, minced
2 tsp fennel seed
2 tsp dried Italian seasoning
1 tsp dried basil
2 tbsp soy sauce
2 cups TVP, rehydrated
1 tsp salt
½ tsp black pepper
1 can 28-ounce diced tomatoes
Ingredients
2 tbsp vegan butter
¼ cup flour
2 cups non-dairy milk
3 cloves of garlic
1 cup pumpkin puree
2 tbsp nutritional yeast
2 tbsp apple cider vinegar
1 tsp dried parsley
1 tsp salt
½ tsp black pepper
½ tsp nutmeg
You will also need:
9 lasagna noodles
1 cup shredded vegan mozzarella style cheese
Directions
Cook 9 lasagna noodles according to package directions. If you are using no-boil noodles, then you can start making the lasagna filling
Vegan Ricotta Filling
Blend all of the ingredients in a food processor until smooth
Set aside and prepare the meat sauce
Meat sauce:
Heat a sauce pan over medium heat
Add the veggie ground and let it brown, about 3 minutes as you break up the pieces with a potato masher or a wooden spoon
Add in the onion and garlic and sautee together until fragrant, about 2 minutes
Add in the spices and toss until fragrant, about 1 minute
Add the soy sauce and the rehydrated TYP and mix until it is well incorporated into the veggie ground mixture
Add the salt, pepper and canned diced tomato and let simmer over medium-low as you prepare the pumpkin sauce mixture
Pumpkin Sauce:
Make your roux by melting the butter over medium heat
Once the butter is melted, add in the flour and mix until the flour is combined
Add in the rest of the ingredients, whisking until there are no clumps over medium high
Once the sauce comes to a boil, turn the heat down to medium low and continue whisking until you get a smooth sauce
To layer the lasagna:
Preheat oven to 375 degrees
Add a thin layer of the meat sauce to the bottom of a 13 x 9 in baking dish
Add a layer of noodles
Add half of the ricotta tofu mixture on top of the noodles
Add 1/3 of the meat sauce on top of the tofu mixture
Pour ½ of the pumpkin sauce on top of the meat mixture
Add another layer of noodles
Add the rest of the ricotta mixture on top of the noodles
Add 1/3 of meat sauce on top of the ricotta mixture
Pour the rest of the pumpkin sauce
Add a final layer of noodles
Add the rest of the meat sauce
To bake the lasagna:
You can make this ahead of time and bake it when you are ready to eat – just be sure to put the cold lasagna tray into the oven as you are preheating it to prevent the tray from cracking
Place the baking dish on top of a cookie sheet to prevent spillage in your oven
Place another cookie sheet on top of the lasagna dish to create a lid
Bake at 375 for 45 minutes
Remove the cookie sheet lid and sprinkle the vegan cheese on top, bake for 15 minutes
Remove the lasagna from the oven and let it sit for 15 minutes before serving
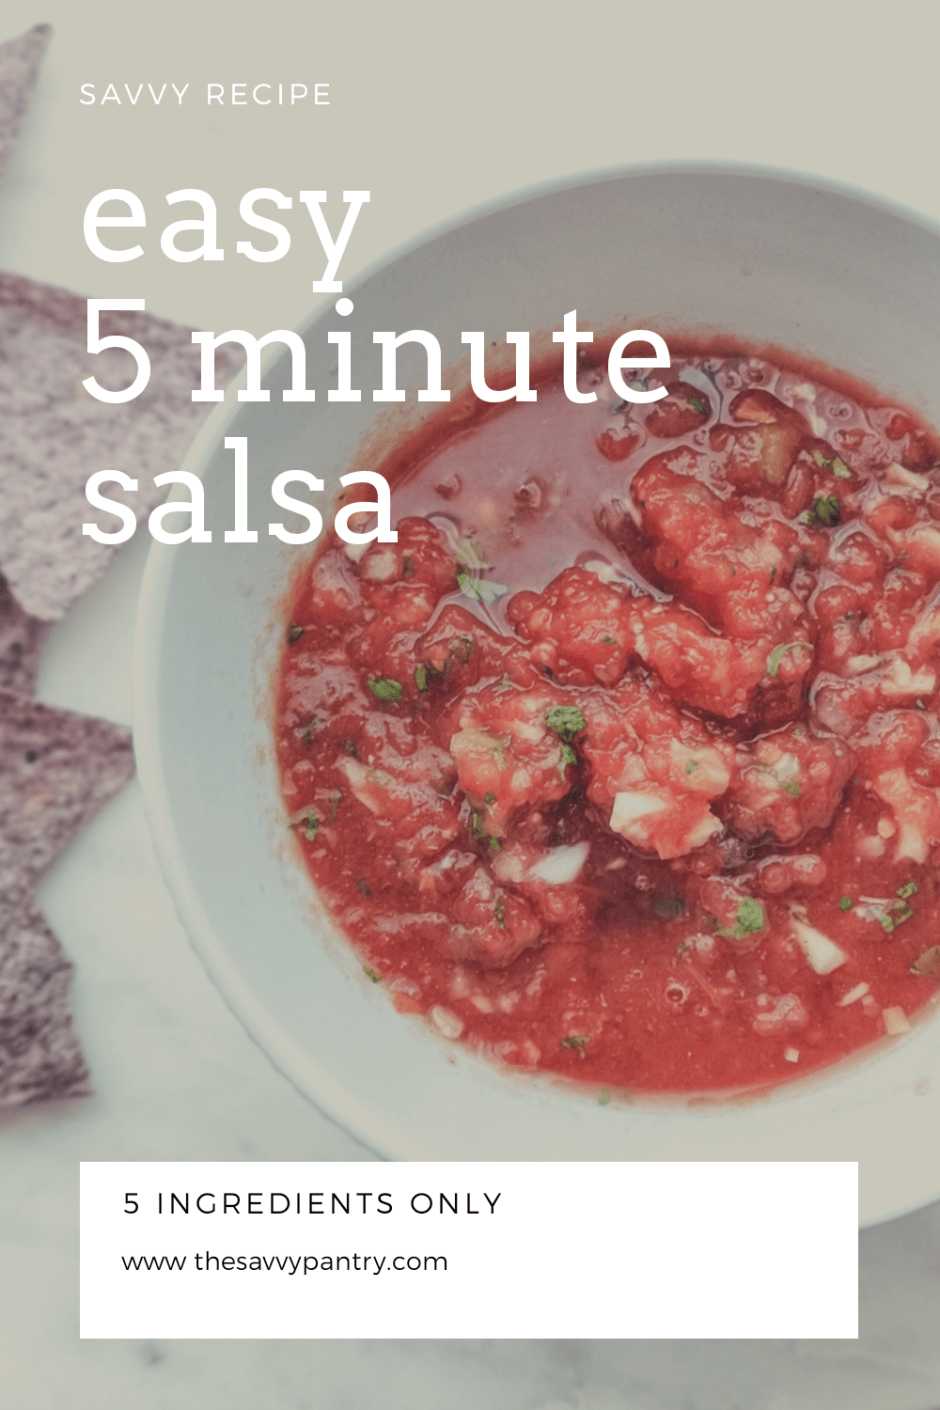
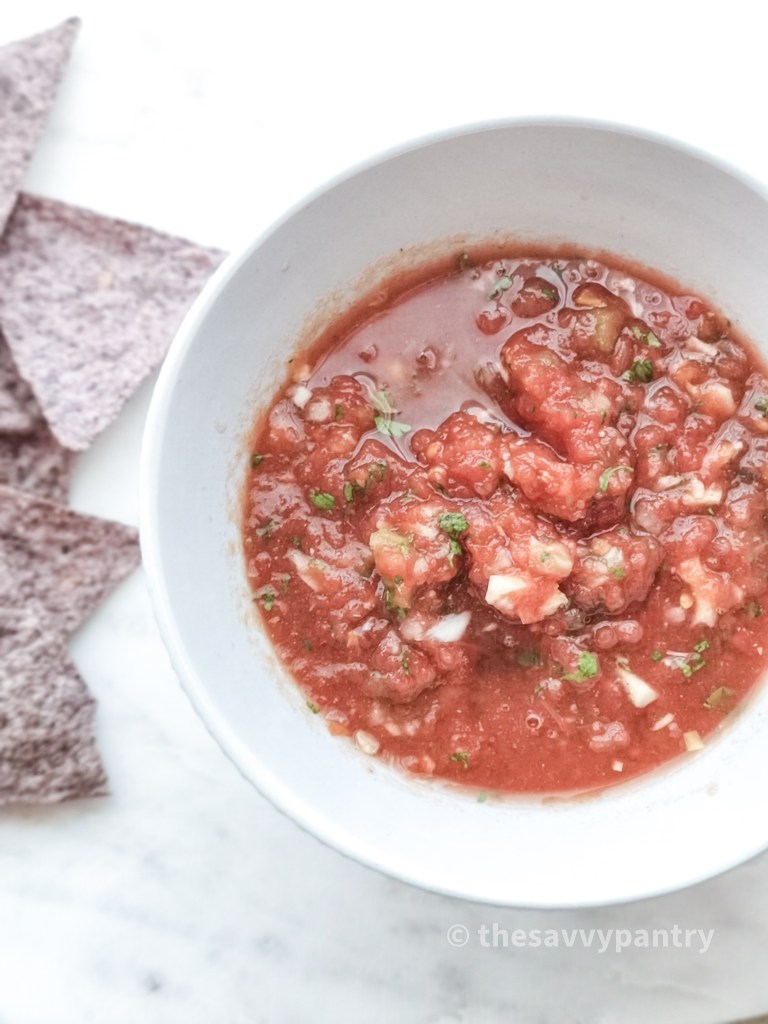
I love having a well stocked pantry so that I can whip up any recipe that my family is craving that week without having to go to the grocery store. One of my pantry staple recipes is this easy 5 ingredient salsa. The base of this salsa is canned diced tomatoes, and it uses ingredients that are already in my fridge and pantry. The only ingredient that we may or may not have is cilantro, but a quick hack is to save some in the freezer for last minute recipes like this one.
All of the ingredients are thrown into the food processor and is ready in less than 5 minutes. I love using this salsa to eat with tortilla chips, as a topping to tacos or even as a sauce for casseroles. Can be jarred and frozen for up to 3 months!
Leave a comment below on what you like to use this salsa with!
Now set forth and be savvy!
Ingredients
1 28 oz can of whole or diced tomatoes
3 cloves of garlic
1 jalapeno (seeded if you prefer less heat)
1 red onion
1 handful of cilantro
1 tsp cumin
½ tsp salt
Directions
In a food processor, add all of the above ingredients
Pulse for 30 seconds, ensuring that the salsa is chunky
You can freeze half of the salsa for a later use for up to 6 months in the freezer